Hardware and related Stuff
Status: This page is work in progress
Last changed: Saturday 2015-01-10 18:32 UTC
Abstract:
Hardware is a general term that refers to the physical artifacts of a technology. In the electronics and especially computer industries, computer hardware specifically means the physical or tangible parts of the equipment, such as circuit boards, keyboards, monitors etc., in contrast to non-physical software running on the computer or other device. Most computer hardware is not seen by normal users. It is in embedded systems in automobiles, microwave ovens, electrocardiograph machines, compact disc players, and other devices. Personal computers, the computer hardware familiar to most people, form only a small minority of computers. This page not just focuses on mainstream enterprise and of the shelf hardware but might also cover some special hardware as I come along it -- may it be with robotics or outside the civil sector.
|
Table of Contents
|
Caution: The reader might get the feeling that this page is mostly
about IBM (International Business Machines Corporation) related
solutions — this is just true for now because after decent
evaluation I found myself mostly dealing with IBM solutions. However,
the fact that every decision is preceded by looking at the market and
what fits my requirements best on the short as well as in the
long-term implicitly states that every possible solution/vendor is
considered. In essence, this page is about common non-vendor specific
knowledge although I do have an IBM background I must say — IBM, HP,
Sun, Dell, Supermicro, Intel, AMD etc. dealing with the same issues
and trying to solve the same problems anyway...
 |
| IBM fanboy... |
Enterprise/Scientific Computing - Random Minds
This section looks into specifics but his vendor-agnostic i.e. it does
not focus on the portfolio of specific vendors but is tend to provide
a big picture view on issues that emerge whenever modern IT
(Information Technology) should be deployed with long-term goals like
investment protection, high availability, security, TCO (Total Cost of
Ownership) and other things, critical to keep the heart (IT) of modern
businesses beating 24/7/365. However, this page also provides a
vendor specific section further down this page (just IBM BladeCenter
for now (October 2007)).
- Some keywords that this section is going to discuss
-
- Complexity Encapsulation
- Support
- Costs (asset, TCO (Total Cost of Ownership, etc.)
- Maintenance
- Vendor lock-in
- Scalability
- Load-balancing
- Mission-critical Services (how to identify them?)
- Redundancy (no Single Point of Failure)
- High Availability
- Virtualization and Isolation
- Storage and Data warehousing
Virtualization/Isolation
sa@pc1:~$ apt-cache show redhat-cluster-modules-2.6.18-4-xen-686
Package: redhat-cluster-modules-2.6.18-4-xen-686
Micro and Macro
Micro = one physical machine serving many virtual machines
Server Consolidation — Move multiple servers onto a single physical
host with performance and fault isolation provided at the virtual
machine boundaries.
Macro = one virtual machine served by many physical machines
Booting
Computing Power
Storage
Distributed Filesystem
- Lustre: by using Lustre, a heavy NAS/SAN setup can be avoided;
however, a SAN/NAS might be used as a Lustre OST (Object Storage
Target) in order to provide data redundancy within a Lustre file
system; as of now Lustre does not provide redundancy for data stored
on its OSTs
Tiered Storage
Create a tiered storage environment: Using virtualization technology,
SVC enables customers to match the cost of the storage to the value of
their data. For example, mission-critical data can be stored on
high-performance, highly available Fibre-Channel disks while
non-mission-critical data can be stored on serial-ATA disks. Data can
easily be moved from one tier to another without application
disruption.
I/O
Management
Efficiency - Time, Costs, Energy, etc.
Redundancy
Wie schon die vorige Chipsatz-Generation fuer Server mit vier Xeons
(Truland-Plattform, Twin Castle/E8501) bietet der Speichercontroller
Funktionen zur Verbesserung von Zuverlaessigkeit, Verfuegbarkeit und
Wartbarkeit (Reliability, Availability, Serviceability, RAS). Dazu
gehoeren etwa Memory Mirroring (eine Art RAM-RAID), Hot-Spare DIMMs
und Hot-Plugging.
Resilience
Vendor Support and Expertise
Interoperability
Networking
There is a dedicated page on this website/platform about networking
with regards to computer networks.
Networking Equipment
As already stated above, there is a dedicated page on this
website/platform about networking with regards to computer networks.
This section will look into some of the equipment I play/work with. I
will do that by just looking at what hardware is it, what are the
specs and how I use it.
I am not going much into detail here since the one interested can use
the presented information to dig deeper for himself if he feels the
need.
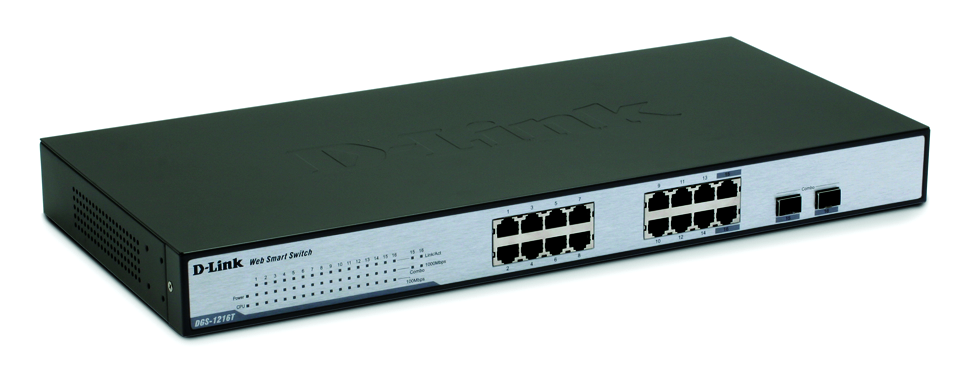
D-Link DGS-1216T - Layer 2 Switch
A while ago, I acquired a 16 port layer 2 switch for my rack@home.
The D-Link DGS-1216T is a layer 2 switch with 16 gigabit Ethernet
ports providing full-duplex gigabit switching speeds on all ports.
Also, in addition to the 16 Ethernet ports, the switch has 2 SFP
(Small Form-Factor Pluggable) expansion slots.
Aside from the layer 2 switching, the switch comes with a variety of
built-in capabilities for smart network management e.g. support for
virtual LANs with support for IEEE 802.1Q] create/handle/relay SNMP
(Simple Network Management Protocol) trap information, handle
jumbo frames, port trunking also known as as link aggregation which
actually comes hand in hand with VLAN trunking, port mirroring,
several security enhancing features etc. Managing the switch can be
done in various ways e.g. via a web browser like Iceweasel for
example.
The link and the screenshot below...

Linksys WRT54GL
Around a year ago I bought myself a
wireless access point/router/firewall/whatnot in order to integrate it
into my LAN (Local Area Network) at home. Now, a year later I finally
found the time to put it into action.
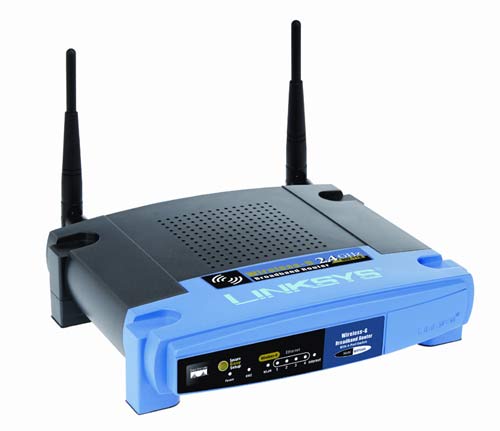
The link and the screenshot in case the page vanishes over time
As many Linksys models from the same series, the WRT54GL v1.1 (serial
number written on the bottom of the device starting with CL7B which is
hardware version v1.1) can be equipped with another firmware than it
is shipped with. The original Linksys firmware is nice
but nice is not enough (at least not for me). Because of that, I went
on to replace the original firmware with OpenWRT and X-WRT, a sister
project to OpenWRT aiming to provide a fully featured web interface
among other things. Of course, both are FLOSS (Free/Libre Open Source
Software).
What Firmware should I chose?
Since I always tend to evaluate the situation, available solutions and
their impacts, I also considered DD-WRT and Tomato but finally decided
to go with OpenWRT. I would suggest to either go with DD-WRT or Tomato
for those who want a easy to install as well easy to use firmware
solution that can be managed via web interface.
The reason I decided to go with OpenWRT is that, as of now (December
2007), OpenWRT is the most extensible, flexible and feature rich
flavor. It provides stuff the normal user would never need plus it is
mainly targeted to CLI (Command Line Interface) folks which actually
makes it hard to deal with for the novice user or those who are not
fond using the CLI.
In short, those are not very skilled with Unix-like OSs (Operating
Systems) or short in time respectively do not want to spend a lot of
time should go with DD-WRT. DD-WRT is very good since it also provides
dozens of features plus it is really easy to handle (install and
manage via web interface).
On the other hand, those who are skilled and want to put a
ridiculously manifold solution into place that behaves depending on
what packages one puts on it and how he configures it, those should
definitely go with OpenWRT + X-WRT as I did. I guess, what finally
made me shift to OpenWRT was its package management with ipkg and the
whole CLI approach.
Install OpenWRT and X-WRT onto the WRT54GL v1.1
Installing OpenWRT plus X-WRT onto the WRT54GL is easy. We just have
to download an image file and select it for firmware update via the
current web interface. Although installing/configuring is very easy
(but then I am not a novice) I strongly recommend to at least read the
FAQ before one continues.
At the current moment, the directory
http://downloads.x-wrt.org/xwrt/kamikaze/7.09/brcm-2.4/ contains all
the things needed. In particular what we need is
1  sa@pc1:~$ cd /tmp/
2  sa@pc1:/tmp$ curl -O http://downloads.x-wrt.org/xwrt/kamikaze/7.09/brcm-2.4/openwrt-wrt54g-2.4-squashfs.bin
3    % Total    % Received % Xferd  Average Speed   Time    Time     Time  Current
4                                   Dload  Upload   Total   Spent    Left  Speed
5  100 1924k  100 1924k    0     0   215k      0  0:00:08  0:00:08 --:--:--  242k
6  sa@pc1:/tmp$ pi bin
7  -rw-r--r--  1 sa   sa   1970208 2007-12-02 09:12 openwrt-wrt54g-2.4-squashfs.bin
8  sa@pc1:/tmp$
I used curl (line 2) to download the new firmware but one can use any
other method that suits him well e.g. via his web browser, wget, etc.
As can be seen in line 7, the image is ~1.9 MiB in size (it must of
course fit into the flash memory of the WRT54GL which is 4 MiB as we
already know). Those who wonder about the pi in line 6... that is
just an alias in my .bashrc.
The new firmware image we just downloaded contains everything that is
needed (current development Release also known as Kamikaze plus the
X-WRT part also known as webif^2).
Now that we have all we need, we want to install the new firmware onto
the WRT54GL. That is a piece of cake... We use the web browser to
navigate to the page (using the web interface to the WRT54GL) which
allows us to chose a firmware image for updating the WRT54GL. We then
select the just downloaded openwrt-wrt54g-2.4-squashfs.bin and wait a
bit (~3 minutes or so) until the upgrading process is done. It is
important, that this upgrading process IS NOT suspended since that
would leave us with just a partial installed firmware which in turn
would render the WRT54GL unusable.
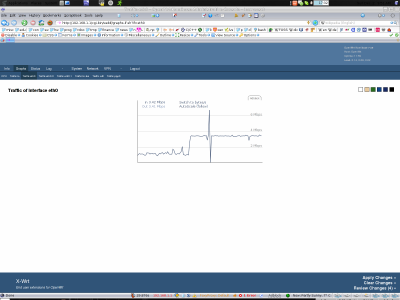
After a few minutes, when the new firmware is installed, we use the
default IP address (192.168.1.1) to log onto the WRT54GL via X-WRT's
web interface also known as webif^2. The two screenshots below show
the initial log on screen on the left and one of several possible
real-time graphs on the right (try this with standard firmware :).
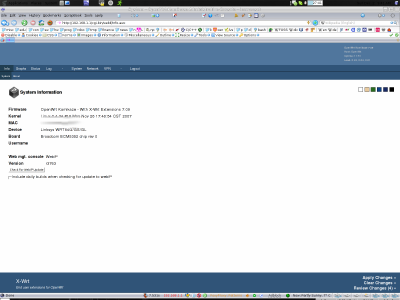
The Current OpenWRT Release
The current (December 2007) OpenWRT release is 7.09 also known as
Kamikaze. This marks the third official release of Kamikaze. What is
ew in Kamikaze?
- Build system
-
The build system (aka buildroot) has been completely rewritten since
the whiterussian releases. There is tons of new packages, and adding
support for new packages has never been easier.
- Platforms
-
There are 10 supported architectures listed below, with support for
many more in progress. Almost all of these platforms are based on 2.6
Linux kernels with the exception of Broadcom — the is no stable wifi
connection for 2.6 so Broadcom still has a 2.4 kernel.
- Configuration
-
A radical change toke place i.e. the NVRAM based configuration has
been phased out in favor of a more robust set of config files in
/etc/config/.
Supported Hardware Platforms
| amcc-2.6 |
AMCC Taishan |
| atheros-2.6 |
Fon Fonera, Ubiquiti LiteStation 2/5, Ubiquiti PowerStation2 Atheros AR231x/AR5312 based devices. |
| au1000-2.6 |
Access/Meshcube (aka 4G Systems MTX-1) |
| avr32-2.6 |
Atmel AVR32 |
| brcm-2.4 |
Broadcom devices requiring Broadcom wifi (everyone migrating from Whiterussian) |
| brcm47xx-2.6 |
Netgear WGT634U, Broadcom Devices without Broadcom wifi (you can use this instead of brcm-2.4 but wifi won't work) |
| ixp4xx-2.6 |
Adi Engineering Pronghorn Metro, Compex NP18A, Compex WP18, Gateworks Avila, Iomega StorCenter, Linksys NSLU2* (NSLU2 avaiable via http://www.slug-firmware.net/) |
| magicbox-2.6 |
Magicbox v1.1 / v2.0 |
| rb532-2.6 |
Mikrotik RouterBoard 532 |
| x86-2.6 |
x86 based devices (eg. WRAP) |
There exits many devices based upon the above platforms e.g. the
WRT54GL.
Configuration
All of the configuration data is now kept within the filesystem, under
the /etc/config directory. This means that when installing or
reflashing, the configuration will be reset to default values as the
filesystem is replaced.
    LAN: 192.168.1.1/24
    WAN: DHCP
   WIFI: Disabled

 Telnet: Enabled until root password set
    SSH: Used after setting root password
The new configuration files are built in sections, each section begins
with a config keyword defining the section, followed by one or more
option keywords defining values for that section.
  config <type> <name>
     option <name> <value>
     option <name> <value>
    ...
Configuration can be done either by editing the configuration files
directly or by using the uci tool in a manner similar to the
previous nvram util.
  uci show
  uci show <config file>
  uci show <config file>.<config name>
  uci get <file>.<config>.<option>
  uci set <file>.<config>.<option>=<value>
  uci del <file>.<config>.<option>
  uci commit
Example:
  root@OpenWrt:~# uci show network.lan
  network.lan=interface
  network.lan.ifname=eth0.0
  network.lan.proto=static
  network.lan.ipaddr=192.168.1.1
  network.lan.netmask=255.255.255.0

  root@OpenWrt:~# uci set network.lan.ipaddr="192.168.1.20"

  root@OpenWrt:~# uci get network.lan.ipaddr
  192.168.1.20

  root@OpenWrt:~# uci commit

  root@OpenWrt:~# /etc/init.d/network restart
Packages
Additional features or utilities can be added via the ipkg system.
ipkg update
ipkg list
ipkg install <package>
ipkg remove <package>
Note, there are two compressed filesystems, squashfs and jffs2. The
squashfs partition is readonly and contains all the files shipped with
the firmware. The jffs2 partition is writable, and stores changes to
squashfs.
- Reinstalling or upgrading packages contained on squashfs is not
recommend — the old package will simply be hidden, not deleted.
- Because the filesystems are compressed, ipkg cannot determine if
you have enough free space, and consequently may run out. If this
happens you should try to manually delete files.
Basic Setup
The screenshot of the above real-time traffic graph on eth0 could not
have been made if I would not have configured the WRT54GL in order to
connect my computer to the Internet using the WRT54GL in between. With
this subsection, I am now going to show how I configured the WRT54GL
to at least fulfill basic needs e.g. entering the WRT54GL via the CLI
(Command Line Interface) and set up a connection to the Internet.
Mandatory Basic Knowledge
CLI (Command Line Interface) basic skills and basic knowledge about h
Unix-like OSs (Operating Systems) e.g DebianGNU/Linux is required to
configure OpenWRT. In other words, with the help of the information
provided below, one who is ~1 year into the Unix-like OS universe
should be able to configure OpenWRT via the CLI.
Basically what we are going to do is to enter the WRT54GL via SSH
(Secure Shell) and then edit a variety of text files with some text
editor. Because of the obvious fact that hardware like the WRT54GL is
not as powerful as a common personal computer running some Unix-like
OS, there are some things that need to be different. One such thing is
that OpenWRT ships with Busybox instead of GNU Core Utilieties.
1 pc1:/home/sa# ssh [email protected]
2 [email protected]'s password:
3
4
5 BusyBox v1.4.2 (2007-11-05 23:35:33 CST) Built-in shell (ash)
6 Enter 'help' for a list of built-in commands.
7
8 _______ ________ __
9 | |.-----.-----.-----.| | | |.----.| |_
10 | - || _ | -__| || | | || _|| _|
11 |_______|| __|_____|__|__||________||__| |____|
12 |__| W I R E L E S S F R E E D O M
13 KAMIKAZE (7.09) -----------------------------------
14 * 10 oz Vodka Shake well with ice and strain
15 * 10 oz Triple sec mixture into 10 shot glasses.
16 * 10 oz lime juice Salute!
17 ---------------------------------------------------
18 root@OpenWrt:~# help
19
20 Built-in commands:
21 -------------------
22 . : [ [[ alias bg break cd chdir command continue echo eval exec
23 exit export false fg getopts hash help jobs kill let local pwd
24 read readonly return set shift source test times trap true type
25 ulimit umask unalias unset wait
26
27 root@OpenWrt:~# busybox
28 BusyBox v1.4.2 (2007-11-05 23:35:33 CST) multi-call binary
29 Copyright (C) 1998-2006 Â Erik Andersen, Rob Landley, and others.
30 Licensed under GPLv2. Â See source distribution for full notice.
31
32 Usage: busybox [function] [arguments]...
33 or: [function] [arguments]...
34
35 BusyBox is a multi-call binary that combines many common Unix
36 utilities into a single executable. Most people will create a
37 link to busybox for each function they wish to use and BusyBox
38 will act like whatever it was invoked as!
39
40 Currently defined functions:
41 [, [[, arping, ash, awk, awx, basename, bunzip2, bzcat,
42 cat, chgrp, chmod, chown, chroot, clear, cp, crond,
43 crontab, cut, date, dd, df, dirname, dmesg, du, echo,
44 egrep, env, expr, false, fgrep, find, free, grep, gunzip,
45 gzip, halt, head, hexdump, hostid, httpd, id, ifconfig,
46 init, insmod, ipkg, kill, killall, killall5, klogd,
47 length, less, ln, lock, logger, logread, ls, lsmod,
48 md5sum, mesg, mkdir, mkfifo, mknod, mktemp, mount, mv,
49 nc, netmsg, netstat, nslookup, passwd, pidof, ping,
50 ping6, pivot_root, poweroff, printf, ps, pwd, rdate,
51 reboot, reset, rm, rmdir, rmmod, route, sed, seq, sh,
52 sleep, sort, strings, switch_root, sync, sysctl, syslogd,
53 tail, tar, tee, telnet, telnetd, test, time, top, touch,
54 tr, traceroute, true, udhcpc, umount, uname, uniq, uptime,
55 vconfig, vi, watchdog, wc, wget, which, xargs, yes,
56 zcat
57
58 root@OpenWrt:~#
The above screendump shows how I use ssh to enter the WRT54GL (lines
1 to 18; note the password request in line 2) and then poked busybox
to reveal its secrets i.e. what CLI utilities are packaged with
busybox v1.4.2 (lines 40 to 56). Of course, if the reader followed
with his installation so far he is not able to ssh into his WRT54GL as
of now as I did above (line 1) since we need to take a few more steps
from the current point to do so. I just put the busybox information
into place to show what we are talking about.
Entering the WRT54GL the usual way
The current status of our WRT54GL is that we have installed the new
firmware image but nothing else was done so far. What we want to do
next is to re-establish connectivity to the Internet. In order to do
so, we need to edit some configuration files onto the WRT54GL but that
in turn requires us to gain access to the WRT54GL.
Pragmatically speaking, there are two choices to do so. We can either
use the web interface since we have X-WRT running on top or OpenWRT or
we can use the more powerful and flexible CLI to configure OpenWRT.
Either ways, in both cases we want to change the root password and
allow for ssh log on to the WRT54GL.
Now, make sure there is at least the cable connection between the
WRT54GL and your computer and the WRT54GL is turned on. Then enter
telnet 192.168.1.1 which means we connect onto the WRT54GL via telnet.
Thereafter we issue passwd in order to change the root user
password (pick a strong passphrase). Then, after the pass phrase has
been entered twice exit disconnects us again.
Right now we have not just changed the password of the user
root but also disabled log in via telnet and enabled log in via SSH
(Secure Shell) which is a good thing since SSH is considered secure
whereas telnet is not since it provides no encryption.
Now we can log in as root user via SSH
sa@pc1:~$ shh [email protected]
bash: shh: command not found
sa@pc1:~$ ssh [email protected]
The authenticity of host '192.168.1.1 (192.168.1.1)' can't be established.
RSA key fingerprint is 91:b0:83:95:e0:db:5a:d3:6a:68:19:43:a9:c3:ba:93.
Are you sure you want to continue connecting (yes/no)? yes
Warning: Permanently added '192.168.1.1' (RSA) to the list of known hosts.
[email protected]'s password:


BusyBox v1.4.2 (2007-11-05 23:35:33 CST) Built-in shell (ash)
Enter 'help' for a list of built-in commands.

  _______                     ________        __
 |       |.-----.-----.-----.|  |  |  |.----.|  |_
 |   -   ||  _  |  -__|     ||  |  |  ||   _||   _|
 |_______||   __|_____|__|__||________||__|  |____|
          |__| W I R E L E S S   F R E E D O M
 KAMIKAZE (7.09) -----------------------------------
  * 10 oz Vodka       Shake well with ice and strain
  * 10 oz Triple sec  mixture into 10 shot glasses.
  * 10 oz lime juice  Salute!
 ---------------------------------------------------
root@OpenWrt:~#
The first time we log on to the WRT54GL, the ssh service asks us if
the fingerprint of the WRT54GL should be added to the list of known
hosts on our local system. We answer with yes RET (RET, in Emacs
speech means to press the return button).
When using the SSH client from OpenWrt, I get the following message: no auths methods could be used
The message no auths methods could be used is related to the following
utilization: dropbear as SSH client and openssh as sshd server,
basically, activating this option in /etc/ssh/sshd_config works:
PasswordAuthentication yes
Entering the WRT54GL with GNU Emacs Powers at our Fingertips
This subsection is totally optional. One can just ssh into the WRT54GL
(as I showed above) and be fine with it. I just mention things here
because, over the years, I got used to traveling at hyperspace speeds
(Emacs) and whenever I drop out of hyperspace, back to sublight speed
(CLI) I get this fizzling noise in my left ear. It gets even worse if
I have to go on a planetary surface mission and move around on foot
(GUI).
There are basically two choices when it comes to edit files remotely
and using GNU Emacs to do so. We can either use TRAMP or SSHFS. In
both cases, we are making use of the SSH (Secure Shell) protocol.
Whereas TRAMP works on a per file basis, sshfs mounts a remote file
system locally so it can be accessed like any other local file system.
All actions (copy, remove, etc.) taken on the sshfs are then reflected
to the remote location via SSH. More on secure methods for remote file
access and/or editing can be found onto the dedicated security page on
this website/platform.
TRAMP (Transparent Remote Access Multiple Protocol)
TRAMP requires perl and uuencode on the remote machine in order to
function properly. This however is not the case with the out of the
box OpenWRT installation since the WRT54GL is simply limited in
hardware resources so I went on to give sshfs a spin.
SSHFS
This subsubsection just shows how to use SSHFS (Secure SHell
FileSystem) in order to use GNU Emacs to edit the files on the WRT54GL
remotely. More detailed information about SSHFS and similar methods
for securely editing files remotely can be found on a dedicated
security page.
As we know (or not) for using sshfs we need to have a few things in
place. On our local machine we need to have the sshfs package
installed. sshfs is a filesystem client based on the SSH File Transfer
Protocol.
Since most SSH servers already support this protocol it is very easy
to set up i.e. on the server side there is nothing to do (well that is
not exactly true for the WRT54gl since it runs dropbear which has no
sftp server which is mandatory. More on that further down).
On the client side mounting the filesystem is as easy as to log into
the server with ssh. sshfs is based on FUSE (Filesystem in
User-space), thus we will either have to prepare a fuse kernel module
or compile it into the kernel to be able to use. Well, we are lucky
since if we use a standard Debian kernel as I currently do then FUSE
is already in place (as kernel module).
sa@pc1:~$ uname -a && lsmod | egrep "^Module|^fuse"
Linux pc1 2.6.23-1-686-bigmem #1 SMP Sat Dec 1 08:09:30 UTC 2007 i686 GNU/Linux
Module                  Size  Used by
fuse                   42644  7
sa@pc1:~$
At first we need to install a few things on our local machine i.e. not
on the WRT54GL but on our workstation, notebook, etc.
 1  sa@pc1:~$ su
 2  Password:
 3  pc1:/home/sa# apt-get install sshfs
 4  Reading package lists... Done
 5  Building dependency tree
 6  Reading state information... Done
 7  The following extra packages will be installed:
 8    fuse-utils libfuse2
 9  The following NEW packages will be installed
10    fuse-utils libfuse2 sshfs
11  0 upgraded, 3 newly installed, 0 to remove and 0 not upgraded.
12  Need to get 171kB of archives.
13  After unpacking 467kB of additional disk space will be used.
14  Do you want to continue [Y/n]? y
15  Get: 1 ftp://ftp.de.debian.org unstable/main libfuse2 2.7.1-2 [121kB]
16  Get: 2 ftp://ftp.de.debian.org unstable/main fuse-utils 2.7.1-2 [15.7kB]
17  Get: 3 ftp://ftp.de.debian.org unstable/main sshfs 1.7-2.1 [34.6kB]
18  Fetched 171kB in 2s (61.1kB/s)
19  Reading package fields... Done
20  Reading package status... Done
21  Retrieving bug reports... Done
22  Parsing Found/Fixed information... Done
23  Selecting previously deselected package libfuse2.
24  (Reading database... 165449 files and directories currently installed.)
25  Unpacking libfuse2 (from.../libfuse2_2.7.1-2_i386.deb)...
26  Selecting previously deselected package fuse-utils.
27  Unpacking fuse-utils (from.../fuse-utils_2.7.1-2_i386.deb)...
28  Selecting previously deselected package sshfs.
29  Unpacking sshfs (from.../sshfs_1.7-2.1_i386.deb)...
30  Setting up libfuse2 (2.7.1-2)...
31  Setting up fuse-utils (2.7.1-2)...
32  creating fuse device node...
33  udev active, devices will be created in /dev/.static/dev/
34  creating fuse group...
35  Adding group `fuse' (GID 119)...
36  Done.
37  Starting filesystem in userspace: fuse.
38  Setting up sshfs (1.7-2.1)...
In lines 3 to 38, we are working on our local machine where we install
sshfs.
In lines 39 to 56 we log on to the WRT54GL in order to install the
server side software needed to mount the WRT54GL file system into our
local file system tree using sshfs.
39  pc1:/home/sa# ssh [email protected]
40  [email protected]'s password:
41
42
43  BusyBox v1.4.2 (2007-11-05 23:35:33 CST) Built-in shell (ash)
44  Enter 'help' for a list of built-in commands.
45
46    _______                     ________        __
47   |       |.-----.-----.-----.|  |  |  |.----.|  |_
48   |   -   ||  _  |  -__|     ||  |  |  ||   _||   _|
49   |_______||   __|_____|__|__||________||__|  |____|
50            |__| W I R E L E S S   F R E E D O M
51   KAMIKAZE (7.09) -----------------------------------
52    * 10 oz Vodka       Shake well with ice and strain
53    * 10 oz Triple sec  mixture into 10 shot glasses.
54    * 10 oz lime juice  Salute!
55   ---------------------------------------------------
56  root@OpenWrt:~# cd /etc
57  root@OpenWrt:/etc#
Per default OpenWRT ships with dropbear. dropbear is a lightweight
SSH2 server and client designed to be small enough to be used in small
memory environments, while still being functional and secure enough
for general use. However, it is missing the sftp server which is why
we are going to install a few things on the server side.
58  root@OpenWrt:/etc# ipkg list | grep ssh
59  autossh - 1.4a-1 - Autossh client
60  openssh-client - 4.5p1-1 - OpenSSH client
61  openssh-client-utils - 4.5p1-1 - OpenSSH client utilities
62  openssh-server - 4.5p1-1 - OpenSSH server
63  openssh-sftp-client - 4.5p1-1 - OpenSSH SFTP client
64  openssh-sftp-server - 4.5p1-1 - OpenSSH SFTP server
65  rssh - 2.3.2-1 - restricted shell for use with OpenSSH
66  root@OpenWrt:/etc# ipkg install openssh-server
67  Installing openssh-server (4.5p1-1) to root...
68  Downloading http://downloads.openwrt.org/kamikaze/packages/mipsel/./openssh-server_4.5p1-1_mipsel.ipk
69  Installing libopenssl (0.9.8e-1) to root...
70  Downloading http://downloads.openwrt.org/kamikaze/7.09/brcm-2.4/packages/./libopenssl_0.9.8e-1_mipsel.ipk
71  Installing zlib (1.2.3-4) to root...
72  Downloading http://downloads.openwrt.org/kamikaze/7.09/brcm-2.4/packages/./zlib_1.2.3-4_mipsel.ipk
73  Configuring libopenssl
74  Configuring openssh-server
75
76  adding group sshd to /etc/group
77  adding user sshd to /etc/passwd
78  Configuring zlib
79  Done.
80  root@OpenWrt:/etc# ipkg install openssh-sftp-server
81  Installing openssh-sftp-server (4.5p1-1) to root...
82  Downloading http://downloads.openwrt.org/kamikaze/packages/mipsel/./openssh-sftp-server_4.5p1-1_mipsel.ipk
83  Configuring openssh-sftp-server
84  Done.
85  root@OpenWrt:/etc# cd
86  root@OpenWrt:~# exit
87  Connection to 192.168.1.1 closed.
88  sa@pc1:~$
In lines 58 to 65 I simply list what packages are available with
regards to ssh. Then, in line 66 I issue the command to install
openssh-server and in line 80 openssh-sftp-server. After that we are
done on the server side so we leave the WRT54GL in line 86.
Now we can use sshfs to enter the WRT54GL via sshfs and thus use
mighty GNU Emacs which means we go from sublight speeds to hypspace
travel again ;-]
 1  sa@pc1:~$ mkdir -p re/wrt54gl
 2  sa@pc1:~$ ll re/wrt54gl/
 3  total 0
 4  sa@pc1:~$ su
 5  Password:
 6  pc1:/home/sa# sshfs [email protected]:/ re/wrt54gl/
 7  [email protected]'s password:
 8  pc1:/home/sa# ls -l re/wrt54gl/
 9  total 36
10  drwxr-xr-x 1 root root 508 2007-11-26 23:48 bin
11  drwxr-xr-x 1 root root   0 1970-01-01 01:00 dev
12  drwxr-xr-x 1 root root   0 2000-01-04 00:23 etc
13  drwxr-xr-x 1 root root   0 2000-01-01 00:02 jffs
14  drwxr-xr-x 1 root root 431 2007-11-06 05:55 lib
15  drwxr-xr-x 1 root root   3 2007-11-06 05:34 mnt
16  dr-xr-xr-x 1 root root   0 2000-01-01 00:00 proc
17  drwxr-xr-x 1 root root 145 2007-11-06 05:51 rom
18  drwxr-xr-x 1 root root 348 2007-11-26 23:48 sbin
19  drwxr-xr-x 1 root root   3 2007-11-06 05:34 sys
20  drwxrwxrwt 1 root root 380 2000-01-04 00:24 tmp
21  drwxr-xr-x 1 root root   0 2000-01-04 00:24 usr
22  lrwxrwxrwx 1 root root   4 2007-11-26 23:48 var -> /tmp
23  drwxr-xr-x 1 root root 148 2007-11-26 23:48 www
24  pc1:/home/sa# cd re/wrt54gl/
25  pc1:/home/sa/re/wrt54gl# echo "I am now operating on the remote file system"
26  I am now operating on the remote file system
27  pc1:/home/sa/re/wrt54gl# cd ..
28  pc1:/home/sa/re# fusermount -u wrt54gl/
29  pc1:/home/sa/re# ls -l wrt54gl/
30  total 0
31  pc1:/home/sa/re# exit
32  exit
33  sa@pc1:~$
If we want to mount a remote file system into our local file system we
need to have a mount point (line 1). As can be seen it is empty (lines
2 and 3). The magic happens in line 6 — we mount the remote file
system (the one of our WRT54GL) into our local file system using
SSHFS. Now we can see the difference it makes (lines 8 to 23) since
before (line 2) the mount point was not occupied. The ll in line 2 is
just an alias in my .bashrc.
In line 24 I am entering the remote file system as if it were a local
file system. Line 28 shows how to unmount the file system formerly
mounted with sshfs. Then, as in line 2, lines 29 and 30 show that the
mount point is unoccupied again.
Well, what we did so far is great but where is mighty GNU Emacs? There
he comes, playing the dired card err swinging the magic hypspace
stick. For more information on dired please see here and here. Maybe a
look at my .emacs would also be a good idea to see how I configured
some bits of dired (especially Image Dired).
We either need to be root in order to enter the WRT54GL file system or
work with sudo like crazy. I decided not to pull out the sudo bat but
to simply become root and work as root since we are going to perform
root tasks anyway e.g. installing/removing packages using ipkg. Of
course, we all know that normally working as root should be avoided
whenever something can be done as normal user e.g.
sa@pc1:~$ whoami
sa
sa@pc1:~$
in my case.
Dired allows to either visit/edit files as the one user who
started Emacs in the first place which would be sa in my case or one
can also visit/edit files as any other user. Now, that we
decided to go into the WRT54GL as root we need to tell Dired to do so.
In my case C-x C-f invokes
,----[ C-h k C-x C-f ]
| C-x C-f runs the command find-file-at-point
|   which is an interactive compiled Lisp function in `ffap.el'.
| It is bound to C-x C-f.
| (find-file-at-point &optional filename)
|
| Find filename, guessing a default from text around point.
| If `ffap-url-regexp' is not nil, the filename may also be an URL.
| With a prefix, this command behaves exactly like `ffap-file-finder'.
| If `ffap-require-prefix' is set, the prefix meaning is reversed.
| See also the variables `ffap-dired-wildcards', `ffap-newfile-prompt',
| and the functions `ffap-file-at-point' and `ffap-url-at-point'.
|
| [back]
`----
When I am in a dired buffer, I use C-x C-f to open the directory
~/re/wrt54gl where we mounted the remote file system. Well, I not
simply tell dired to open ~/re/wrt54gl but I also tell dired to open
it as root. After C-x C-f dired prompts for a path in the minibuffer,
I then enter /su::/home/sa/re which is the short for
/su:root@pc1.:/home/sa/re. The left screenshot below shows this in the
left window (note the path at the top).
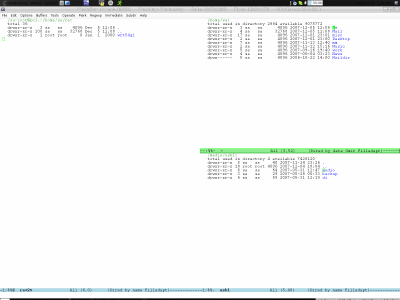
The right screenshot above shows a few things so folks might start
getting a notion of what it means travelling in hyperspace. I movded
further down the path to ~/re/wrt54gl, used dired-maybe-insert-subdir
bound to i in order to include more than just one directory into a
single dired buffer. Next thing I did was to move down into the
subdirectory and use o on the file ipkg.conf which opens the file for
editing within the buffer in the lower right corner as can be seen.
Well, that is just a tiny prise of hyperspace travelling up your noses
but there is more... a lot more... check out the GNU Emacs manual
for more e.g. (Info-goto-node "(emacs) Dired"). Also for the
/su::/re/wrt54gl thing, we actually used a little TRAMP magic
(Info-goto-node "(tramp) Default Method"). You guys know the trick —
place point behind form and then C-x C-e. Hehe, yes, do not be
surprised... Hyperspace ;-]
Setting up the PPPoE Connection
Information beyond what I am going to tell can be found in the
official documentation (go here and here) for Kamikaze. Let us recap.
We can now access the WRT54GL either via the CLI (Command Line
Interface) or via GNU Emacs respectively dired.
The PPPoE (Point-to-Point Protocol over Ethernet) configuration data
is stored in /etc/config/network which for our current case (I am
using dired) means the path is
/su:root@pc1.:/home/sa/re/wrt54gl/etc/config/network. This file
contains seveal stanzas (a stanza is a block or subsection of a
human-readable configuration file). One of them is responsible to
connect the WRT54GL to the Internet via PPPoE.
#### WAN configuration
config interface        wan
        option ifname   "eth0.1"
        option proto    pppoe
        option username "<your_username>"
        option password "<your_password>"
        option keepalive 10
        option mtu      1492
After altering this stanza according to ones individual values i.e.
your_username and your_password the first of two steps in order to
connect local computers/devices to the Internet is accomplished. The
next step is to make the WRT54GL the gateway for the LAN (Local Area
Network). This LAN might either be a whole bunch of devices or in the
most trivial case just one computer e.g. Internet <--> WRT54GL <-->
Computer.
If your provider only accepts CHAP (Challenge-handshake authentication
protocol) authentication, you will also need to add the username and
password to /etc/ppp/chap-secrets. If your password is empty, use two
double-quotes "". This might then look somewhat like the code below.
In my case, as with most others, it is not necessary to fiddle with
/etc/ppp/chap-secrets i.e. I just had to edit /etc/config/network.
#USERNAME  PROVIDER  PASSWORD  IPADDRESS
<your_isp_login>  ""  <your_isp_password>  *
Setting up DHCP (Dynamic Host Configuration Protocol)
The dnsmasq program acts as DNS and DHCP server in OpenWRT. By default
it hands out IP addresses from 192.168.1.100 to 192.168.1.250. This
can be changed by editing /etc/config/dhcp.
root@OpenWrt:~# cat /etc/config/dhcp
config dhcp
        option interface        lan
        option start    100
        option limit    150
        option leasetime        12h

config dhcp
        option interface        wan
        option ignore   1
root@OpenWrt:~#
The defaults are just fine so there should not be the need to alter
them. However, if there is the need to do so then we need to restart
dnsmasq which is done with killall -9 dnsmasq; /etc/init.d/dnsmasq.
Now the second step after PPPoE in order to have connectivety to the
Internet is to get a dynamic IP address from the DHCP server
(dnsmasq). Therefore we need to configure our computer to ask the
local DHCP server for an IP address. This is done by editing
/etc/network/interfaces on our local machine i.e. not the WRT54GL.
Note that in case the is not just a single computer connected to the
WRT54GL but a LAN consisting of several other computers/devices, the
all need to be set up to ask the DHCP server to hand out IP addresses
to them. Also, in such case one should make sure that there is only
one DHCP server in his LAN otherwise that would cause confusion the
the overall network integritiy and even more the human(s)
administering the LAN.
sa@pc1:~$ cat /etc/network/interfaces
auto lo
iface lo inet loopback

auto eth0
iface eth0 inet dhcp
sa@pc1:~$
The dhcp leases can be shown with cat /dhcp.leases on the WRT54GL. The
defaults are also just fine here so there should be no need to alter
them. Finally, if the local machine is configured (i.e.
/etc/network/interfaces) and the WRT54GL is configured, after an
ifdown -a followed by an ifup -a on the local machine, the command
ifconfig should show us something like this
 1  pc1:/home/sa# ifconfig
 2  eth0      Link encap:Ethernet  HWaddr 00:85:f3:65:28:27
 3            inet addr:192.168.1.101  Bcast:192.168.1.255  Mask:255.255.255.0
 4            inet6 addr: fe95::485:f569:fef0:128/64 Scope:Link
 5            UP BROADCAST RUNNING MULTICAST  MTU:1500  Metric:1
 6            RX packets:11776426 errors:0 dropped:0 overruns:0 frame:0
 7            TX packets:12487430 errors:0 dropped:0 overruns:0 carrier:0
 8            collisions:0 txqueuelen:1000
 9            RX bytes:955243876 (910.9 MiB)  TX bytes:3933396118 (3.6 GiB)
10            Interrupt:10 Base address:0xa400
11
12  lo        Link encap:Local Loopback
13            inet addr:127.0.0.1  Mask:255.0.0.0
14            inet6 addr: ::1/128 Scope:Host
15            UP LOOPBACK RUNNING  MTU:16436  Metric:1
16            RX packets:229158 errors:0 dropped:0 overruns:0 frame:0
17            TX packets:229158 errors:0 dropped:0 overruns:0 carrier:0
18            collisions:0 txqueuelen:0
19            RX bytes:74175578 (70.7 MiB)  TX bytes:74175578 (70.7 MiB)
20  pc1:/home/sa#
Note the IP address (line 2) the eth0 interface on the local machine
got assigned. It is the first one out of 150 addresses (see
/etc/config/dhcp contents above). Now we have connectivity to the
Internet as can be seen
sa@pc1:~$ ping -c 3 google.com
PING google.com (64.233.167.99) 56(84) bytes of data.
64 bytes from py-in-f99.google.com (64.233.167.99): icmp_seq=1 ttl=241 time=67 ms
64 bytes from py-in-f99.google.com (64.233.167.99): icmp_seq=2 ttl=241 time=58 ms
64 bytes from py-in-f99.google.com (64.233.167.99): icmp_seq=3 ttl=241 time=71 ms

--- google.com ping statistics ---
3 packets transmitted, 3 received, 0% packet loss, time 1203ms
rtt min/avg/max/mdev = 147.853/161.315/185.035/16.829 ms
sa@pc1:~$
Advanced Configuration and Setup for the WRT54GL
I mentioned before why I had chosen OpenWRT over some other, also good
pieces of software. Now, with this subsection, I am going to take a
deeper look into OpenWRT and what it can do for us. This subsection
will tell about networking, firewalling and some other really nifty
stuff that can be done with OpenWRT.
Package Management
First and foremost one needs to be skilled with the package management
system that ships with OpenWRT. It is called iPKG (Itsy Package
Management System).
There are a few commands everybody should know. Issuing ipkg --help
when logged into the WRT54GL shows all the help
root@OpenWrt:~# ipkg --help
BusyBox v1.4.2 (2007-11-05 23:35:33 CST) multi-call binary

Usage: ipkg [options]... sub-command [arguments]...

ipkg is an utility to install, remove and manage .ipk packages.

Sub-commands:

Package Manipulation:
        update                  Update list of available packages
        upgrade                 Upgrade all installed packages to latest version
        install <pkg>           Download and install <pkg> (and dependencies)
        install <file.ipk>      Install package <file.ipk>
        configure [<pkg>]       Configure unpacked packages
        remove <pkg|regexp>     Remove package <pkg|packages following regexp>
        flag <flag> <pkg>...   Flag package(s) <pkg>
         <flag>=hold|noprune|user|ok|installed|unpacked (one per invocation)

Informational Commands:
        list                    List available packages and descriptions
        list_installed          List all and only the installed packages and description
        files <pkg>             List all files belonging to <pkg>
        search <file|regexp>            Search for a package providing <file>
        info [pkg|regexp [<field>]]     Display all/some info fields for <pkg> or all
        status [pkg|regexp [<field>]]   Display all/some status fields for <pkg> or all

[skipping a lot of lines...]

root@OpenWrt:~#
As can be seen, I skipped a lot of lines from the above screendump.
What remains is what I consider basic knowledge in order to operate
ipkg. One example of ipkg usage was shown above when we installed
openssh-server and openssh-sftp-server.
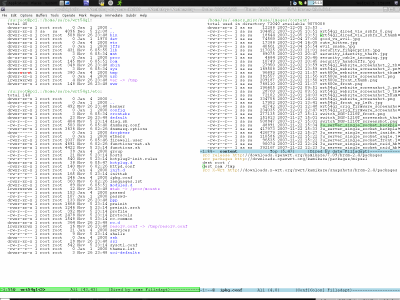
A package management system needs to have a repository in order to
obtain meta information as well as data (packages). In case of
OpenWRT, the repository information for ipkg is located in the file
/su:root@pc1.:/home/sa/re/wrt54gl/etc/ipkg.conf respectively
/etc/ipkg.conf. The dired screenshot above shows it opened in the
lower right window. I am fine with the default so I will not add new
repository URLs (Uniform Resource Locators).
Firewall
3.2. Where should I put custom firewall rules?
They go into the file /etc/firewall.user. This file has a few examples
in it as well. Don't forget to rerun the /etc/firewall.user scirpt to
activate your changes.
/etc/firewall.user gets called from the /etc/init.d/S45firewall script
on each reboot.
Since OpenWrt uses the standard Linux iptables for firewalling a good
starting point for documentation is
http://www.netfilter.org/documentation/.
note: RC6 seems has a more easier way of configuring firewall rules.
Instead of editing /etc/firewall.user, you can edit
/etc/config/firewall. This seems to be used by X-wrt as well.
TIP: If you install qosfw-scripts then it is easier to configure port
forwarding.
WDS (Wireless Distribution System)
3.11. Wireless Distribution System (WDS) / Repeater / Bridge
This is an ASCII art for what WDS can be useful.
                / - - - Wireless Clients
               |
INTERNET-----WRT54G_1- - - - - -WRT54G_2 - - - - - Wireless Clients
             | | | |            | | | |
            4 clients          4 clients
----- Cable link
- - - Wlan link
With WDS you can connect wireless clients to all APs. In client mode
this is not possible.
For connection of two AP together, both machines have to be set up.
nvram set wl0_lazywds=0
nvram set wl0_wds=aa:bb:cc:dd:ee:ff
nvram commit
ifup wifi; /sbin/wifi
Replace aa:bb:cc:dd:ee:ff with the MAC address of the router you would like to connect via WDS. On WRT54G_1 set MAC of WRT54G_2 and on WRT54G_2 set MAC of WRT54G_1.
If the other router is running OpenWrt too you can get the MAC address from output of:
iwconfig eth1
/!\ IMPORTANT: Use the correct network interface name for your hardware.
See OpenWrtDocs/Configuration for details.
Linksys WRT600N
I am planning to acquire that thingy sometime around late 2008 or so.
A prerequisite is of course OpenWRT and X-WRT support for it which is
not available so far (December 2007).

The link and the screenshot in case the page vanishes over time

Servers / Enterprise Hardware
This section is about enterprise hardware i.e. stuff that goes into a
datacenter.
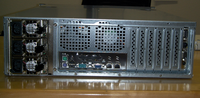
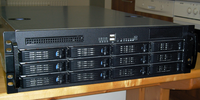
3U Single Socket Rack Server
During summer 2007, I decided to buy myself a new 3U server, powerful
enough to consolidate a bunch of my private stuff spread across
several machines across the globe, onto this machine for ease of
maintenance and thus overall time savings.
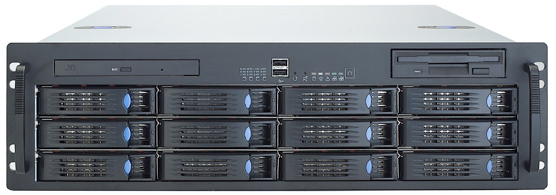 |
| Front with 12 hot swap HDD (Hard Disk Drive) bays and controls. |
 |
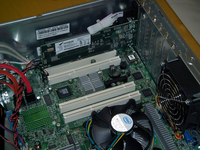
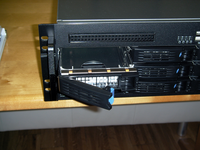
| Some possible inside i.e. a variety of motherboards etc. possible. |
Go here for more photos...
The ~3 leased servers I used before to host my private stuff were off
the shelf consumer hardware respectively one of them was a virtual
server with, well pretty limited hardware resources. Also, there were
no real redundancy in place with any of the leased servers which gave
me headaches from the beginning but then I could simply not afford
state of the art 19" rack-mounted hardware and its hosting at a DC
(Data Center) back then — I started with those servers when I was
still a student with pockets full of nothing else but lints ;-]
Usage
I am going to use this server for private stuff only i.e. there will
be no commercial service running on this machine nor will I use this
machine to generate some income whatsoever. That has some benefits in
terms of I am completely immune against any sort of insanity from
crazy/toxic people I find myself observing from time to time. In
short, my party, my rules... I like that, not because I like wearing
the ruler hat but because it makes life easier because I can simply
ignore dump people without any aftermath issues. Also, having my own
hardware saves me a lot of time since I do not have to ask for
permission or wait for approval... Amen!
FLOSS (Free/Libre Open Source Software)
Well, as we know, FLOSS is not just a hobby of mine or a job, it
rather is one of my obsessions. Because of that, I will use the server
to help with some tasks I do in the course of my involvements (for
example, my involvements with Debian) with FLOSS e.g. providing Debian
repositories to the public, hosting this website, etc.
Remote Backup
I backup data from my workstation and several other computers several
times a day. The backup location is not just locally onto some other
storage media but also to some remote places (to be save in cases when
a local disaster strikes e.g. flooding). I will thus also use this
server as a save haven for my data not matter of my current location
on this planet.
Archive
Next to cyclic backups, the server will be used as an archive. The
data in this archive will mainly consist of private stuff like family
photo albums/videos etc. I will probably also put all my music and
movie collection into the archive. Well, there is a lot of stuff that
comes in mind that should be put into the remote archive just in case
something bad (a fire, housebreaking, etc.) happens.
Website
Last but not least, I will host this website/platform using the new
server.
Communication
I will but a mail system and instant/group messaging software
(ejabberd) on the server.
Software running on the Server
With regards to software there is not much to say. There is the OS
(Operating System) and a bunch of services I have running.
OS (Operating System) / Virtualization
The OS is Debian. Kernels will be Linux/OpenBSD. Virtualization is
done with OpenVZ.
Application / Services
Well, the usual shebang i.e. some httpd, some Python magic, Postfix, a
prise of PostgreSQL and a little bit of Django.
Hosting Location
The server will not just finally be put into a DC (Data Center) for
colocation once set up but I will, as usual, start from scratch when
the server is already in colocation. I will therefore use so called
out-of-band management also known as remote management to install the
kernel and OS (Operating System) environment remotely (from a couple
of thousand miles away from the server), set up the RAID (Redundancy
Arrays of Independent Disks) and configure the BIOS (Basic
Input/Output System).
From my point of view, putting a server into colocation is the only
way that really makes sense (but then I am a little biased because of
my background I guess).
Aside from the current focus on this particular server, I am going to
cover the hosting subject on its own as well.
Specifications
I guess this is the subsection which will be of most interest so I
will detail things here. For the most part, I will simply provide
links to either vendor but most likely producer websites of various
components which of the server is made of.
As it may have already come into mind for most of the readers, I chose
this server with the idea in mind that I do not need a multi socket
machine since a shortage in computing power is quite unlikely to
happen — as I said, all the machine will be used for is to host a few
of my private services e.g. this website/platform.
However, I put emphasis on the storage part — the machine will run a
fully encrypted RAID 6 array made up of up to 12 HDDs driven by a
high-end RAID HBA (Host Bus Adapter) controller card. Next to the
emphasis on the storage part, I always find it very important to take
care about redundancy for the most critical components which is why
the server features a triple redundant power supply nest to the RAID 6
array.
Also, there is the importance of RAM (Random Access Memory). It is
common sense that, with regards to the overall system performance, the
amount of RAM is vital — in most real-world scenarios it is higher
prioritized than the amount of available computing power i.e. RAM is
seen more important than the CPU part. Since I am going to have this
server running common applications and services it is true in my case
as well and this is why I have chosen to put in the maximal amount of
non-persistent storage (RAM) which in this case, for this motherboard,
as of now (November 2007), is 8 GiB.
Motherboard
There is a link to the original page plus I also took a screenshot
since as time goes by, such pages tend to disappear.

CPU (Central Processing Unit)
Again, the link and in case this page may disappear over time the
screenshot as well
RAM (Random Access Memory)
2x4 GiB Kit respectively 4x2 GiB DIMMs (Dual In-Line Memory Modules)
i.e. 8 GiB in total:
4GB 667MHz DDR2 ECC CL5 DIMM (Kit of 2)
Standard 256M X 72 ECC 667MHz 240-pin Unbuffered DIMM (SDRAM-DDR2, 1.8V, CL5)
i.e. its an even number of DIMMs and therefore I am leveraging the
dual-channel option.
Power Supply
The power supply is a triple redundant (N+1, with N = 2)
power supply with hot-swap units which means one out of three units
may fail (but not more) and can then be replaced on the fly i.e. while
the machine is up and running. Again, the link and the screenshot below:

Remote Management
Basically we are talking about managing hardware one level below the
usual SSH (Secure Shell) actions taken. Wikipedia has the details.
Only thing left to me is to tell about the how and why I use it.
The Why: Anybody who has ever compiled a new kernel, rebooted and then
waited... [Here goes the story of you calling the data center staff,
pegging them to reboot your server]. Also, think about the most
ugliest weather possible and then, out of nowhere, you are presented
with two choices:
- The funky one: Sit down, preferably at home, and install a new OS
on some server within a DC (Data Center) on the other end of the
city while watching the rain going horizontal towards your windows.
All spiced up with some nice lightnings.
- The not-so-funky one: Search the house for your Army combat 100%
waterproof clothing stuff. Grab some install CDs, your suitcase
with some tools and some food (this will take a while... of
course). Then... several hours later [You write an email to you
superior that you got stuck in traffic jam for 5 hours because of
severe flooding etc. and could not even make it to the DC.] Finally
... lucky you, still 2 hours time left to get some seep until you
have to head to the office anyway.... 9am, there are 754 humans
at the office plus one zombie, hitting the coffee machine every 40
minutes or so.
Those scenarios are the amusing point of view but of course, there is
the pragmatical one too. I am talking about TCO (Total Cost of
Ownership), Manageability, etc.
The How: Everything needed is a common web browser and connectivity to
the net. Most of the remote management hardware choices come with easy
to use GUI (Graphical User Interface) software to connect to remote
hardware and carry out management task from any place as long as one
can establish communications.
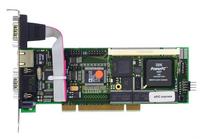
eRIC express: eRIC express is a KVM-over-IP PCI card that provides
browser-based remote, unblocked, BIOS (BasicInput/Output System) level
access and control my server. It allows administrators to perform a
variety of remote management tasks (e.g. set passwords, rename
servers, turn the server on/off, reboot, change IP address, etc.)
eRIC express requires no client software on the remote user side and
supports standard browsers such as Firefox, Iceweasel, Internet
Explorer and Safari. Since it operates at the BIOS level, server
access is available even if the server OS (Operating System) fails. An
integrated modem allows emergency access when the network or Internet
is unavailable. Its combination of KVM encryption, 256-bit SSLv3/TLSv1
and certification protects servers from unauthorized access.
- What is the eRIC express?
-
eRIC express is a PCI card that enables IT administrators to remotely
access and control a server over the IP network with BIOS level
functionality. It is completely hardware and OS independent and allows
users to troubleshoot and reconfigure servers even when servers are
down.
- How does eRIC express differ from remote control software?
-
Because eRIC express is not a software but a hardware solution, it is
much more powerful:
- OS and hardware independent eRIC express can be used to manage any
type of server running any OS, whether Intel, Sun, PowerPC running
Windows, Linux, Solaris, Novell, etc.
- State-independent / Agent-less eRIC express does not require the
managed server OS to be up and running, nor does it require any
special software to be installed on the managed server.
- Out-of-Band Even if the managed servers own network connection is
unavailable, it can still be managed through eRIC express.
- BIOS-level access Even if the server is hung at boot up, requires
booting to safe mode, or requires system BIOS parameters to be
altered, eRIC express still works flawlessly to enable these
configurations to be made.
- Can multiple people look at the same server at the same time?
-
Yes, eRIC express allows up to 15 people to view the same server at
the same time.
- What hardware, software, or network configuration is required to access eRIC express?
-
eRIC express requires no proprietary software to be installed on
clients for access. It is accessible via any major web browser
including: Internet Explorer, Netscape, and Firefox. Currently, eRIC
express requires a Java-enabled browser. With eRIC express,
administrators can perform a variety of remote management tasks (set
passwords and security, rename servers, change IP address, etc.).
The link and the screenshot plus a few images from that beloved
controller card of mine.

Storage
I put emphasis on this particular part as I already mentioned above. I
simply needed some remote place where I could drop all my private data
(photos, music, documents etc.) and have it available all the time.
Also, once I dropped some data there it should be secure i.e. not get
lost or be tampered with. The not get lost part can be established
with common high availability measures like redundant power supplies
but especially redundant, fail tolerant storage.
HDD (Hard Disk Drives)
The server may be equipped with up to 12 3.5" HDDs (Hard Disk Drives)
which are all hot swappable and thus, even when some disk drives fail,
the machine always remains operational. The disk drives in question
are all of the same type (Seagate Barracuda ES SATA 3.0/Gb/s 400-GB
Hard Drive ST3400620NS).
As of now (November 2007), depending on the chosen RAID (Redundancy
Arrays of Independent Disks) level, I could theoretically store up to
12 TB (there is a difference between TiB and TB) of data — current
state of the art HDDs store up to 1 TB of data each.
I do not have the need for that much storage right now but that might
change in the future and so I have still space to grow. My current
determination is that I will probably use only ~6 out of 12 available
bays and use 400 GB HDDs which leaves me with 1.6 TB of available
storage capacity since I am going to use RAID level 6.
Maybe I will also add some more HDDs, for hot standby, to the 6 other
actives in the RAID 6 array. Although my RAID HBA (Host Bus Adapter)
would allow for several arrays, each one independent from the others,
I am just going to have one featuring RAID 6. In this case it does not
matter, if I assign a dedicated hot standby disk drive to just this
array or if I declare is as global hot standby HDD.
The latter one would get picked up by the HBA and assigned to any
array that just suffered a disk failure. The former one (the array
dedicated hot standby) is dedicated to a particular array
i.e. even when a disk within another array fails, the HBA would not
assign this hot standby disk to the other array but keep it on stock
for the particular array it was initially assigned to.
Another benefit of putting more disks into the server than needed for
the active array is that I might grow the array remotely without the
need to get in touch with the DC (Data Center) staff and ask them to
put in some more HDDs that I send them. In general, I hate the idea
someone else fiddling with my IT (Information Technology) stuff! Of
course, I took measures to avoid such situations.
Yet another benefit of putting in a few more HDDs than needed for the
active array is that I just have to run my errands once... it is
simply easier and saves me time as opposed to acquire them 2 or so
years later, send them to the DC etc. Of course, this is a no go in
enterprise environments but then this is just one little server and we
are talking private affairs.
All in all I think I am fine with this setup — I do not need
virtualized storage and SAN (Storage Area Network) powers for my
private affairs... not yet ;-]
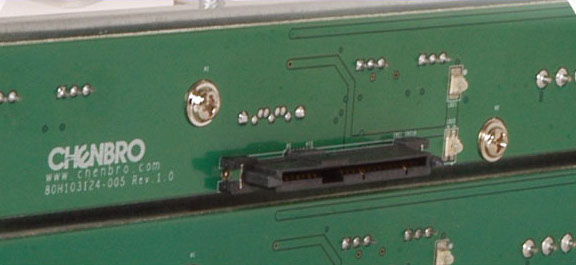
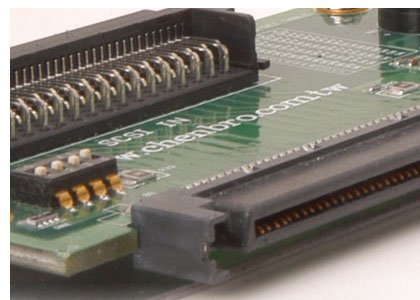
SATA (Serial ATA) / SAS (Serial Attached SCSI) Backplane
The server chassis and backplane comes as one unit manufactured by
Chenbro. All the other components i.e. motherboard, CPU, power supply,
etc. are then added to the mix.
The backplane/chassis I acquired was the RM31212B. As can be seen
above, the HDDs are loaded/unloaded using the 3.5" bays. In
conjunction with the RAID HBA (Host Bus Adapter), what I get is a
situation where I can exchange/add/remove HDDs while the server is
running in operations mode i.e. hot swapping. Same goes for the power
supply — also hot swappable as I mentioned above.
Since, statistically shown by several independent studies, HDDs (Hard
Disk Drives) and power supplies are those components that cause ~76%
of overall system downtimes, having made those two failure tolerant
means a lot. The number of 76% is off head — no prove here
— I just remembered a paper I skimmed across the other day, telling
about single server (not SAN, no Blade stuff, etc.) environments and
the causes for downtimes.
RAID Host Bus Adapter Card
Please go here.
Intel Modular Server
WRITEME
IBM BladeCenter
This section is about IBM's BladeCenter line in general. It is not
just about how to figure what are the requirements for oneself, for a
customer who hired you or for the company you work but it is also
about how to buy and what to consider by doing so. It is then of
course also about deploying, setting up and running the whole shebang.
In the end, what counts can be expressed briefly
- Modern IT (Information Technology) solutions must allow to run and
provide mission critical services to oneself and others (not just
in theory but also in practice) i.e. it does not help if a vendors
website or the sales represantative promotes a product with a bunch
of high availability, virtualization etc. solutions and fancy
stuff if it is too complicated to handle for humans.
- Investment protection and cost savings in the long-term. One has to
be realistic. The initial costs for BladeCenters are enormous
compared to usual 19inch rack hardware. For example, a I/O
(Input/Output) module for a blade chassis might cost as much as two
complete 19inch rack servers together. Fact is, that in the long
run blade hardware in general does not have the same worse impact
on TCO (Total Cost of Ownership) than usual rack hardware because
of time savings for the IT staff who runs it.
- Time savings. Blade solutions or any modern IT solution in general
must save humans time. Plain and simple. If it does not then, no
matter how fancy its features are, just forget it...
- Complexity encapsulation. Complexity with modern IT solutions is
growing at a rate that is almost exponential for any new service
that is added to some existing infrastructure. Modern IT solutions
need to help keeping this rate to at least a linear rate or even
better make it vanish. Plain and simple. If it does not then, no
matter how fancy its features are, just forget it...
- Scalability. It must be possible to scale services i.e. no matter
if a service gets 5 requests per second today and 50000 tomorrow
(ever been slashdotted? fun!), and a week later it again drops down
to say 100 requests for the time being, modern IT has to handle
that otherwise just forget it.
- Resource consumption. We have to take care of the habitat we are
living in thus modern IT has to be spare with resources like
electricity etc.
One thing I cannot stress enough is the fact that CTOs (Chief
Technology Officers) or CIOs (Chief Information Officers) should
really make it clear that the procedure of writing down ones
requirements, discussing them with various vendors and folks in
general (also non technicians) as well as talking to others who have
already gone to this process is vital!
Do not hurry during this step. Take your time even if management
starts bitching. Tell them about the importance and include them in
the process. If you tell them that the wrong decision might cause
stocks to fall or even worse (just imagine what happens if say all IT
services are unavailable for ~2 business days i.e. no email, no
website, no VoIP (Voice over IP), no CRM (Customer Relationship
Management) no nothing... nuclear winter at anybodies desk) and that
modern IT is the heart and brain of your company, the might start
listening and understand things better. It is possible to live with
just one arm or leg but take the brain or heart... end of the road!
However, the situation is as it is — good or not, I do not know —
fact is if you are dealing with IT then you are dealing with heart and
brain. CEOs (Chief Executive Officers) and friends are toes, fingers,
arms and such — customers will not notice if they are sitting behind
their desks for two days or not. Try this with mister DC (Data Center)
...
IBM's Website
Disclaimer: Skip this subsection if easily offended since it
demonstrates what bad designed IT (Information Technology) solutions
can do to peaceful, well-balanced people.
-
Even though I love IBM solutions and their hardware I must say (and I
say this although I am normally not the emotional guy), that from my
point of view, IBM's website is crap — I hate it!
-
Why? Because there is just dumb marketing speech all over the place
and it is so damn slow that you could go for lunch while the site you
want to visit loads. And yes, the performance matter is not local —
all other things work fast here.
-
You can surf this stupid site for hours and still, you would not have
an answer to the question that initially brought you there. What were
they thinking? Was their intention to make people feel uncomfortable?
... I doubt it. I simply do not know why this site is in place but
they should definitely fix that mess. For example, surfing a Django
site instead is pure joy and even the marketing people can be happy
since they get their so damn-nerdy-overall-important-shiny-message
out.
-
IBM's website must have been made by marketers and self-declared
world-class web-designers but clearly not by someone who has a
technical background and wants to find answers to questions as fast as
possible. Well, most probably, as it happens way to often, the
marketers-business-breed was in powers and the technicians had to obey
... now, we all have to suffer for that fact.
-
What is wrong with the marketers, lawyers and business folks nowadays?
This breed should be told that it does not rule the world. I am used
to refer to the current state as a phenomenon of mass-narcissism. Of
course, I also know sane, very grassroots business/lawyer folks as
well. Funny thing is, even they agree on that point of view...

-
Whatever... the only thing I wanted to say here is: Do not think you
are stupid because you are already surfing this website for hours but
you still have not found what you were looking for... It is this
website, not you!
And just to make that clear. I was just talking about IBM. It is the
same for Hewlett Packard, Dell, Sun, Intel, AMD etc. although I think
IBM has the worst site in senses of search time/information retrieval
ratio. For anything aside dumb marketing speech please contact a sales
representative who will try to... IBM, thank you for stealing my time
with your website. I consider that a crime against humanity. And it is
not just me — many folks I know say the same about your site.
What I would like to do with this page (the one you are currently on
not IBM's bad joke) is to really provide worthy information on a
technical level in order to install, configure and manage IBM hardware
and software bundles in as less time as needed to get from A to B and
without information redundancy.
If however, you are more the kind of guy who likes sites like I talk a
lot but actually say nothing please just go to IBM's website... you
are wrong here.
Type S
Type H
Storage
As we know, the representative of information with modern IT is called
data. Therefore this section is about storing data respectively
information and what it takes to enable fast, secure and reliable
access to it at all times. Another very important aspect with storage
is to keep information from degrading or even worse, from being lost.
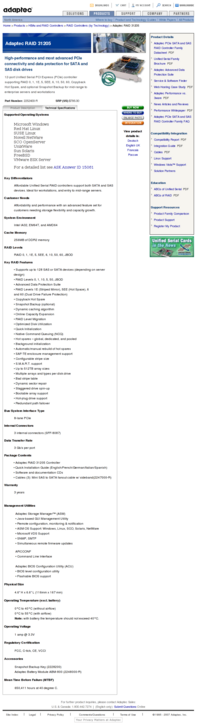
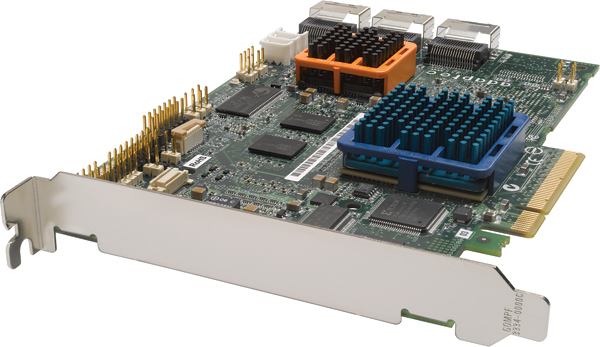
Adaptec 31205 RAID Controller
This one is an Adaptec series 3 RAID HBA (Host Bus Adapter) card.
Series 3 is the second-best right after Series 5 HBAs which target the
high-end enterprise market exclusively. The 31205 is an 8-lane PCIe
HBA controller supporting RAID levels 0, 1, 1E, 5, 5EE, 6, 10, 50, 60,
JBOD. I use this controller in a few of my servers as well as with my
workstation.
My experience over the years is that Adaptec HBAs work excellent with
Linux out of the box. All drivers are GPL (General Public License) and
part of mainline Linux since Linux version 2.4. I also dealt with
high-end 3ware, Intel, HP and Areca gear but I must say, that from my
point of view, Adaptec always was the better choice not just in terms
of HBA performance and the included features but also in terms of OS
(Operating System) support and management utilities provided to manage
the storage attached to the HBA.
Before we move on, here is the link, a comparison plus a the images
below. For more information take a look here. For linux support see
here.
Installation and Configuration
Installing the RAID HBA into a computer case, connecting all cables
and HDDs (Hard Disk Drives) is beyond this section. Information about
this is available on http://www.adaptec.com plus any controller ships
with manuals and guides anyway.
Management Ulitities
In order to install and/or manage storage space with the Adaptec 31205
RAID HBA (and others of the same controller family), four utilities
are provided by Adaptec:
- AFU (Adaptec Flash Utility)
-
Is a text-based DOS utility which can be used to update, save, or
verify our RAID controller's firmware BIOS and NVRAM (non-volatile
Random Access Memory). As we will see later, we do not need it since
its functionality is also part of ARCCONF as well as ASM which makes
updating the firmware a lot easier instead of fiddling around with the
AFU.
- ACU (Array Configuration Utility)
-
On the lowest level we have a BIOS configuration utility called ACU.
It is used for quick and easy local setup without the involvement of
any OS (Operating System) i.e. this is what can be used to install a
system from scratch. We will use this one to initialize the array and
make it bootable i.e. this is the task that happens before any OS gets
installed. Once the array is set up and build plus made bootable we
can proceed installing DebianGNU/Linux as usual e.g. using a
Netinstall ISO image.
- ARCCONF (Adaptec RAID Controller Configuration)
-
This one provides roughly the same (a little less) features as does
the ASM. Its main distinction to the ASM is that it is a CLI utility
(which I normally prefer). The real difference from a practical point
of view is, the ASM provides all the remote management features, the
notification features (email notifications etc.) plus the ASM can be
used to schedule a bunch of tasks to monitor all sorts of things.
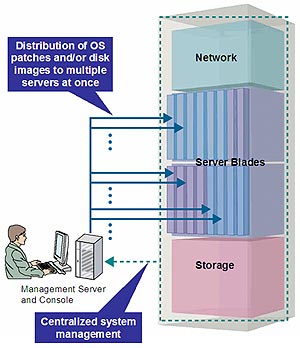
- ASM (Adaptec Storage Manager)
One-view GUI (Graphical User Interface) utility which centralizes
management of all Adaptec RAID products. ASM enables local as well as
remote (see storage space below) RAID management, monitoring, and
configuration through secure, encrypted communication. Aside from
using the ACU for initial setup and installing the storage as well as
ARCCONF for all CLI actions, the ASM is probably the most important
tool.
-
The ASMA (Adaptec Storage Manager Agent), part of the ASM, can be
thought of being identical to the ASM except for not including any
sort of software that provides us with some GUI. A combination of the
ASM and the ASMA is used to build a storage space across two or more
machines which is then also known as SAN (Storage Area Network).
ARCCONF
This one is a very handy tool, especially if we want to do things
quickly via the CLI, possible even remote:
wks:/usr/StorMan# type pi; pi arcconf
pi is aliased to `ls -la | grep'
-rwxr--r--  1 root root  1694258 2008-02-06 08:02 arcconf
wks:/usr/StorMan# ./arcconf -h

  | UCLI |  Adaptec uniform command line interface
  | UCLI |  Version 5.30 (B17509)
  | UCLI |  (C) Adaptec 2003-2008
  | UCLI |  All Rights Reserved

 COPYBACK      | toggles controller copy back mode
 CREATE        | creates a logical device
 DATASCRUB     | toggles the controller background consistency check mode
 DELETE        | deletes one or more logical devices
 FAILOVER      | toggles the controller autotomatic failover mode
 SNAPSHOT      | creates a copy of a logical device
 GETCONFIG     | prints controller information
 GETLOGS       | gets controller log information
 GETSTATUS     | displays the status of running tasks
 GETVERSION    | prints version information for all controllers
 IDENTIFY      | blinks LEDS on device(s) connected to a controller
 KEY           | installs a Feature Key onto a controller
 MODIFY        | performs RAID Level Migration or Online Capacity Expansion
 RESCAN        | checks for new or removed drives
 ROMUPDATE     | updates controller firmware
 SETALARM      | controls the controller alarm, if present
 SETCONFIG     | restores the default configuration
 SETCACHE      | adjusts physical or logical device cache mode
 SETNAME       | renames a logical device given its logical device number
 SETPRIORITY   | changes specific or global task priority
 SETSTATE      | manually sets the state of a physical or logical device
 TASK          | performs a task such as build/verify on a physical or logical device

wks:/usr/StorMan# ./arcconf GETVERSION
Controllers found: 1
Controller #1
==============
Firmware           : 5.2-0 (15753)
Staged Firmware    : 5.2-0 (15753)
BIOS               : 5.2-0 (15753)
Driver             : 1.1-5 (2456)
Boot Flash         : 5.2-0 (15753)


Command completed successfully.
wks:/usr/StorMan# ./arcconf GETSTATUS 1
Controllers found: 1
   Current operation              : None

Command completed successfully.
wks:/usr/StorMan# ./arcconf GETCONFIG 1
Controllers found: 1
----------------------------------------------------------------------
Controller information
----------------------------------------------------------------------
   Controller Status                        : Optimal
   Channel description                      : SAS/SATA
   Controller Model                         : Adaptec 31205
   Controller Serial Number                 : 7D2210C1707
   Temperature                              : 59 C/ 138 F (Normal)
   Installed memory                         : 256 MB
   Copyback                                 : Enabled
   Background consistency check             : Enabled
   Automatic Failover                       : Enabled
   Global task priority                     : Medium
   Defunct disk drive count                 : 0
   Logical devices/Failed/Degraded          : 1/0/0
   --------------------------------------------------------
   Controller Version Information
   --------------------------------------------------------
   BIOS                                     : 5.2-0 (15753)
   Firmware                                 : 5.2-0 (15753)
   Driver                                   : 1.1-5 (2456)
   Boot Flash                               : 5.2-0 (15753)
   --------------------------------------------------------
   Controller Battery Information
   --------------------------------------------------------
   Status                                   : Optimal
   Over temperature                         : No
   Capacity remaining                       : 98 percent
   Time remaining (at current draw)         : 3 days, 0 hours, 31 minutes

----------------------------------------------------------------------
Logical device information
----------------------------------------------------------------------
Logical device number 0
   Logical device name                      : array0
   RAID level                               : 6 XOR
   Status of logical device                 : Optimal
   Size                                     : 953495 MB
   Stripe-unit size                         : 256 KB
   Read-cache mode                          : Enabled
   Write-cache mode                         : Enabled (write-back)
   Write-cache setting                      : Enabled (write-back) when protected by battery
   Partitioned                              : Yes
   Protected by Hot-Spare                   : Yes
   Dedicated Hot-Spare                      : 0,5
   Bootable                                 : Yes
   Failed stripes                           : No
   --------------------------------------------------------
   Logical device segment information
   --------------------------------------------------------
   Segment 0                                : Present (0,0)             9QG4F3MG
   Segment 1                                : Present (0,1)             9QG405C4
   Segment 2                                : Present (0,2)             9QG41WFC
   Segment 3                                : Present (0,3)             9QG43SS4
   Segment 4                                : Present (0,4)             9QG4393C


----------------------------------------------------------------------
Physical Device information
----------------------------------------------------------------------
      Device #0
         Device is a Hard drive
         State                              : Online
         Supported                          : Yes
         Transfer Speed                     : SATA 1.5 Gb/s
         Reported Channel,Device            : 0,0
         Reported Location                  : Connector 0, Device 0
         Vendor                             : ST340062
         Model                              : 0NS
         Firmware                           : 3.AEG
         Serial number                      : 9QG4F3MG
         Size                               : 381554 MB
         Write Cache                        : Enabled (write-back)
         FRU                                : None
         S.M.A.R.T.                         : No
      Device #1
         Device is a Hard drive
         State                              : Online
         Supported                          : Yes
         Transfer Speed                     : SATA 1.5 Gb/s
         Reported Channel,Device            : 0,1
         Reported Location                  : Connector 0, Device 1
         Vendor                             : ST340062
         Model                              : 0NS
         Firmware                           : 3.AEG
         Serial number                      : 9QG405C4
         Size                               : 381554 MB
         Write Cache                        : Enabled (write-back)
         FRU                                : None
         S.M.A.R.T.                         : No


[skipping a lot of lines...]


      Device #5
         Device is a Hard drive
         State                              : Hot Spare
         Dedicated Spare for                : logical device 0
         Supported                          : Yes
         Transfer Speed                     : SATA 1.5 Gb/s
         Reported Channel,Device            : 0,5
         Reported Location                  : Connector 1, Device 1
         Vendor                             : ST340062
         Model                              : 0NS
         Firmware                           : 3.AEE
         Serial number                      : 5QH04LA1
         Size                               : 381554 MB
         Write Cache                        : Enabled (write-back)
         FRU                                : None
         S.M.A.R.T.                         : No


Command completed successfully.
wks:/usr/StorMan# ./arcconf GETLOGS 1 EVENT tabular
Controllers found: 1

   ControllerLog
      controllerID..................... 0
      type............................. 6
      time............................. 1241695120

      eventlog

         event
            Date............................. 1241695120
            eventType........................ FSA_EM_ENHANCED_BATTERY_CHANGE
            eventCode........................ 0x8000000
            capabilities_bits................ 0
            event_bits....................... 32768
            status_bits...................... 0
            temperature...................... 0
            current.......................... 0
            designCapacity................... 0
            fullCapacity..................... 0
            remainingCapacity................ 0
            DramCurrentDraw.................. 0
            nextReconDate.................... 0
            lastReconDate.................... 0
            tabStatusRegisterBits............ 0
            tabControlRegisterBits........... 0
            rombStatusRegisterBits........... 0
            rombControlRegisterBits.......... 0
            max_temperature.................. 0
            voltage.......................... 4070
            batSubSysColdStartedDays......... 0
            batSubSysColdStartedHours........ 0
            batSubSysColdStartedMinutes...... 0
            batSubSysColdStartedSeconds...... 0
            controllerID..................... 0


[skipping a lot of lines...]


Command completed successfully.
wks:/usr/StorMan#
I think the above is self-explanatory. What is easy to see is that I
have 6 HDD's connected to the controller, setup as RAID 6 whereas one
HDD is used as hot spare.
Obviously, that setup is targeted at preventing data loss rather than
maximal speed — I would have made a RAID 5 without a hot spare HDD if
I would have opted for maximum speed. Anyway, below is a statement
about the current setups speed parameters — firstly the Bash script I
put together
 1  wks:/usr/StorMan# cat /home/sa/0/bash/test_raid_controller_speed.sh
 2  #!/bin/bash
 3  shopt -s extglob
 4
 5  get_kernel_info ()
 6  {
 7    echo -e "Current kernel is: $(uname -a)\n\n"
 8  }
 9  get_release_info ()
10  {
11    echo "Debian release information:"
12    [[ -x /usr/bin/lsb_release ]] && lsb_release -ric || cat /etc/debian_version
13    echo
14  }
15  raid_controller_speed ()
16  {
17    declare -i _counter
18    declare -i _repetions
19    _counter=0
20    _repetions=4
21    _controller_path=/dev/sda
22
23    echo "Pseudo speed test for the Adaptec 31205 with 6 HDDs in RAID 6 setup"
24
25    while [[ $_counter -Lt $_repetions ]]
26    do
27      echo "------------------------------Running test: $_counter..."
28      hdparm -tT $_controller_path
29      _counter+=1
30    done
31  }
32
33  get_release_info
34  get_kernel_info
35  raid_controller_speed
36
37
38  #_ emacs local variables
39  # Local Variables:
40  # mode: shell-script
41  # allout-layout: (0 : 0)
42  # End:
and secondly the results it delivers:
43  wks:/usr/StorMan# /home/sa/0/bash/test_raid_controller_speed.sh
44  Debian release information:
45  Distributor ID: Debian
46  Release:        unstable
47  Codename:       sid
48
49  Current kernel is: Linux wks 2.6.26-2-openvz-amd64 #1 SMP Fri Mar 27 05:10:50 UTC 2009 x86_64 GNU/Linux
50
51
52  Pseudo speed test for the Adaptec 31205 with 6 HDDs in RAID 6 setup
53  ------------------------------Running test: 0...
54
55  /dev/sda:
56   Timing cached reads:   10752 MB in  2.00 seconds = 5381.87 MB/sec
57   Timing buffered disk reads:  380 MB in  3.01 seconds = 126.44 MB/sec
58  ------------------------------Running test: 1...
59
60  /dev/sda:
61   Timing cached reads:   15916 MB in  2.00 seconds = 7967.75 MB/sec
62   Timing buffered disk reads:  408 MB in  3.01 seconds = 135.72 MB/sec
63  ------------------------------Running test: 2...
64
65  /dev/sda:
66   Timing cached reads:   14074 MB in  2.00 seconds = 7044.32 MB/sec
67   Timing buffered disk reads:  464 MB in  3.01 seconds = 154.29 MB/sec
68  ------------------------------Running test: 3...
69
70  /dev/sda:
71   Timing cached reads:   15832 MB in  2.00 seconds = 7925.55 MB/sec
72   Timing buffered disk reads:  490 MB in  3.01 seconds = 162.85 MB/sec
73  wks:/usr/StorMan#
Note that we make four runs (line 20) in order the get a mean of the
results from lines 57, 62, 67 and 72. For more information take a look
at man 8 hdparm.
As I said, those numbers are not really through the roof in terms of
speed but then it is only a series 3 controller (not series 5, which
is the fastest line Adaptec has as of now (May 2009)) and there are
only 6 SATA (Serial ATA) HDDs attached — a setup that is not opted
for maximal speed but rather safety against data loos and cost
effectiveness. A series 5 controller with a high number of SAS (Serial
Attached SCSI) HDDs would make things look very differently — so
differently that in fact it may only be topped by exchanging the SAS
HDDs with SSDs (Solid State Drives).
- A Geek having Fun
-
However, once this is done, the storage is not the systems bottleneck
anymore but probably the CPU — in which case we would have to invest
in a new CPU and motherboard i.e. make the transition from a one
socket CPU setup to at least two sockets — of course, that would
require a bigger case and way better cooling.
-
Afterwards we would need to eliminate our new bottleneck... the
graphic card that is... no problem, we make it a 3-ways SLI setup. At
some point and thousands of euros later we might again find out, that
now, the weakest link is yet again the storage ;-]
-
After several iterations, and tens of thousands euros later we may
have end up building our own datacenter... that is way more fun than
gardening anyway ;-]
ASM (Adaptec Storage Manager)
Usually I tend to choose the CLI over any GUI but in this particular
case it is the GUI that I find is a way better choice to get the job
done. As an example, try to figure the current status of some SAN
(Storage Area Network) with say around 520 HDDs with the ARCCONF and
then with the ASM... With the ASM we can get an overview of very much
and complex information pretty quick plus we can drill down on any
details we are interested in.
-
With the ASM we do not just get a GUI to manage a local system i.e. a
computer with an Adaptec RAID HBA (Host Bus Adapter) build in but a
lot more. The ASM can be used to manage a whole SAN (Storage Area
Network). The ASM also includes an agent, which when installed on some
system, allows us to manage this system remotely with the ASM from
some other host over the network. Therefore the ASM is a GUI to manage
one or more controllers and all their attached storage, may that be
remotely or/and locally attached to the machine running the ASM GUI in
order for some human to carry out tasks on the storage space.
-
The ASM also provides us with fine-grained permission sets in order to
do user management e.g. to only allow senior administrators to carry
out the most risky operations on the storage while junior
administrators might be allowed to set up and configure monitoring
tasks and notifications only.
-
Speaking of, the ASM allows us to set up monitoring for various things
regarding the storage e.g. HDD status and notification (e.g. via
email) if anything happens e.g. a disk failure. We can also use the
built-in task manager to for example schedule tasks to for example run
consistency checks, health checks on hot spare disks, RAID level
migration or for example capacity expansion (scheduled for the nights
when there is the least I/O (Input/Output) on the storage), etc.
I will now explain how to acquire, package into a .deb, install and
finally use the ASM on DebianGNU/Linux with the Adaptec 31205 RAID HBA
(actually it is the same for all controllers of Adaptec's series 3 and
5 controllers plus very akin for other SAS/SATA HBAs made by Adaptec).
Acquiring the latest ASM
Although the ASM is the same for family 3, 5 and other Adaptec
controllers, in the current case we navigate to the download area for
the 31205 and get the URL for the ASM which we then use with wget or
curl in order to download the latest ASM. Since I am on
DebianGNU/Linux 64bit, I am going with Adaptec Storage Manager Ver.
5.30.17509 for 64-bit Linux which is the most current one as of now (October 2008).
 1  sa@wks:/tmp/asm$ ll
 2  total 0
 3  sa@wks:/tmp/asm$ curl -O http://download.adaptec.com/raid/storage_manager/asm_linux_x64_v5_30_17509.rpm
 4    % Total    % Received % Xferd  Average Speed   Time    Time     Time  Current
 5                                   Dload  Upload   Total   Spent    Left  Speed
 6  100 46.8M  100 46.8M    0     0  1711k      0  0:00:28  0:00:28 --:--:-- 1716k
 7  sa@wks:/tmp/asm$ ll
 8  total 47M
 9  -rw-r--r-- 1 sa sa 47M 2008-10-29 14:42 asm_linux_x64_v5_30_17509.rpm
Create a Debian Package and install it
Adaptec distributes the ASM as .rpm only (see line 3) which means we
are going to transform it into a .deb (Debian package) so we are able
to ensure a clean and quick handling once we have a Debian package of
the ASM available i.e. installation and removal is a one-liner on the
CLI plus it scales way better because it may be distributed to
numerous machines over the net as well.
10  sa@wks:/tmp/asm$ mkdir asm_linux_x64_v5_30_17509
11  sa@wks:/tmp/asm$ mv asm_linux_x64_v5_30_17509.rpm asm_linux_x64_v5_30_17509/
12  sa@wks:/tmp/asm$ cd asm_linux_x64_v5_30_17509/
13  sa@wks:/tmp/asm/asm_linux_x64_v5_30_17509$ su
14  Password:
15  wks:/tmp/asm/asm_linux_x64_v5_30_17509# alien --scripts asm_linux_x64_v5_30_17509.rpm
16  storman_5.30-17510_amd64.deb generated
17  wks:/tmp/asm/asm_linux_x64_v5_30_17509# ls -la
18  total 95844
19  drwxr-xr-x 2 sa   sa         77 2008-10-29 15:00 .
20  drwxr-xr-x 3 sa   sa         38 2008-10-29 14:56 ..
21  -rw-r--r-- 1 sa   sa   49084641 2008-10-29 14:42 asm_linux_x64_v5_30_17509.rpm
22  -rw-r--r-- 1 root root 49053838 2008-10-29 15:00 storman_5.30-17510_amd64.deb
Lines 10 to 14 are self-explaining. In line 15 we make use of alien
which is designed to make the transformation from .rpm's into .deb's.
What is exactly happening in line 15 is that we are also converting
the scripts which handle the installation and removal of a package
from RedHat's format into Debian's format. That works but we have to
adjust a little bit manually because the Debian package that was just
created (line 22) contains some paths in its pre- and post-install
scripts that do not exist on a Debian-based system, therefore they
must be removed.
23  wks:/tmp/asm/asm_linux_x64_v5_30_17509# mkdir -p storman_5.30-17510_amd64/{debian,DEBIAN}
24  wks:/tmp/asm/asm_linux_x64_v5_30_17509# ls -lR storman_5.30-17510_amd64/
25  storman_5.30-17510_amd64/:
26  total 0
27  drwxr-xr-x 2 root root 6 2008-10-29 15:31 debian
28  drwxr-xr-x 2 root root 6 2008-10-29 15:31 DEBIAN
29
30  storman_5.30-17510_amd64/debian:
31  total 0
32
33  storman_5.30-17510_amd64/DEBIAN:
34  total 0
35  wks:/tmp/asm/asm_linux_x64_v5_30_17509# dpkg --extract storman_5.30-17510_amd64.deb storman_5.30-17510_amd64/
36  wks:/tmp/asm/asm_linux_x64_v5_30_17509# dpkg --control storman_5.30-17510_amd64.deb storman_5.30-17510_amd64/DEBIAN/
Now, in order to carry out our manual changes to the just created
Debian package from line 22, we are going to create a few new
directories as can be seen in line 23. Then we extract the Debian
package into those directories (line 35) and also explicitly extract
the control file of it as can be seen in line 36. Above I mentioned
that we need to alter the post-install and post-removal respectively.
So we visit those files with some editor (I used dired as can be seen
below) and change the stuff that needs to be changed i.e. in postin we
remove/uncomment chkconfig --add stor_agent and in postrm we
remove/uncomment chkconfig --del stor_agent.
37  wks:/tmp/asm/asm_linux_x64_v5_30_17509# rm storman_5.30-17510_amd64.deb
38  wks:/tmp/asm/asm_linux_x64_v5_30_17509# dpkg --build storman_5.30-17510_amd64/ storman_5.30-17510_amd64.deb
39  dpkg-deb: building package `storman' in `storman_5.30-17510_amd64.deb'.
40  wks:/tmp/asm/asm_linux_x64_v5_30_17509# ls -la
41  total 95844
42  drwxr-xr-x 3 sa   sa        108 2008-10-29 15:49 .
43  drwxr-xr-x 3 sa   sa         38 2008-10-29 14:56 ..
44  -rw-r--r-- 1 sa   sa   49084641 2008-10-29 14:42 asm_linux_x64_v5_30_17509.rpm
45  drwxr-xr-x 5 root root       42 2008-10-29 15:00 storman_5.30-17510_amd64
46  -rw-r--r-- 1 root root 49054140 2008-10-29 15:49 storman_5.30-17510_amd64.deb
In line 37 we remove the old .deb and then rebuild it from our just
adapted version in line 38. We are done i.e. the package from line 46
can now be installed on our system with dpkg --install
storman_5.30-17510_amd64.deb in a clean and quick manner. Of course we
might also redistribute it for installation on other Debian boxes as
well. In order to check if all went well, we can take a look
47  wks:/tmp/asm/asm_linux_x64_v5_30_17509# exit
48  exit
49  sa@wks:/tmp/asm/asm_linux_x64_v5_30_17509$ cd
50  sa@wks:~$ type dpl
51  dpl is aliased to `dpkg -l'
52  sa@wks:~$ dpl stor* | grep ^ii
53  ii  storman                                    5.30-17510                 Adaptec Storage Manager
54  sa@wks:~$ dpkg-query -s storman
55  Package: storman
56  Status: install ok installed
57  Priority: extra
58  Section: alien
59  Installed-Size: 59424
60  Maintainer: markus.gattol <sa@wks>
61  Architecture: amd64
62  Version: 5.30-17510
63  Depends: libc6 (>= 2.7-1), libgcc1 (>= 1:4.1.1), libstdc++5 (>= 1:3.3.4-1), libx11-6, libxext6
64  Description: Adaptec Storage Manager
65   Adaptec Storage Manager
66   .
67   (Converted from a rpm package by alien version 8.72.)
68  sa@wks:~$
and to no surprise it did went well as we can see from line 52 and
lines 55 to 67.
Start the ASM
After the installation of the ASM is complete we can start it. Before
we can do so however, since the ASM is a Java based Application, we
might need to edit the ASM launcher script.
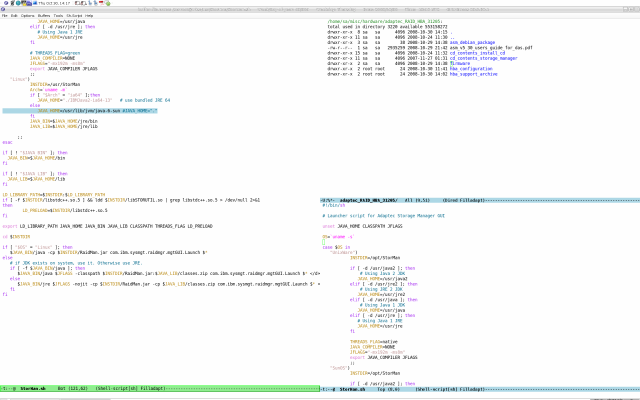
As can be seen, the changes I made to /usr/StorMan/StorMan.sh are
highlighted in the image above. What I did was simply to tell the
launcher script where to find my local Java installation i.e. I
altered JAVA_HOME="." into
JAVA_HOME=/usr/lib/jvm/java-6-sun. Then another quick
shell alias, put into /root/.bashrc, and we are ready to launch as can
be seen below.
wks:/home/sa# alias | grep asm
alias asm='sh /usr/StorMan/StorMan.sh >& /dev/null &'
wks:/home/sa# source /root/.bashrc
wks:/home/sa# asm
[1] 7075
wks:/home/sa#
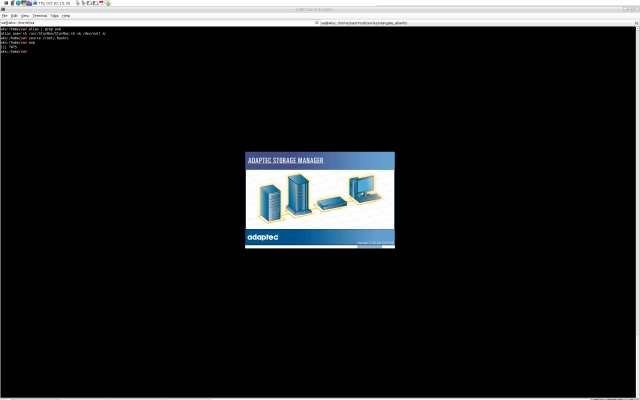
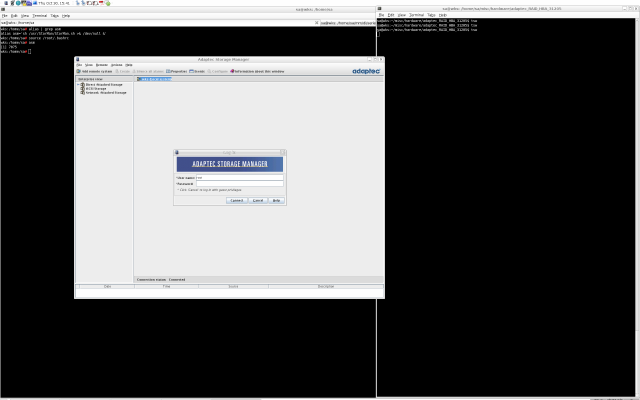
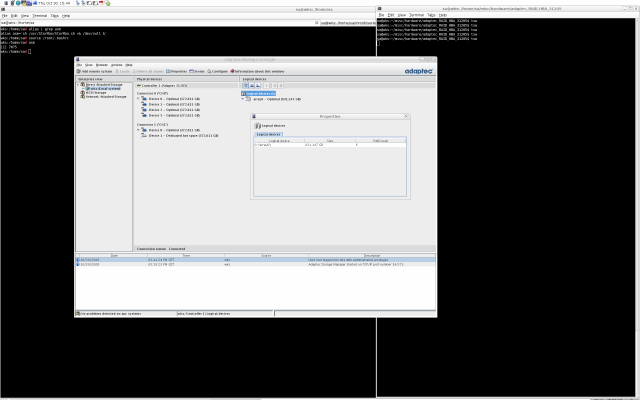
After issuing our alias asm, the ASM starts (left image) then we have
to provide some user credentials (remember what I told about
fine-grained permissions and thus user management above). Since I log
in as root on my local system (currently being my workstation), I use
my root password (middle image) and then I end up on the ASM instance
installed on my workstation with currently 6 HDDs installed locally
and no other storage attached remotely. What that means is that my
workstation is not part of any storage space (also known as SAN
(Storage Area Network)) which is typically constructed of two or more
boxes with Adaptec RAID HBA's installed, each running either the ASM
or the ASMA (Adaptec Storage Manager Agent). It is just my workstation
with the 31205 installed running the ASM.
Use the ASM
Adaptec provides a great guide to the ASM which can be downloaded
here.
Remove the ASM
In case we want to upgrade to a new version of the ASM with an earlier
version already installed, we need to remove the old one first. dpkg
--remove storman_5.30-17510_amd64 does the trick. After we removed it,
we build, install and configure the new version as shown above.
ASMA (Adaptec Storage Manager Agent)
When ASM is installed on a system, the ASMA is also installed
automatically. The ASMA is like a service that keeps our storage space
running. It is designed to run in the background, without user
intervention, and its job is to monitor and manage system health,
event notifications, tasks schedules, and other on-going processes on
that system. It sends notices when tasks are completed successfully,
and sounds an alarm when errors or failures occur on that system. In
short, the ASMA can be thought of being identical to the ASM except
for not including any sort of software that provides us with some GUI
(Graphical User Interface).
The ASMA uses less memory than the full application (ASM). If our
storage space includes systems that will not be connected to display
devices, we can choose to run the ASMA only on those systems instead
of the full application. We may want to do this if system resources
are limited, or simply if we want more system resources available for
other tasks.
-
In a real-world scenario where we would have for example 3 computers,
two of which are servers with no display device attached and one being
a workstation with an attached display device, the two servers would
be running the ASMA and only the workstation would be running the ASM
(which includes the ASMA as we know).
-
From our local system (workstation) we could then use the ASM to not
just manage the local storage within the workstation but also the
remote storage within our two servers. This scenario is a SAN (Storage
Area Network) already i.e. a decentralized storage space with means of
arbitrary management opportunities across the whole storage space from
any of its attached systems.
Installing the ASMA
Nothing to do here — the ASMA is part of the ASM so if we did as
pointed out above, the ASMA is installed already. The only thing left
for us to do is to configure the ASMA.
Configure the ASMA
This depends whether or not we want the ASMA running in background
continuously or not. For setups that involve more than one machine,
all need to either run the ASM or ASMA. Usually the machine used to
manage a storage space has the ASM running. All machines not used to
manage the storage space will have the ASMA running as a daemon
process.
It is also important to mention that we may use several instances of
the ASM to manage the storage space if we do a little synchronization.
Also, a machine used to manage the storage space must not necessarily
have an Adaptec RAID HBA installed and some storage attached to it. It
only needs to have the ASM installed i.e. we might for example use a
subnotebook to manage a storage space of dozens of servers.
What we actually need to accomplish is that the ASMA is started at
boot time and stopped when the system is shutdown. Above we have
altered /usr/StorMan/StorMan.sh, the ASM launcher script. Now we need
to alter /usr/StorMan/StorAgnt.sh (the ASMA launcher script) plus we
need to put /usr/StorMan/stor_agent (the System-V style init script
for the ASMA) into /usr/init.d/ and also modify it. The image below
shows that in fact, the changes made to /usr/StorMan/StorAgnt.sh are
the same as we already made them to /usr/StorMan/StorMan.sh above.
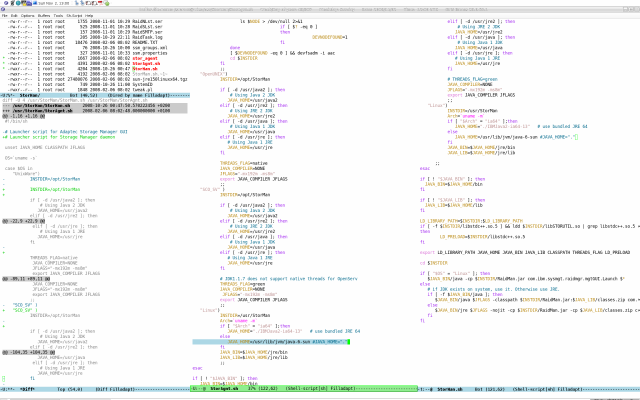
After we set JAVA_HOME to the correct path (which, in my case happens
to be /usr/lib/jvm/java-6-sun) we can now ensure that the ASMA is
started at system boot respectively stopped at system shutdown.
sa@wks:~$ su
Password:
wks:/usr/StorMan# cp stor_agent{,_orig}
wks:/usr/StorMan# chmod 755 stor_agent
wks:/usr/StorMan# mv stor_agent /etc/init.d/
wks:/usr/StorMan# ls -l | grep agent
-rw-r--r-- 1 root root     1667 2008-11-02 17:52 stor_agent_orig
wks:/usr/StorMan#
As can be seen, I created a copy of the System-V style init script for
the ASMA (stor_agent) to work on, made it executable and moved it to
/etc/init.d. Next I modified stor_agent to comply with Debian
guidelines i.e. I for example adapted the runlevel settings. I also
set the PATH variable plus I altered the overall code to be a bit more
... well... professional. The result can be seen below — once as
images and once the screendumps for easy copy and paste ;-]


sa@wks:~$ cat /usr/StorMan/stor_agent_orig /etc/init.d/stor_agent
#!/bin/bash
#chkconfig: 35 99 99
# description: stor_agent
# MPD, 11/9/2003'
### BEGIN INIT INFO' # Provides: stor_agent
# Required-Start:   $local_fs $network
# X-UnitedLinux-Should-Start:
# Required-Stop:    $local_fs $network
# X-UnitedLinux-Should-Stop:'
# Default-Start:    3 5
# Default-Stop:     0 1 2 6
# Short-Description: Storage Management Agent
# Description:      Storage Management Agent
### END INIT INFO'

PATH=$PATH:/usr/StorMan/jre/bin
export PATH

start() {
  echo "starting Adaptec Storage Manager agent..."
  kill `ps axwww | grep java | grep StorMan | grep ManagementAgent | cut -b0-6` 1>/dev/null 2>&1
  sleep 2
  kill -9 `ps axwww | grep java | grep StorMan | grep ManagementAgent | cut -b0-6` 1>/dev/null 2>&1
  sh /usr/StorMan/StorAgnt.sh >/dev/null 2>&1 &
  sleep 1
  echo
}


stop() {
  echo "stopping Adaptec Storage Manager agent..."
  kill `ps axwww | grep java | grep StorMan | grep ManagementAgent | cut -b0-6` 1>/dev/null 2>&1
  sleep 2
  kill -9 `ps axwww | grep java | grep StorMan | grep ManagementAgent | cut -b0-6` 1>/dev/null 2>&1
  sleep 1
  echo
}

case "$1" in
  start)
      start
  ;;
  stop)
      stop
  ;;
  restart|reload)
      stop
      start
  ;;
  *)
      echo $"Usage: $0 {start|stop|restart}"
      exit 1
  esac
exit 0


#!/bin/sh -e
### BEGIN INIT INFO'
# Provides:                      stor_agent
# Required-Start:                $local_fs $network
# X-UnitedLinux-Should-Start:
# Required-Stop:                 $local_fs $network
# X-UnitedLinux-Should-Stop:'
# Default-Start:                 2 3 4 5
# Default-Stop:                  0 1 6
# Short-Description:             ASMA (Adaptec Storage Manager Agent)
# Description:                   System-V style init script for Adaptect ASMA in order to
#                                manage storage space build of several RAID controllers
### END INIT INFO'

JAVA_HOME=/usr/lib/jvm/java-6-sun
JAVA_BIN=$JAVA_HOME/jre/bin
PATH=$PATH:$JAVA_BIN
export PATH

start() {
  echo "starting ASMA (Adaptec Storage Manager Agent)..."
  pkill -u root -f /usr/StorMan/RaidMan.jar >/dev/null 2>&1 &
  sleep 1
  pkill -9 -u root -f /usr/StorMan/RaidMan.jar >/dev/null 2>&1 &
  sh /usr/StorMan/StorAgnt.sh >/dev/null 2>&1 &
  sleep 1
  renice -1 $(pgrep -u root -f /usr/StorMan/RaidMan.jar) >/dev/null 2>&1 &
  echo
}


stop() {
  echo "stopping ASMA (Adaptec Storage Manager Agent)..."
  pkill -u root -f /usr/StorMan/RaidMan.jar >/dev/null 2>&1 &
  sleep 1
  pkill -9 -u root -f /usr/StorMan/RaidMan.jar >/dev/null 2>&1 &
  echo
}

case "$1" in
  start)
      start
  ;;
  stop)
      stop
  ;;
  restart|reload)
      stop
      start
  ;;
  *)
      echo $"Usage: $0 {start|stop|restart|reload}"
      exit 1
  esac
exit 0
sa@wks:~$
Finally we have to make sure that all the default System-V style init
script links are set for /etc/init.d/stor_agent. We do this by issuing
the command update-rc.d stor_agent defaults which will make links to
start the ASMA in runlevels 2, 3, 4, 5 and to stop the service in
runlevels 0, 1, 6. By default all the links will have the sequence
number 20 which is just fine for us.
Firmware
Adaptec constantly improves the firmware for its controllers, allowing
us to update our controller's firmware. This can be done in two ways.
The first one would be to use the AFU (Adaptec Flash Utility) which
means we would fiddle around with some DOS command line. No thanks but
thanks! The second way is to use the ASM (Adaptec Storage Manager) and
therefore a fool-proof way to do it. All we have to do is to download
the firmware for our controller do some trivial modification to it and
then use the ASM to flash the controller's NVRAM (non-volatile Random
Access Memory) with our new firmware.
 1  sa@wks:~$ cd /tmp/
 2  sa@wks:/tmp$ mkdir adaptec_31205_firmware
 3  sa@wks:/tmp$ cd adaptec_31205_firmware/
 4  sa@wks:/tmp/adaptec_31205_firmware$ ll
 5  total 0
 6  sa@wks:/tmp/adaptec_31205_firmware$ curl -O http://download.adaptec.com/raid/asr/fw_bios/31205_fw_b15753.exe
 7    % Total    % Received % Xferd  Average Speed   Time    Time     Time  Current
 8                                   Dload  Upload   Total   Spent    Left  Speed
 9  100 1603k  100 1603k    0     0   184k      0  0:00:08  0:00:08 --:--:--  213k
10  sa@wks:/tmp/adaptec_31205_firmware$ ll
11  total 1.6M
12  -rw-r--r-- 1 sa sa 1.6M 2008-10-30 20:48 31205_fw_b15753.exe
13  sa@wks:/tmp/adaptec_31205_firmware$ mv 31205_fw_b15753.exe 31205_fw_b15753.zip
14  sa@wks:/tmp/adaptec_31205_firmware$ unzip 31205_fw_b15753.zip
15  Archive:  31205_fw_b15753.zip
16    inflating: A3120501.ufi
17    inflating: A3120502.ufi
18    inflating: A3120503.ufi
19    inflating: A3120504.ufi
20    inflating: acusas.exe
21    inflating: afu.exe
22    inflating: Relnotes.txt
23  sa@wks:/tmp/adaptec_31205_firmware$ ll
24  total 6.1M
25  -rw-r--r-- 1 sa sa 1.6M 2008-10-30 20:48 31205_fw_b15753.zip
26  -rw-r--r-- 1 sa sa 629K 2008-09-07 01:45 A3120501.ufi
27  -rw-r--r-- 1 sa sa 1.4M 2008-09-07 01:45 A3120502.ufi
28  -rw-r--r-- 1 sa sa 1.4M 2008-09-07 01:45 A3120503.ufi
29  -rw-r--r-- 1 sa sa 629K 2008-09-07 01:45 A3120504.ufi
30  -rw-r--r-- 1 sa sa 256K 2008-09-07 07:57 acusas.exe
31  -rw-r--r-- 1 sa sa 196K 2008-09-07 07:57 afu.exe
32  -rw-r--r-- 1 sa sa 3.8K 2008-10-01 18:13 Relnotes.txt
33  sa@wks:/tmp/adaptec_31205_firmware$
The tricky thing here is that as we see from line 6 for example, that
Adaptec seems to only distribute the firmware as a .exe. Well, I got
no Windows around to somehow extract the contained .ufi files which
are the firmware. So what do we do?
No problem. All we need to know is this little trick from line 13 and
14 i.e. we rename the .exe into a .zip, unpack it and go to our ASM
where we pick up the files in lines 26 to 29, wait for a few minutes
while the ASM flashes the new firmware onto the controller and be
done. Please note that it is important NOT to interrupt the firmware
installation because that might render the controller unusable.
Below are three images which show, in chronological order, how to use
the ASM to install the new firmware onto the Adaptec RAID HBA (Host
Bus Adapter) card. If we compare the BIOS version number from the
third image below (which was taken after flashing the new firmware
onto the controller) with the one shown in lines 6 etc. we can see
that it worked. Afterwards we can see that the current firmware images
are kept in /usr/StorMan/images/<some_id> by the ASM itself as well.
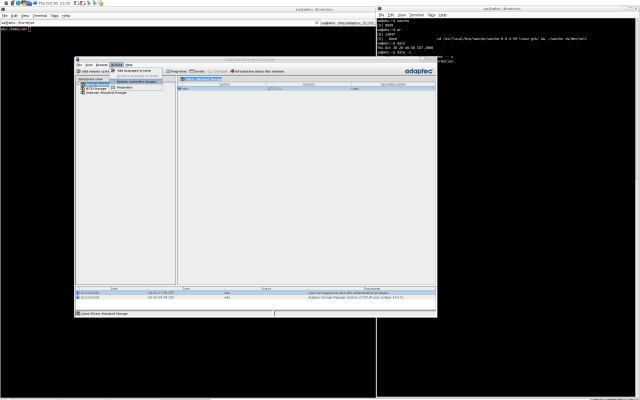
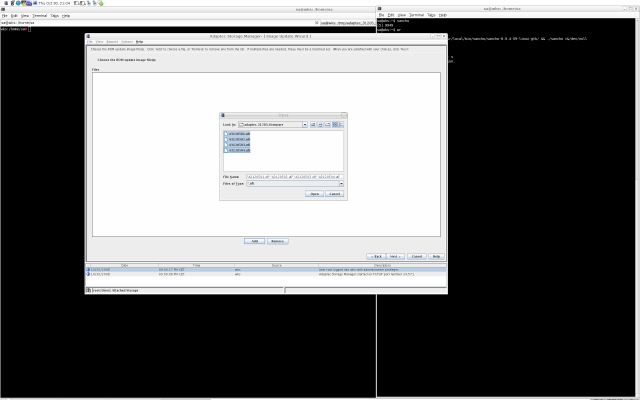
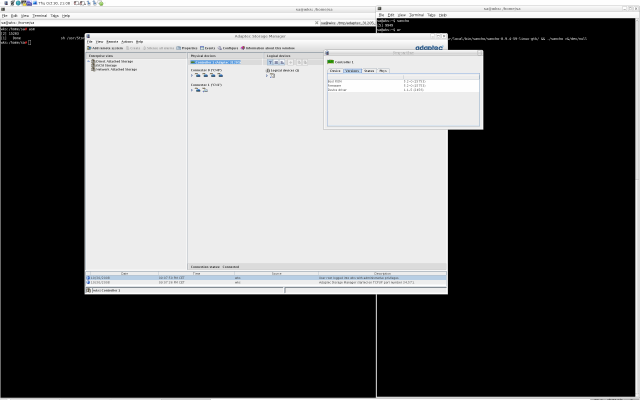
BBU (Battery Backup Unit)
I also installed a BBU onto my 31205 so I can enable the write cache
without being concerned of any potential data loos in the event of some
power outage.
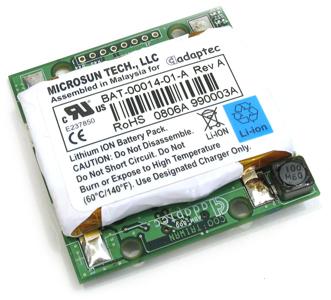
Drive Failure
This subsubsection shows how a drive fails which means the array gets
degraded. After replacing the failed drive, the rebuild starts.
Degraded Array
Update, 2009-06-01, Degraded Array: Loooooooooooud beeeeeEEEEEEP
coming from the RAID HBA... what just happened?... HDD vs. Reaper
... guess who was the last one standing... Let me show you how it
looks like when a HDD goes over the cliff ;-]
And yes, meanwhile I exchanged the 31205 with the 51245 (the metadata
is stored within the array so we can just switch the controller and it
will recognize the existing array, import it and all operations
continue as if nothing happened) and online migrated to RAID 5
without hot-spare (which is dangerous but then I had my temporary
reasons).
Anyway, I just ordered new HDDs and will make it a RAID 6 plus
hot-spare again once they arrive. Right now I am a bit nervous... if
another HDD fails right now (array is in degraded state) it is
happy-backup-time all over the place... totally, from scratch ;-]
Rebuild
Update, 2009-06-02, The Rebuild: The new HDDs arrived, I exchanged the
failed one with a new one and the rebuild starts immediately as can be
seen:
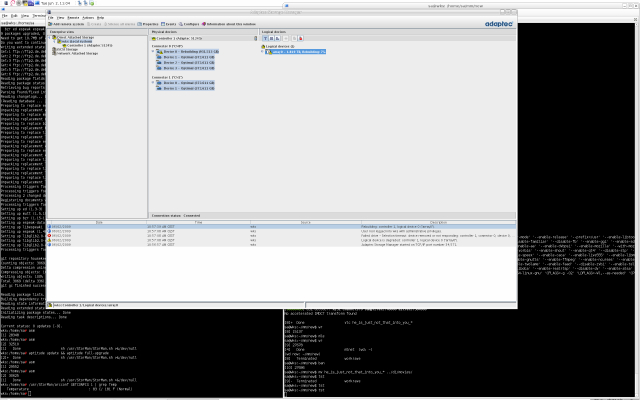
Of course, I did not even have to reboot while this whole drama
happened, the OS did not even recognize it...
wks:/home/sa# date; uptime
Tue Jun  2 11:33:54 CEST 2009
 11:33:54 up 3 days,  4:47,  8 users,  load average: 0.10, 0.09, 0.06
wks:/home/sa#
Optimal Array State
Update, 2009-06-02, Optimal Array: The array rebuild just finished. It
took around 100 minutes. Now I have a fully working RAID 5 array again
as can be seen:
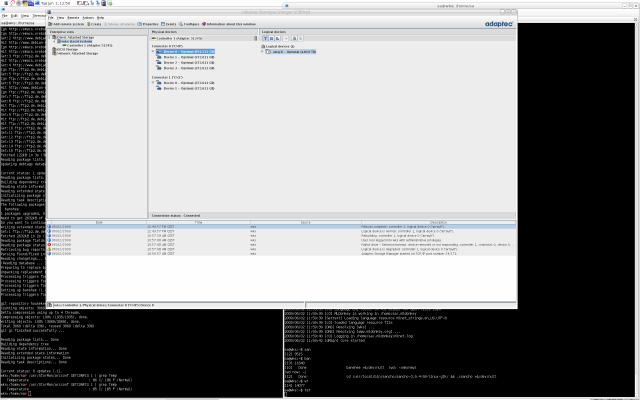
Next thing on my todo list is to add a few more HDDs, switch back to
RAID 6 again and also add a dedicated hot-spare again. However, that
task is not super-urgent anymore because the array is fine now i.e.
not in degraded state anymore which means I will probably postpone the
task of creating the RAID 6 and adding the hot-spare for 3 days or so.
I am simply to busy right now...
Disposing the HDD
So what do I do with the failed HDD? The fact it failed does not mean
it could not be a huge security breach followed by a public relations
disaster — the HDD platters are still intact, it is only the
read-and-write head that died. Intact platters means intact data which
means with the right skills and equipment, the data could be
retrieved.
The UK government for example is notorious for such security breaches
like for example when they loose data (medical records, social
security number, address, bank account numbers, etc.) of tens of
thousands of it citizens every now and then. Modern-age IT criminals
find that very good of course...
-
I could go on with crazy stories here that I got to know myself (99%
of which the public never came to know and we were not allowed to tell
because of our NDA contracts) but let me cut it short... I have never
seen a governmental agency, medical complex, company or any other
entity dealing with sensitive data that we could not penetrate or get
data from while we where paid to run penetration tests against their
whole setups. Most of the time it takes us less than a week to open
them up like a can of beans... at which point we stop, for others,
that is just the beginning ^^
Back to our current problem, disposing of the failed HDD. The only
thing we can be sure nothing sensitive or secret leaks out or falls
into wrong hands is if we are using block-layer encryption, which is what
I do and thus I can dispose of the failed HDD without any concerns.
Growing the Storage
Once in a while we might want/need to grow the storage i.e. grow the
array and all layers (e.g. partition, LVM, dm-crypt, etc.) on top of
it. In case we have the 31205 (or any other series 3 or 5 controller)
running, then growing the storage works like this:
- Using the either ASM (Adaptec Storage Manager) or ARCCONF, we grow
the RAID array by either adding HDDs, online migrating from one
RAID level to another (e.g. RAID 6 to RAID 5), replace the existing
HDDs with bigger ones, integrate a hot-spare into the array, etc.
- Reboot
- Use
fdisk or a similar utility to grow the partition provided by
the array e.g. sda2. We do so by deleting it and creating it anew
with the same starting point in block size and the now elevated
upper barrier also in block size (use u with fdisk to switch from
cylinders to block units0, we check and finally safe the partition
table — with fdisk this is pretty much only hitting u, p and RET
to go with the automatically computed values that fdisk provides us
with... piece of cake...
- Reboot (actually this reboot is optional; sometimes
fdisk and
friends give us a warning (no error!) that syncing the partition
table might not work properly)
- In case we setup our system the Debian way, the next layer on top
the partition is the dm-crypt/LUKS layer. However, if we move the
partition table as we did during the former step, then there is no
need to explicitly call
cryptsetup resize <name_of_logical_block_device> again since
growing the partition with
fdisk also grows the dm-crypt container
because the metadata for dm-crypt container is at the beginning of
the underlying partition and we only elevate the upper boundary.
- Next we grow LVM (Logical Volume Manager) layer by
- growing the PV (Physical Volume) inside the dm-crypt container
using
pvresize /dev/dm-0 whereas /dev/dm-0 might differ from setup
to setup (go here for a more verbose example)
- grow LV (Logical Volume) e.g.
vg0-root in /dev/vg0/root using
lvresize -l +100%FREE vg0/root
- Finally, the top layer, the filesystem — we grow the filesystem
using
xfs_growfs / in case we are using XFS for example — this
step/syntax is pretty much the same for any filesystem that can be
grown/shrunk.
Workstation / Notebook / Gadgets
This section is about computing equipment I use to get things done
like for example write/manage this website/platform, do what I do,
be what I am, have fun, experience excitement stay in contact with
family/friends all over the globe, write a weblog, organize my life
and finally to get filthy rich ;-]...
Money can't buy happiness, but neither can poverty.
— Leo Rosten (1908 - )
I have ways of making money that you know nothing of.
— John D. Rockefeller
Money isn't everything — but it's a long way ahead of what comes next.
— Sir Edmond Stockdale
Most importantly, I use this gear to gain more and more skills,
knowledge and competence which ultimately gives self-determination,
liberty and autonomy.
Lack of money is no obstacle. Lack of an idea is an obstacle.
— Ken Hakuta
Every great advance in natural knowledge has involved the absolute
rejection of authority.
— Thomas H. Huxley (1825 - 1895)
All men by nature desire knowledge.
— Aristotle (384 BC - 322 BC)
In particular it is about my workstation, subnotebook and some gadgets
I use in order to create/modify multimedia contents, write software (a
wonderful art), administer computers all over the globe, etc. This
sections is NOT about gear provided by someone else i.e. I had
notebooks/computers/gadgets provided by the companies I worked at/with
but then those are mostly so-called business notebooks/desktops/gear
which tend to suck out of the box — even more so if they come with
Windows and all the other preinstalled crap... Only a few companies I
worked at so far already figured that, letting people decide on their
own, really makes happy and thus productive employees...
Workstation
I had a desktop replacement (fat notebook that is) which I used for
the last 8 years. It died in summer 2008. At around the same time,
some company had problems, contacted me and after around three hours
of remote work via SSH (Secure Shell) they where happy which in turn
made me happy... got this bundle in return.
     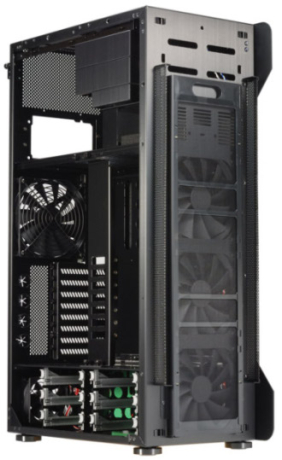 
Pre-Current-Workstation Live
Why do people own things they do not actually need? No idea, but now I
am one of those nutters. Why? Well, because the last 8 years I had one
notebook — some dirty-old piece of trash which I pretty much used
24/7, which I threw down a few times, dropped cake onto, cat slept on,
cat used its claws on, cat jumped around at (muddy paws included), cat
spit onto, I flooded with water/tea/wine/whiskey/coffee... the usual
...
What happened?
As I said, my old desktop replacement somehow made it into its 8th
year before a few capacitors went off in smoke and darting flames plus
the screen went from disco stroboscope light to moving-light-ball to
black... not sure who triggered that, me or my tomcat — at this
moment however, the notebook scared the shit out of me and my tomcat
... bitch-ass-notebook! It served me well but now it is gone. The
replacement is a 30" screen, a desktop box (some crazy overclocked
thingy) and two high-end products from Logitec which I got in return
for some rescue mission...
Short Specs
- Screeen: SyncMaster 305Tplus / 30" / 16:10 / 2560x1600 native screen
resolution
- Mouse: Logitec MX Revolution
- Keyboard: diNovo Edge / US Layout
- I recommend removing the
bluez package so it does not block the
bluetooth synchronization
- Desktop:
- Casing: Lian Li TYR PC-X2000
- Cooling: Zalman Reserator 1 v2 (aside from the built-in fans with
the casing)
- Motherboard: ABIT IX38 QuadGT
- RAM: 8 GB RAM (Random Access Memory) / 800 MHz / DDR-2
- CPU: Intel Core2 Quad Yorkfield Q9550 4x3600 MHz (overclocked)
- Graphics: nVidia GeForce GTX 280 PCI-Express x16 2.0 / 1024 MB
DDR-3 / TV-out / dual-DVI
- RAID: same RAID HBA (Host Bus Adapter) as I have in one of my
servers.
- HDD:
- 6x400 GB HDDs in RAID6 setup (actually 5 and 1 hot spare) / SATA2
/ Seagate Enterprise Edition / 16 MB cache / 7200 rpm
- PSU: LC-Power Arkangel / 850 watts peak performance (750 watts for
continuous operations)
- DVD/CD: LG H22LP20 LightScribe (I do not need that stuff but then
the bundle come with it...)
- OS: DebianGNU/Linux
Price: Around 5600 USD for the whole bundle if I had to pay which I
did not. Actually, I helped some company with some serious problem
they were facing and got this bundle in return. Not bad for ~3 hours
of work ;-]
Knowledge is power.
— Sir Francis Bacon (1561 - 1626)
Images, Screen{shots,dumps} etc.
WRITEME
Benchmarks respectively an Inside
This subsection shows some benchmarks and insides on my workstation.
Mainboard
wks:/home/sa# dmidecode --type baseboard
# dmidecode 2.9
SMBIOS 2.5 present.

Handle 0x0002, DMI type 2, 10 bytes
Base Board Information
        Manufacturer: http://www.abit.com.tw/
        Product Name: IX38 QuadGT (Intel X38-ICH9R)
        Version: 1.0
        Serial Number:

wks:/home/sa#
CPU
Intel Core2 Quad Yorkfield Q9550. Overclocked, as mentioned
wks:/home/sa# dmidecode --type 4
# dmidecode 2.9
SMBIOS 2.5 present.

Handle 0x0004, DMI type 4, 40 bytes
Processor Information
        Socket Designation: Socket 775
        Type: Central Processor
        Family: Other
        Manufacturer: Intel
        ID: 77 06 01 00 FF FB EB BF
        Version: Intel(R) Core(TM)2 Quad
        Voltage: 0.0 V
        External Clock: 423 MHz
        Max Speed: 4000 MHz
        Current Speed: 3596 MHz
        Status: Populated, Enabled
        Upgrade: ZIF Socket
        L1 Cache Handle: 0x000A
        L2 Cache Handle: 0x000B
        L3 Cache Handle: Not Provided
        Serial Number:
        Asset Tag:
        Part Number:
        Characteristics: None

wks:/home/sa#
Graphics
sa@wks:~$ glxgears -info
GL_RENDERER   = GeForce GTX 280/PCI/SSE2
GL_VERSION    = 2.1.2 NVIDIA 177.80
GL_VENDOR     = NVIDIA Corporation
GL_EXTENSIONS = GL_ARB_color_buffer_float [skipping a lot of stuff...]  GL_SGIX_depth_texture GL_SGIX_shadow GL_SUN_slice_accum
74887 frames in 5.0 seconds = 14977.397 FPS
66753 frames in 5.0 seconds = 13350.573 FPS
73297 frames in 5.0 seconds = 14645.445 FPS
74972 frames in 5.0 seconds = 14989.846 FPS
^C
sa@wks:~$
Disk Usage
The 10 biggest directories on my workstation are
sa@wks:~$ du -mS * | sort -nr | head
36726   mm/di/series/lost
32189   mm/di/series/house
24234   mm/di/series/battlestar_galactica
23675   mm/di/series/prison_break
22583   mm/di/series/the_l_word
22567   mm/di/series/veronica_mars
19910   mm/di/series/heroes
17872   mm/di/series/my_name_is_earl
12795   mm/di/series/dexter
12782   mm/di/series/weeds
sa@wks:~$
Using gnuplot to visualize it, that is
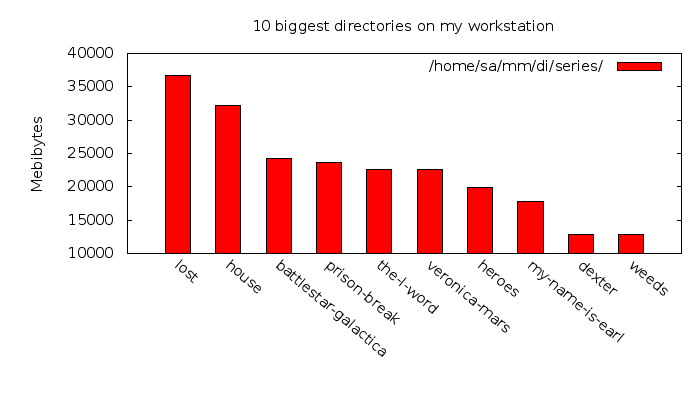
what it looks like. So now I know where to fire the rm -r gun should I
ever run out of diskspace ;-]... Na, just kidding. Should I ever run
out of storage space, then I am going to grow my storage as mentioned
above i.e. either by replacing the 400 GB HDDs with bigger ones or
adding more HDDs — currently I got still 6 more HDDs to go on the
31205 because as of now (November 2008) I have only 6 in place where
there could be 12. However, no need to be worried as can be seen
sa@wks:~$ di -h
Filesystem         Mount               Size     Used    Avail %Used fs Type
/dev/mapper/vg0-ro /                 886.1G   398.5G   487.5G  45%  xfs
/dev/sda1          /boot             227.9M    36.4M   179.4M  21%  ext2
udev               /dev               10.0M    96.0k     9.9M   1%  tmpfs
tmpfs              /dev/shm            3.9G       0      3.9G   0%  tmpfs
tmpfs              /lib/init/rw        3.9G       0      3.9G   0%  tmpfs
sa@wks:~$
Subnotebook
WRITEME
Will happen during fall 2010, probably the Dell Adamo Onyx
Audio
This section is about my equipment with regards to audio i.e.
equipment used to play and record audio.
IPod
I had an iPod but stopped using it. Actually I pretty much stopped
using portable music players at all. That might change in the future.
In those rare occasions where I desire to use portable music players,
I now go with my Miniket Photo (see below).
Wireless Headset
I got myself the Sennheiser RS 140 which I use to listen to music,
watch movies, news... actually, all sorts of audiocasts and videocasts. I do this either on my subnotebook and/or workstation
depending on my mood, type of media and current situation — I also
got an audio switch to switch among the headphone and the audio high
fidelity set...

Headphones Specs:
- Transducer Principle: Dynamic, closed
- Frequency Response: 18-21000Hz
- Weight without cable: 280g
- Characteristic Spl: at 1 kHz 110 dB
- Ear Coupling: Circumaural
- Distortion: < 0.5%
- Power Supply: 2.4 V – 3 V via 2 AAA size NiMH batteries (LR 03)
- Operating Time: headphone batteries last for approximately 23 hours
Receiver:
- Modulation: FM stereo
- Carrier Frequency: 864 MHz
- Operating Time: 23 hours
Transmitter:
- Modulation: FM stereo
- Carrier Frequency: 864 MHz or 927 MHz
- Signal To Noise Ratio: > 68 dBA
- Broadcast Distance: up to 150 m (RS 140 864 MHz)
- Jack plug: 3,5mm / 6,3 mm stereo (864 MHz), cinch (927 MHz)
Images / Videos
This subsection is part of my photography page.
Boys and their Toys
This is about some of my toys (hardware I own) in order to... well,
do what handicraft enthusiasts, folks curious about technology /
science / nature need to do. Human senses are neat but not enough — I
need to know more about my environment. For example, one might check
if sound emissions in his office are healthy or not. This is fun!
Scares the heck outta employers ;-]
Or you might be interested if the values reported by some hardware
monitoring software (e.g. some server IPMI system) are correct. For
example you might check HDDs (Hard Disk Drives) temperatures with an
digital infrared thermometer and then compare the values to what some
software reports to you — surprise surprise...
Digital Laser Rangefinder
WRITEME
Digital Infrared Thermometer
Sound Level Meter
Digital Multimeter
Clamp Meter
Charge Manager Station
Maintenance/Repair Tool Kit
19-inch self-made Rack@home
Just some photos for now...
WRITEME
|


