Secure Shell
Status: Done except for three minor WRITEME parts.
Last changed: Saturday 2015-01-10 18:32 UTC
Abstract:
The SSH (Secure Shell) is one of the most important tools -- if not the most important at all -- in daily use by millions of people all over the globe at any times. Thousands of businesses, governments, individuals, military, non-governmental organizations etc. rise and fall with its sound functioning. SSH has become a corner pillar of modern IT (Information Technology). One of the coolest things about Unix-like environments has been that there is not one but several different ways to administer systems from remote consoles. Sad to say, most of these methods (Telnet, rsh and X, to name a few) send everything over the network in clear text, including passwords. The combination of our reliance on the Internet with the proliferation of script kiddies and other packet-sniffing deviants has made administrative clear-text network applications obsolete. But then, more than a decade ago (1995), Finnish hacker Tatu Ylonen created a mind-blowingly cool thing called the SSH (Secure Shell). SSH is a suite of tools that roughly correspond to Sun's rsh, rcp and rlogin commands, but with one very important difference... a paranoia component built-in. SSH lets us do everything rsh, rcp and rlogin allows us to do, using our choice of libertarian-grade encryption and authentication methods. For some time their was no FLOSS (Free/Libre Open Source Software) variant for SSH available. That changed when OpenSSH come along the way in order to provide us with a free (free as in Freedom) and secure tool to do our jobs. As of now (July 2009), OpenSSH is the single most popular SSH implementation, coming by default in a large number of operating systems like for example mighty DebianGNU/*. With this page, I am not just going to provide some theoretical and historical background information but most and foremost I am going to show how to install and configure SSH in order to speedup things, make working with SSH more comfortable and last but not least, I am going to show how to create highly-secure working environments using SSH.
|
Table of Contents
|

The best order in which this page should be consumed/read is probably
starting with the Overview section from below, followed by the Best
Practices section which contains information about a basic SSH setup.
The Best Practices section also contains information on the very
important subject of PKA (Public Key Authentication) with SSH.
After those, the reader might probably want to take a look at some of
the more advanced SSH topics like for example multi-user ssh setup and
last but not least, some nice to know bits and pieces on SSH.
Overview
This section is in place in order to provide some background
information on SSH itself.
History
Wikipedia has an excellent article about SSH's history already.
SSH Use Cases
This subsection lists some of the most common use cases for SSH:
- Using an SSH client that supports terminal protocols for remote
administration of computers via a terminal (character-mode)
console.
- In combination with SFTP (SSH File Transfer Protocol), as a secure
alternative to FTP (File Transfer Protocol) which can be set up
more easily on a small scale without a public key infrastructure
and X.509 certificates.
- In combination with rsync or unison to backup, copy and mirror
files efficiently and securely.
- In combination with SCP (Secure Copy), as a secure alternative for
rcp file transfers.
- For port forwarding or tunneling, frequently used as an alternative
to some fully-fledged VPN (Virtual Private Network). Uses of SSH
port forwarding include accessing database servers, email servers,
securing X11, rdesktop, Windows Terminal Services and VNC
connections or even forwarding Windows file shares.
- Tunneling connections through firewalls which would ordinarily
block that type of connection, and for encrypting protocols which
are not normally encrypted like for example VNC.
- For X11-forwarding through multiple hosts.
- For generally browsing the WWW (World Wide Web) through an
encrypted proxy connection, using the SSH server as a proxy (with
an SSH client that supports dynamic port forwarding).
- For automated and securely remote monitoring and managing of
servers.
- For securely mounting a directory from a remote server as a file
system on the local computer, using the SSH File System.
- etc.
Theory
Go here.
OpenSSH

The OpenSSH suite includes the following tools:
ssh, the SSH client, a replacement for rlogin and telnet to
allow shell access to a remote machine (e.g. server within some
datacenter, notebook, phone, etc. basically everything that can
run an sshd).scp, a replacement for rcp, and sftp, a replacement for ftp to
copy files between computers.sshd, the SSH server daemon.ssh-keygen, a tool to inspect and generate the RSA and DSA keys
that are used for user and host authentication.ssh-agent and ssh-add, utilities to ease authentication by
holding keys ready and avoid the need to enter passphrases every
time they are used.ssh-keyscan, which scans a list of hosts and collects their
public keys.
Single User SSH Setup
This is when we set up an SSH environment without any central
management instance which takes care of user management, access
control, user credentials and things like that.
Most people use this kind of setup which is perfectly fine for a
single person or a small group of humans and a small group of remote
machines which are entered via SSH. However, once the number of humans
and/or machines exceeds a number of 3 or so, a single user setup does
not scale anymore in which case a multi-user SSH setup should be used
(this becomes even more true if the SSH environment is very dynamic in
its nature i.e. users, account data, machines, access control, etc.
changes very frequently).
One remote Machine at a Time
This is the most common use case of SSH — there is one SSH session
established having single ends on both sides, the one originating at
our local machine and the other one ending on the remote machine.
Note that there can be of course several SSH sessions at a time in
parallel. However, each one has just two ends.
Whether we use a basic SSH setup using a user's password to
authenticate ourselves or PKA (Public Key Authentication) is
irrelevant.
Server-Side Configuration
For this type of setup there is basically just one file
(/etc/ssh/sshd_config) we need to take care about on the remote
machine. Detailed information about how to do so can be found below.
Client Side Configuration
On the client side there are basically just three things we need to
take care of:
- SSH client configuration files used for all kinds of SSH shortcuts
~/.ssh/config per user or/etc/ssh/ssh_config for all users on our local machine
ssh-copy-id is a utility needed when setting up a PKA (Public Key
Authentication) SSH environment. It is used to copy the public SSH
key to the remote machine.
I make heavy use of ~/.ssh/config and ssh-copy-id as can be seen
further down.
Two or more remote Machines at a Time
This is what we are confronted with in case we (a single person
actually) want/need to carry out the same action on several remote
machines. Sure, we could log into remote machine 1, carry out the
work, log out, log into remote machine 2, carry out the exact same
work there, log out, log into remote machine 3, carry out the exact
same...
Clearly, in order to, for example, run aptitude update && aptitude
full-upgrade on 173 or so remote machines we do not want to jump
through 173 log in, do the work, log out hoops but what we want is to
specify the list of 173 remote machines once, jump through the hoop
once and let our fellow computer do the other 172 jumps for us.
The most commonly used tools to accomplish such thing are
sa@wks:~$ type acs; acs ssh | egrep pssh\|clusterssh\|dsh
acs is aliased to `apt-cache search'
clusterssh - administer multiple ssh or rsh shells simultaneously
dsh - dancer's shell, or distributed shell
pssh - Parallel versions of SSH-based tools
sa@wks:~$
I am very fond of ClusterSSH not just because it is probably the most
capable tool, but especially because it allows for all the little
things that, at the end of the day, make a difference.
For example, it honors my ~/.ssh/config (which I think is
utterly important in terms of comfort and overall time savings), it
also works with basic SSH setup using a user's password to
authenticate as well as PKA authentication and last but not least, it
is easy to use.
ClusterSSH
After installing clusterssh, there is not much to do left because we
already have a ~/.csshrc in place which has sane defaults —
man 1
cssh
has the details.
Another configuration file which I use a lot is /etc/clusters. Its
format is <tag> [user@]<server> [user@]<server> [...] e.g. live
admin1@server1 admin2@server2 server3 server4.
It contains a list of tag to server mappings. When any name is used on
the command line it is checked to see if it is a known tag name. If it
is, then the tag is replaced with the list of servers following this
particular tag.
The beauty of all of this is that it allows us to make the fine
grained specification of remote machines in ~/.ssh/config and use
those SSH shortcuts /etc/clusters so we can issue cssh
all_my_testing_hosts for example. all_my_testing_hosts would then
resolve itself to, for example, two remote machines, once
testing and once testing_sec. Both are specified in
~/.ssh/config (or the global SSH config file for that matter). Let us
take a look:
 1  sa@wks:~$ cat /etc/clusters
 2  all_my_testing_hosts testing testing_sec
 3  sa@wks:~$ grep -A3 testing .ssh/config
 4  # description:  wks-ve2; testing
 5  Host            testing
 6  HostName        192.168.1.101
 7  Port            18689
 8  User            sa
 9  --
10  # description:  wks-ve5; testing_sec
11  Host            testing_sec
12  HostName        192.168.1.104
13  Port            18689
14  User            sa
15  sa@wks:~$ cssh all_my_testing_hosts &
16  sa@wks:~$ tsw
17
18
19  [here the screenshot has been taken ...]
20
21
22  sa@wks:~$ testing session closed
23  testing_sec session closed
24  sa@wks:~$
Line 2 shows the contents of /etc/clusters — the tag
all_my_testing_hosts and its two servers testing and
testing_sec. Note that we did not make the fine grained
specifications here but rather used ~/.ssh/config for that as can be
seen in lines 4 to 14
Those who are confused about the private IP addresses i.e. 192.168.*.*
should know that I am using two OpenVZ VEs (Virtual Environments),
running locally on my workstation, for this demonstration — of course
it could be non-virtualized remote machines with non-private IPv4
addresses too (I use that all the time).
Also, I am only using two remote machines here to demonstrate things
but then again, a real-world scenario could go in the thousands (I
myself have used it for around 800 remote machines once were it worked
perfectly fine).
Anyway, in line 15 we use ClusterSSH with our current setup. I
took a screenshot in line 16 which can be seen below.

Note that for wks-ve2 (SSH shortcut testing that is) we use
standard user password authentication (we are asked for the
password) whereas, for wks-ve5 we are not asked for a password simply
because we use PKA (Public Key Authentication).
After issuing a few commands (on all remote machines simultaneously,
using the little input window which can be seen in the middle) we exit
this ClusterSSH session again which is shown by lines 22 and 23.
If we ever run into timeout issues like Connection timed out during
banner exchange for example, here is what we can do.
Last but not least, I have a nice hint for GNU Emacs fans with regards
to ClusterSSH... there is actually a ClusterSSH mode for GNU Emacs ;-]
Multi-User SSH Setup
If we need/want to have a central management instance for all SSH
related actions regarding one or more users then we are speaking of a
multi-user SSH setup. Above I have already pointed out when such setup
is a good idea respectively becomes mandatory.
SSH Proxy
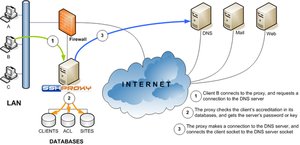
- SSH Proxy can ease some pain
- make the PKA infrastructure transparent for users (no added
difficulty)
- having a centralized, easy to maintain PKA infrastructure
- centralized user management and access control to the whole
However, at the time I was evaluating a multi-user SSH setup,
Monkeysphere was the more appropriate choice so I actually never took
a deeper look at SSH proxy.
Monkeysphere
In order to understand this subsection, knowledge about PKA (Public
Key Authentication) is a mandatory prerequisite — I would advice the
reader to read about PKA before proceeding and afterwards come back
here.

What is Monkeysphere?
Many people ask a certain question at first which is why I decided to
answer it right away: No modifications to the OpenSSH software are
required to use Monkeysphere. OpenSSH can be used as is — completely
unpatched and out of the box.
What does Monkeysphere do? Why do we need it? Well, let me answer this
question with a counterquestion: What is the best procedure to
establish trust with our PKA infrastructure? Especially, how can we be
sure to trust SSH host keys?
At the core of the problem/issue which can be eased with
Monkeysphere-the-Software is the subject of trust, and the fact that
humans have their Monkeysphere.
There are certain approaches to this problem which more or less get
the job done like for example, putting a remote machine's host key
fingerprint online so we can validate it with the fingerprint that
SSH shows us when we connect to this remote machine for the first
time.
sa@wks:~$ ssh sub
The authenticity of host 'sub (192.168.1.3)' can't be established.
RSA key fingerprint is ed:d3:29:bd:4d:e2:7d:a3:b0:15:96:26:d4:60:1e:22.
Are you sure you want to continue connecting (yes/no)? no
sa@wks:~$
Or, we could use sshfp and use DNS (Domain Name System) queries to
verify the authenticity of the remote machine.
Whatever we do, it certainly gets overly complex really soon plus
most of those methods do not scale well and are way to inflexible
in our dynamic environments as we have them nowadays.
Monkeysphere provides a solution to all of the afore mentioned issues
i.e. it provides us with a flexible and scalable framework to
establish trust in both directions — from users to remote machines
and vice versa.
The Monkeysphere project's goal is to extend OpenPGP's web of trust to
new areas of the Internet to help us securely identify each other
while we work on-line.
Specifically, Monkeysphere-the-Software currently offers a framework
to leverage the OpenPGP web of trust for OpenSSH authentication, both
ways — for users to verify the authenticity of the remote hosts they
connect to and also, remote machines can verify the authenticity of
its users.
In other words, it allows us to use SSH as we normally do, but also to
identify ourselves and the remote machines we administer or connect to
with our OpenPGP keys.
OpenPGP keys are tracked via GPG (GNU Privacy Guard), and Monkeysphere
manages the ~/.ssh/known_hosts file (on the local machine) and
~/.ssh/authorized_keys files (on the remote machine) used by OpenSSH
for authentication, checking them for cryptographic validity.
How does it work?
Everyone who has used SSH before is familiar with the prompt given the
first time we log into a new server, asking if we want to trust the
remote machine's key by verifying the key fingerprint (see above).
Unfortunately, unless we have access to the remote machine's key
fingerprint through a secure out-of-band channel (e.g. the one used
for remote management), there is no way to verify that the fingerprint
we are presented with is in fact that of the remote machine we are
really trying to connect to.
Most of us also take advantage of PKA (Public Key Authentication) with
OpenSSH's, rather than on relying on the exchange of a user
account password.
However, the public part of the key needs to be transmitted to the
server through a secure out-of-band channel (usually via a separate
password-based SSH connection or a (hopefully GPG (GNU Privacy Guard)
signed) email to the system administrator) in order for this type of
authentication to work.
OpenSSH currently provides a functional way to manage the RSA and DSA
keys required for these interactions through the ~/.ssh/known_hosts
and ~/.ssh/authorized_keys files.
However, it lacks any type of PKI (Public Key Infrastructure) that can
verify that the keys being used really are the one required or
expected.
The basic idea of the Monkeysphere is to create a framework that uses
GnuPG's capabilities and public keyserver communication to manage the
keys that OpenSSH uses for authentication.
The Monkeysphere provides an effective PKI for OpenSSH, including the
possibility for key transition, transitive identification of keys,
key revocation, and key expiration — it actively invites broader
participation in the OpenPGP web of trust.
With Monkeysphere, both parties to an OpenSSH connection (client and
remote machine/server) explicitly designate who they trust to certify
the identity of the other party.
These trust designations are explicitly indicated with traditional GPG
keyring trust models. Monkeysphere then manages the keys in the
~/.ssh/known_hosts, /etc/ssh/ssh_known_hosts and
~/.ssh/authorized_keys files directly, in such a way that is
completely transparent to SSH.
No modification is made to the SSH protocol on the wire (it continues
to be PKA i.e. use raw RSA public keys), and no modification is needed
to the OpenSSH software itself.
Benefits in a Nutshell
For the user who connects to some remote machine using SSH
- No more need to verify the fingerprint of the remote machine's SSH
host key — Monkeysphere/GPG does this now in a safe and sound
manner.
- If using PKA, the loss of the private key is a huge security
problem. Not so with Monkeysphere because a key can be revoked
across a huge number of remote machines for all user accounts using
that particular keypair for PKA. This is a matter of seconds no
matter if we are talking about one or thousands of user accounts
using that keypair (see below).
- Also, with PKA, phase out or revoke an old key and start using a
new one without having to comb through every single user account on
each remote machine we have.
For the administrator of some remote machine
- Exchange a remote machine's public host key without the need to
communicate the key change to users. Ergo no big scary warning
message for them that the host key had changed.
- Allow/disallow somebody PKA-based access to a remote machine
without needing to have a copy of their public key at hand. Yes, I
am talking about super-effective and super-comfortable access
control here. It gets better...
- Being able to add or revoke the ability of a user to authenticate
across an entire infrastructure that we manage, without touching
each host by hand (always O(1) no matter what).
All of these added benefits are related to the additional notion of an
PKI (Public Key Infrastructure) that Monkeysphere brings to SSH. A PKI
at its core is a mechanism to provide answers to a few basic
questions:
- Trust. Do we know whom or what remote machine a key actually
belongs? How do we know?
- Is the key still valid for use?
Given a clearly stated set of initial assumptions, functional
cryptographic tools, and a PKI, these questions can be clearly
answered in an automated fashion.
We should not need to ask humans to do complicated, error-prone things
like for example checking host key fingerprints — Monkeysphere can do
this for us in a manner that is a lot faster, a lot more comfortable,
a lot more secure as well as a lot more flexible and scalable.
Remote Machine Setup / Host Verification
This is about setting up and/or running a remote machine with
Monkeysphere. In case the reader is just a user to some remote machine
running Monkeysphere then here is what to do.
As the administrator of some computer/gadget providing access via SSH,
we can take advantage of Monkeysphere in two ways — these two are
independent i.e. we can do one without the other:
- We can publish the host key of our remote machine to the WOT
(Web of Trust) so that our users can automatically verify it,
and/or
- We can set up a remote machine to automatically identify
connecting users by their presence in the WOT (this is covered
further down).
Preparations
At the very beginning each person about to setup Monkeysphere on a
remote machine is of course a user to Monkeysphere at this point as
well — this is optional but I recommend to make a little addition to
~/.ssh/config because sooner or later one will do it anyway to safe
himself a lot of typing.
Ok, now we can really start setting up Monkeysphere on a remote
machine...
 1  sa@wks:~$ whoami
 2  sa
 3  sa@wks:~$ pwd
 4  /home/sa
 5  sa@wks:~$ hostname
 6  wks
 7  sa@wks:~$ ssh testing_sec
 8
 9
10  [skipping a lot of lines...]
11
12
13  sa@wks-ve5:~$ whoami
14  sa
15  sa@wks-ve5:~$ pwd
16  /home/sa
17  sa@wks-ve5:~$ hostname
18  wks-ve5
19  sa@wks-ve5:~$ su
20  Password:
21  wks-ve5:/home/sa# whoami
22  root
23  wks-ve5:/home/sa# dpl monkeysp* | grep ii
24  ii  monkeysphere                    0.24-1                use the OpenPGP web of trust to verify ssh connections
Just a bit orientation in lines 1 to 24 — we started locally at my
workstation, then entered a remote machine (actually an OpenVZ VE
(Virtual Environment) running locally on my workstation) via SSH. The
remote machine wks-ve5 has an up and running PKA (Public Key
Authentication) setup.
What we need to do is to install the monkeysphere package as I already
did which can be seen in line 24. The dpl from line 23 is just an
alias in my ~/.bashrc.
25  wks-ve5:/home/sa# cd /etc/ssh/; type pi; pi ssh_host
26  pi is aliased to `ls -la | grep'
27  -rw-------  1 root root    668 2009-03-08 18:07 ssh_host_dsa_key
28  -rw-r--r--  1 root root    602 2009-03-08 18:07 ssh_host_dsa_key.pub
29  -rw-------  1 root root   6363 2009-03-08 18:09 ssh_host_rsa_key
30  -rw-r--r--  1 root root   1418 2009-03-08 18:09 ssh_host_rsa_key.pub
31  wks-ve5:/etc/ssh# dpl openssh-server | grep ii
32  ii  openssh-server                  1:5.1p1-5             secure shell server, an rshd replacement
33  wks-ve5:/etc/ssh# netstat -tulpe | grep ssh
34  tcp        0      0 *:18689                 *:*                     LISTEN      root       29916       300/sshd
35  tcp6       0      0 [::]:18689              [::]:*                  LISTEN      root       29918       300/sshd
As I mentioned above, we need to have a fully functional PKA setup in
place which includes the RSA host keys (lines 29 and 30), and a
running and well configured sshd. Nothing new here, all that is part
of setting up PKA.
Where we start with Monkeysphere is right on top of a functioning PKA
setup as I will now demonstrate below.
Create and Publish an OpenPGP Certificate for a remote Machine
36  wks-ve5:/etc/ssh# la /var/lib/monkeysphere/
37  total 4
38  drwxr-xr-x  4 root root           49 2009-03-18 19:49 .
39  drwxr-xr-x 21 root root         4096 2009-03-18 19:49 ..
40  drwxr-x---  5 root monkeysphere   40 2009-03-18 19:49 authentication
41  drwxr-xr-x  2 root root            6 2009-03-18 19:49 authorized_keys
42  wks-ve5:/var/lib/monkeysphere# monkeysphere-host import-key /etc/ssh/ssh_host_rsa_key foo.bar.com:18689
43  ms: host key imported:
44  pub   8192R/E00C6FA8 2009-03-22
45        Key fingerprint = 10A8 068F D530 ACBC 1392  1A05 027E 3BCD E00C 6FA8
46  uid                  ssh://foo.bar.com:18689
47
48  OpenPGP fingerprint: 10A8068FD530ACBC13921A05027E3BCDE00C6FA8
49  ssh fingerprint: 8192 12:48:df:ad:b3:89:8c:d0:c8:09:49:8d:e6:b8:69:29 (RSA)
50  wks-ve5:/etc/ssh# la /var/lib/monkeysphere/
51  total 8
52  drwxr-xr-x  5 root root           91 2009-03-22 20:29 .
53  drwxr-xr-x 21 root root         4096 2009-03-18 19:49 ..
54  drwxr-x---  5 root monkeysphere   40 2009-03-18 19:49 authentication
55  drwxr-xr-x  2 root root            6 2009-03-18 19:49 authorized_keys
56  drwx------  2 root root           79 2009-03-22 20:29 host
57  -rw-r--r--  1 root root         3010 2009-03-22 20:29 ssh_host_rsa_key.pub.gpg
We can see that after issuing line 42 in order to import the remote
machines host key, all that information ends up in
/var/lib/monkeysphere on the remote machine wks-ve5. For example, the
just created certificate can be seen in line 57.
As mentioned earlier, having a pair of SSH host keys in place is a
prerequisite — those can also be created pretty easily. With the
command from line 42 we use the RSA private key in order to create the
OpenPGP certificate for the remote machine wks-ve5.
Also, we specify a FQDN (Fully Qualified Domain Name) and sshd
listening port like for example foo.bar.com:18689 . Actually, this is
going to be the primary UID (User ID) for this key/certificate — it
is the SSH service URI (Uniform Resource Identifier) and should be a
FQDN for the remote machine in order for our users to find it when
they search the key servers.
As we will see later, we can change the primary UID using
revoke-hostname. We can also add additional UID's with add-hostnames.
I already mentioned it above, installing and setting up Monkeysphere
does not require any changes to some running SSH setup except for a
one-line change to /etc/ssh/sshd_config —
/var/lib/monkeysphere/authorized_keys/%u instead of
%h/.ssh/authorized_keys. More on that further down...
Monkeysphere is after all just the cherry on top of SSH —
it is
possible to use standard PKA and Monkeysphere in parallel because,
as of now (March 2009), by default, monkeysphere-authentication
actually just appends the existing keys from ~/.ssh/authorized_keys to
the list of keys generated via the WOT (Web of Trust) i.e. the whole
certificate thingy we are doing right now.
Of course, we can turn that off if we do not want to allow PKA
authentication in addition to Monkeysphere-style authentication.
58  wks-ve5:/etc/ssh# monkeysphere-host show-key
59  pub   8192R/E00C6FA8 2009-03-22
60        Key fingerprint = 10A8 068F D530 ACBC 1392  1A05 027E 3BCD E00C 6FA8
61  uid                  ssh://foo.bar.com:18689
62
63  OpenPGP fingerprint: 10A8068FD530ACBC13921A05027E3BCDE00C6FA8
64  ssh fingerprint: 8192 12:48:df:ad:b3:89:8c:d0:c8:09:49:8d:e6:b8:69:29 (RSA)
65  wks-ve5:/etc/ssh# monkeysphere-host show-key | awk '/^OpenPGP fingerprint: /{print $3}'
66  10A8068FD530ACBC13921A05027E3BCDE00C6FA8
67  wks-ve5:/etc/ssh# gpg --search --keyserver hkp://keys.gnupg.net 0x$(monkeysphere-host show-key | awk '/^OpenPGP fingerprint: /{print $3}')
68  gpg: searching for "10A8068FD530ACBC13921A05027E3BCDE00C6FA8" from hkp server keys.gnupg.net
69  gpg: key "10A8068FD530ACBC13921A05027E3BCDE00C6FA8" not found on keyserver
70  wks-ve5:/etc/ssh# monkeysphere-host publish-key
71  Really publish host key to pool.sks-keyservers.net? (Y/n) Y
72  gpg: sending key E00C6FA8 to hkp server pool.sks-keyservers.net
With line 58 we take a look at the certificate we just created with
line 42. I always opt to use the key ID instead of some UID on the key
simply because the key ID is for sure unique.
With line 65 we can see the command which can be used to get the key
ID/fingerprint. As with the examples in the GPG (GNU Privacy Guard)
section, we use such command to supply another one with a unique key
ID as can be seen in line 67.
Also notable about line 67 is the use of 0x which may be necessary
depending on what key server we end up because of the round robin
scheme used here. Some older versions of key server software require
to supply the 0x, others do not... we just filled a bug report so we
will see...
Anyway, the reason for line 67 is that I wanted to show there is no
key with key ID 10A8068FD530ACBC13921A05027E3BCDE00C6FA8 on the key
servers yet. It will be after we issued line 70.
Note that it might take several minutes until the key/certificate has
been distributed across the entire key server network. Also note, that
all actions so far were carried out on our remote machine wks-ve5.
73  wks-ve5:/etc/ssh# exit
74  exit
75  sa@wks-ve5:~$ exit
76  logout
77  Connection to 192.168.1.104 closed.
78  sa@wks:~$ gpg --search 10A8068FD530ACBC13921A05027E3BCDE00C6FA8
79  gpg: searching for "10A8068FD530ACBC13921A05027E3BCDE00C6FA8" from hkp server keys.gnupg.net
80  gpg: key "10A8068FD530ACBC13921A05027E3BCDE00C6FA8" not found on keyserver
81  sa@wks:~$ gpg --search 0x10A8068FD530ACBC13921A05027E3BCDE00C6FA8
82  gpg: searching for "0x10A8068FD530ACBC13921A05027E3BCDE00C6FA8" from hkp server keys.gnupg.net
83  (1)     ssh://foo.bar.com:18689
84            8192 bit RSA key E00C6FA8, created: 2009-03-22
85  Keys 1-1 of 1 for "0x10A8068FD530ACBC13921A05027E3BCDE00C6FA8".  Enter number(s), N)ext, or Q)uit > 1
86  gpg: requesting key E00C6FA8 from hkp server keys.gnupg.net
87  gpg: key B58220DB: public key "ssh://foo.bar.com:18689" imported
88  gpg: Total number processed: 1
89  gpg:               imported: 1  (RSA: 1)
90  sa@wks:~$ gpg --fingerprint foo.bar.com:18689
91  pub   8192R/E00C6FA8 2009-03-22
92        Key fingerprint = 10A8 068F D530 ACBC 1392  1A05 027E 3BCD E00C 6FA8
93  uid                  ssh://foo.bar.com:18689
94
Starting with line 73, we go back where we came from i.e. we leave the
remote machine and end up on my workstation in line 78. If we now
search for the former created and uploaded OpenPGP certificate for the
remote machine wks-ve5 we run into the 0x problem first but another
try in line 81 just works fine as can be seen.
We choose to import the key/certificate into our local GPG keyring
because we are going to sign it now.
One important thing is to make sure to compare the key ID (also known
as fingerprint) of the retrieved certificate/key (e.g. line 92) with
the output from show-key in line 63 — they need to match!
Sign the published Certificate
 95  sa@wks:~$ gpg --sign-key foo.bar.com:18689
 96
 97  pub  8192R/E00C6FA8  created: 2009-03-22  expires: never       usage: CA
 98                       trust: unknown       validity: unknown
 99  [unknown] (1). ssh://foo.bar.com:18689
100
101
102  pub  8192R/E00C6FA8  created: 2009-03-22  expires: never       usage: CA
103                       trust: unknown       validity: unknown
104   Primary key fingerprint: 10A8 068F D530 ACBC 1392  1A05 027E 3BCD E00C 6FA8
105
106       ssh://foo.bar.com:18689
107
108  Are you sure that you want to sign this key with your
109  key "Markus Gattol () <markus.gattol[at]foo.org>" (C0EC7E38)
110
111  Really sign? (y/N) y
112
113  You need a passphrase to unlock the secret key for
114  user: "Markus Gattol () <markus.gattol[at]foo.org>"
115  1024-bit DSA key, ID C0EC7E38, created 2009-02-06
116
117
118  sa@wks:~$ gpg --list-sig foo
119  pub   8192R/E00C6FA8 2009-03-22
120  uid                  ssh://foo.bar.com:18689
121  sig 3        E00C6FA8 2009-03-22  ssh://foo.bar.com:18689
122  sig          C0EC7E38 2009-03-22  Markus Gattol () <markus.gattol[at]foo.org>
123
124  sa@wks:~$ gpg --send-key 10A8068FD530ACBC13921A05027E3BCDE00C6FA8
125  gpg: sending key E00C6FA8 to hkp server keys.gnupg.net
126  sa@wks:~$
Nothing special in lines 95 to 117, just signing the host
key/certificate for our remote machine. The result can be seen in
line 122. After we are done, we publish the key/certificate into the
WOT in line 124 and 125.
Now I know for sure, the just published key/certificate with the
key/certificate ID 10A8068FD530ACBC13921A05027E3BCDE00C6FA8 is valid
and belongs to our remote machine wks-ve5.
I know because it was me who set up the remote machine, also, I used
my own OpenPGP key with the key ID
F6F78566432A78A90D39CDAE48E94AC6C0EC7E38 to sign the certificate
10A8068FD530ACBC13921A05027E3BCDE00C6FA8.
Can the reader be sure to trust this key/certificate as well? Well,
there is a problem! Anyone could publish a simple self-signed
certificate to the WOT with any UID (e.g. foo.bar.com:18689) attached
to it.
Actually, that is what we should expect — as time goes by, any domain
will probably have a dozen keys/certificates in the WOT simply because
some idiots are going to create those and use our UID for those
certificates as well.
However, users to a monkeysphere-enabled remote machine are able to
tell the difference between the right key/certificate and all the
fakes ones by looking at the signatures.
For example, if gpg --search --keyserver <some_url>
'=ssh://foo.bar.com:18689' would return many results then only
the key/certificate with the fingerprint (key ID)
10A8068FD530ACBC13921A05027E3BCDE00C6FA8 which is signed by me, with
my private key with the fingerprint
F6F78566432A78A90D39CDAE48E94AC6C0EC7E38, would be the right
key/certificate for the host wks-ve5. All others, although the show
the UID foo.bar.com:18689, would be fakes.
In reality though a user would not know about the validity of the host
key/certificate as I just pointed it out i.e. with the key IDs above.
In reality the validity for a key/certificate comes from the WOT
because there will be host keys/certificates signed by folks the user
does not know in person and thus he has to relying on the validity of
this particular key/certificate. This is what Monkeysphere is/does...
more on that below...
Thoughts on signing the Host Key/Certificate
This subsection is meant to address the issue of signing OpenPGP-based
SSH host keys/certificates.
Computers are not people, so the circumstances under which we should
sign a remote machines host key/certificate are different from those
under which we should sign another person's public key.
Why are signatures on an SSH host key/certificate important?
In order for users to validate a host (also known as remote machine
respectively sshd or SSH server) in a monkeysphere-enabled network,
the host key/certificate must have full calculated validity from the
perspective of the connecting user.
If the user has not signed the remote machine's key himself, then the
remote machine's key can only be valid if other people that the user
trusts have signed the key/certificate — standard WOT (Web of Trust)
behavior that is...
If only one person has signed the remote machine's key, then the user
must fully trust this single person who has signed the host
key/certificate.
Full trust should be granted sparingly and with consideration —
unless the users knows the server admin very well, they will in
general not have full trust of this person.
However, full trust of the host key/certificate can also be achieved
if the remote machine's key has been signed by three or more people
that the user has marginal trust of.
In other words, three or more marginally trusted signatures equals one
fully trusted signature — this however depends on the chosen
trust model.
It is much more common for users to have marginal trust of other users
in the WOT than having full trust. For this reason, it is advisable
to have as many people sign the remote machine's key/certificate as
possible.
What information we should have before signing a host key/certificate?
Before signing the key of a person, we want to do two things:
- Verify the identity of the person e.g. by comparing his passport
to the output from
gpg --list-key <UID_or_key_ID>
- Verify that the person is actually in control of the key that we
are signing e.g. make him add (and later remove again) another
UID which we tell him, or even better, by using
caff from the
signing-party package.
For a server, we want to do basically the same thing:
- Verify the identity of the server.
- Verify that the server is actually in control of the host
key/certificate that we are signing.
However, verifying these things for a server is less intuitive than it
is for a human. For example, what exactly does it means to verify the
identity of a remote server on the Internet?
The identity in this case is the FQDN (Fully Qualified Domain Name) of
the remote machine e.g. foo.bar.com in our case. Verifying this
identity amounts to being sure that the host in question really is
located at that FQDN.
Verifying that a remote machine is in control of the key/certificate
is, straightforward. If we manage to log into the remote machine in
question, then that key/certificate exists on the remote machine.
Further down I am going to show how we can do both, #1 and #2 in one
shoot...
If we are the person (or persons) that actually setup the remote
machine from scratch and configured Monkeysphere and SSH on it, then
we should sign the host key/certificate as part of that process.
When the remote machine is first set up, the administrator(s) who set
it up are the only ones who can actually vouch for the server key, so
their signatures are necessary to get things going. Remember, that is
exactly what I was taking about above...
Their signatures are also necessary so that they can validate the host
key themselves and log into the server via the monkeysphere-enabled
SSH setup in the future.
If we did not set up the server initially, we do not have an
accumulated full trust of the person(s) who did, and we do not
necessarily have console access to the server directly, it is hard to
confidently verify the server identity and key ownership.
We would like to be able to walk up to the server, log in at the
console, and get the key ID (fingerprint) of the SSH host
key/certificate directly — exactly that is usually impossible.
However, it is still possible to verify the server identity and server
ownership of the key, even in this case.
 95  sa@wks:~$ gethostip foo.bar.com
 96  foo.bar.com 64.34.161.100 4022A164
 97  sa@wks:~$ grep foo /etc/hosts
 98  sa@wks:~$ su
 99  Password:
100  wks:/home/sa# echo "192.168.1.104 foo.bar.com" >> /etc/hosts
101  wks:/home/sa# exit
102  exit
103  sa@wks:~$ grep foo /etc/hosts
104  192.168.1.104 foo.bar.com
105  sa@wks:~$ gethostip foo.bar.com
106  foo.bar.com 192.168.1.104 C0A80168
Before we start verifying #1 and #2 from above we have to pull a
little stunt — I am doing this demonstration locally on my
workstation using an OpenVZ VE (Virtual Environment) for the remote
machine wks-ve5 — the one where we are setting up Monkeysphere right
now.
Because of that, we need to reroute queries that go to foo.bar.com
(see line 42) to my local machine for the verification of #1 and #2 to
work.
Line 96 shows the result when resolving the URL foo.bar.com before the
stunt in line 100. It worked as can be seen in line 106. We are now
ready to actually go and verify #1 and #2...
107  sa@wks:~$ ssh-keygen -l -F [foo.bar.com]:18689
108  sa@wks:~$ grep -{A,B}2 foo.bar.com .ssh/config
109  # description:  wks-ve5; testing_sec
110  Host            testing_sec
111  HostName        foo.bar.com
112  Port            18689
113  IdentityFile    %d/.ssh/ssh_pka_key_wks-ve5
114  sa@wks:~$ export MONKEYSPHERE_LOG_LEVEL=DEBUG; ssh testing_sec
115  ms: checking path permission '/home/sa/.ssh/known_hosts'...
116  ms: checking path permission '/home/sa/.ssh'...
117  ms: checking path permission '/home/sa'...
118  ms: checking path permission '/home'...
119  ms: checking path permission '/'...
120  ms: path ok.
121  ms: lock created on '/home/sa/.ssh/known_hosts'.
122  ms: processing: foo.bar.com:18689
123  ms:  primary key found: 027E3BCDE00C6FA8
124  ms:   * acceptable primary key.
125  ms: * new key for foo.bar.com:18689 added to known_hosts file.
126  ms: lock touched on '/home/sa/.ssh/known_hosts'.
127  ms: lock removed on '/home/sa/.ssh/known_hosts'.
128  ms: known_hosts file updated.
129
130
131  [skipping a lot of lines...]
132
133
134  sa@wks-ve5:~$ whoami
135  sa
136  sa@wks-ve5:~$ pwd
137  /home/sa
138  sa@wks-ve5:~$ hostname
139  wks-ve5
140  sa@wks-ve5:~$ exit
141  logout
142  Connection to foo.bar.com closed.
143  sa@wks:~$ ssh-keygen -l -F [foo.bar.com]:18689
144  # Host [foo.bar.com]:18689 found: line 2 type RSA
145  8192 12:48:df:ad:b3:89:8c:d0:c8:09:49:8d:e6:b8:69:29 |1|FLHGJ1t+9RROV+ne/1SAjFBS4Ro=|LvzUJPJP8s1xjIsue1cl2CIdfU0= (RSA)
In line 107 we take a look whether or not our ~/.ssh/known_hosts file
already knows about our just created host key/certificate — it does
not as can be seen. We also take another look at the SSH settings for
wks-ve5 in lines 108 to 113.
Line 114 is interesting — I increased the log level so we have a more
verbose output when we try to establish contact to wks-ve5 using
Monkeysphere for the first time.
Lines 122 to 125 is where we verify #1 and #2 from above —
Monkeysphere finds the host key/certificate
10A8068FD530ACBC13921A05027E3BCDE00C6FA8 on our GPG keyring and
because I signed it myself, it instantly finds that this
key/certificate can be fully trusted (line 124).
The new key/certificate is then automatically added to our
~/.ssh/known_hosts file as we see in line 125 and as line 144 and 145
proof it. Note that the key ID from line 145 is of course the one from
the remote machine's host keypair (from the public key to be more
precise).
It is also interesting to note that, although we connected to wks-ve5
for the first time (I provided a clean/empty ~/.ssh/known_hosts), we
are not bothered by the usual message that wants us to
check the host key fingerprint — Monkeysphere does this now... a lot
faster and reliable than a human could ever do.
How to Revoke a Certificate for a remote Machine
This is important because we could eventually loose the private key
used to sign the remote machine's OpenPGP key/certificate.
Loosing here actually means stolen (someone else gets a hold of it;
hopefully the original key owner was smart enough to
protect the private key with a password) or a hardware failure could
also cause loosing it.
There are basically two subcommands to monkeysphere-host in this
regard:
add-revoker can be used to add others and ourselves so we can
revoke a certificate even if the private key got stolen (someone
else owns it physically plus knows the password to unlock it plus
we lost it physically as well)- use
revoke-key to create a revocation certificate upfront just in case
146  sa@wks:~$ ssh testing_sec
147
148          / \      _-'
149        _/   \-''- _ /
150   __-' {            \
151       /              \
152       /       "o.  |o }
153       |            \ ;            YOU ARE BEING WATCHED!
154                     ',
155          \_         __\
156            ''-_    \./
157              / '-____'
158             /
159           _'
160         _-'
161
162
163  This computer system is the private property of its owner, whether individual, corporate or government. It is
164  for authorized use only. Users (authorized or unauthorized) have no explicit or implicit expectation of
165  privacy.
166
167  Any or all uses of this system and all files on this system may be intercepted, monitored, recorded, copied,
168  audited, inspected, and disclosed to your employer, to authorized site, government, and law enforcement
169  personnel, as well as authorized officials of government agencies, both domestic and foreign.
170
171  By using this system, the user consents to such interception, monitoring, recording, copying, auditing,
172  inspection, and disclosure at the discretion of such personnel or officials.
173
174
175          UNAUTHORIZED OR IMPROPER USE OF THIS SYSTEM MAY RESULT
176          IN CIVIL AND CRIMINAL PENALTIES AND ADMINISTRATIVE OR
177          DISCIPLINARY ACTION, AS APPROPRIATE !!
178
179
180  By continuing to use this system you indicate your awareness of and consent to these terms and conditions of
181  use. LOG OFF IMMEDIATELY if you do not agree to the conditions stated in this warning. However, if you are
182  authorized personal with no bad intentions please continue. Have a nice day! :-)
183
184  sa@wks-ve5:~$ su
185  Password:
186  wks-ve5:/home/sa# export MONKEYSPHERE_DEBUG_LEVEL=DEBUG; monkeysphere-host add-revoker F6F78566432A78A90D39CDAE48E94AC6C0EC7E38
187  gpg: requesting key C0EC7E38 from hkp server pool.sks-keyservers.net
188  ms: key found:
189  pub   1024D/C0EC7E38 2009-02-06
190        Key fingerprint = F6F7 8566 432A 78A9 0D39  CDAE 48E9 4AC6 C0EC 7E38
191  uid                  Markus Gattol () <[email protected]>
192  uid                  Markus Gattol () <markus.gattol[at]foo.org>
193  sub   4096g/34233DEF 2009-02-06
194
195  Are you sure you want to add the above key as a revoker
196  of the host key? (Y/n) Y
197  ms: Revoker added.
198  wks-ve5:/home/sa# monkeysphere-host show-key
199  pub   8192R/E00C6FA8 2009-03-22
200        Key fingerprint = 10A8 068F D530 ACBC 1392  1A05 027E 3BCD E00C 6FA8
201  uid                  ssh://foo.bar.com:18689
202
203  The following keys are allowed to revoke this host key:
204  revoker: F6F78566432A78A90D39CDAE48E94AC6C0EC7E38
205
206  OpenPGP fingerprint: 10A8068FD530ACBC13921A05027E3BCDE00C6FA8
207  ssh fingerprint: 8192 12:48:df:ad:b3:89:8c:d0:c8:09:49:8d:e6:b8:69:29 (RSA)
208  wks-ve5:/home/sa# monkeysphere-host publish-key
209  Really publish host key to pool.sks-keyservers.net? (Y/n) Y
210  gpg: sending key E00C6FA8 to hkp server pool.sks-keyservers.net
211  wks-ve5:/home/sa# exit
212  exit
213  sa@wks-ve5:~$ exit
214  logout
215  Connection to foo.bar.com closed.
In line 146 we issue our well-known command in order to enter wks-ve5
which works just fine as we end up on the remote machines CLI (Command
Line Interface) in line 184 after the banner message showed.
After we became root on wks-ve5 we issue line 186 where we use
add-revoker in order to add a revoker (a persons public OpenPGP key
that is) to our host key/certificate — we use my key ID
F6F78566432A78A90D39CDAE48E94AC6C0EC7E38 i.e. I show up as the
revoker(s) (line 204) for our host key/certificate with the ID
10A8068FD530ACBC13921A05027E3BCDE00C6FA8.
Increasing the log level in line 186 has only been done in order to
make the following commands more verbose — usually, of course,
increasing the log level is no necessity.
Line 208 is interesting, not from a technical point of view but
actually the motivation why we publish the host key/certificate again.
We do so to make the just added revoker information public. Now,
usually that is what we want. However, there might be cases when this
might not be favorable to us which is if we wanted to hide our
relationship (as administrative force) to that particular remote
machine.
Of course, in that case we would also not sign the host
key/certificate in the first place. Being mentioned not just as
somebody who has signed the host key/certificate but also as a revoker
is an even stronger relationship than just having signed the key/certificate.
Let us imagine a remote machine with 50 people (users of all different
levels) who have signed its key/certificate but anyone who can revoke
the host key is probably someone with a level of administrative access
one way or another (or at least well-trusted by folks with
administrative access).
Bottom line is, if we do not want to hide our relationship with the
remote machine (which is the default) then publishing the host
key/certificate as we did in line 208 is perfectly fine.
216  sa@wks:~$ gpg --check-sigs E00C6FA8
217  pub   8192R/E00C6FA8 2009-03-22
218  uid                  ssh://foo.bar.com:18689
219  sig!3        E00C6FA8 2009-03-22  ssh://foo.bar.com:18689
220  sig!         C0EC7E38 2009-03-22  Markus Gattol () <[email protected]>
221
222  sa@wks:~$ gpg --fixed-list-mode --with-colons --check-sigs E00C6FA8
223  tru::1:1237839982:0:3:1:5
224  pub:f:8192:1:027E3BCDE00C6FA8:1237730598:::m:::aA:
225  uid:f::::1237730598::CA020D08768F6C3244B3AE727F3034842C96988E::ssh\x3a//foo.bar.com\x3a18689:
226  sig:!::1:027E3BCDE00C6FA8:1237730598::::ssh\x3a//foo.bar.com\x3a18689:13x:
227  sig:!::17:48E94AC6C0EC7E38:1237732642::::Markus Gattol (http\x3a//www.markus-gattol.name) <[email protected]>:10x:
228  sa@wks:~$ gpg --export E00C6FA8 | gpg --list-packets
229  :public key packet:
230          version 4, algo 1, created 1237730598, expires 0
231          pkey[0]: [8192 bits]
232          pkey[1]: [6 bits]
233  :user ID packet: "ssh://foo.bar.com:18689"
234  :signature packet: algo 1, keyid 027E3BCDE00C6FA8
235          version 4, created 1237730598, md5len 0, sigclass 0x13
236          digest algo 2, begin of digest 25 14
237          hashed subpkt 2 len 4 (sig created 2009-03-22)
238          hashed subpkt 27 len 1 (key flags: 20)
239          hashed subpkt 11 len 5 (pref-sym-algos: 9 8 7 3 2)
240          hashed subpkt 21 len 3 (pref-hash-algos: 2 8 3)
241          hashed subpkt 22 len 3 (pref-zip-algos: 2 3 1)
242          hashed subpkt 30 len 1 (features: 01)
243          hashed subpkt 23 len 1 (key server preferences: 80)
244          subpkt 16 len 8 (issuer key ID 027E3BCDE00C6FA8)
245          data: [8191 bits]
246  :signature packet: algo 17, keyid 48E94AC6C0EC7E38
247          version 4, created 1237732642, md5len 0, sigclass 0x10
248          digest algo 2, begin of digest 0d e6
249          hashed subpkt 2 len 4 (sig created 2009-03-22)
250          subpkt 16 len 8 (issuer key ID 48E94AC6C0EC7E38)
251          data: [157 bits]
252          data: [160 bits]
The commands from lines 216, 222 and 228 are the same as those in
lines 263, 270 and 278.
However, lines 216 to 252 show detailed information on our host
key/certificate before we issued line 253 in order to update our local
keyring with the former published host key/certificate (line 208).
253  sa@wks:~$ gpg --refresh-key gpg E00C6FA8
254  gpg: refreshing 1 key from hkp://keys.gnupg.net
255  gpg: requesting key E00C6FA8 from hkp server keys.gnupg.net
256  gpg: key E00C6FA8: direct key signature added
257  gpg: key E00C6FA8: "ssh://foo.bar.com:18689" 1 new signature
258  gpg: Total number processed: 1
259  gpg:         new signatures: 1
260  gpg: 3 marginal(s) needed, 1 complete(s) needed, PGP trust model
261  gpg: depth: 0  valid:   2  signed:   1  trust: 0-, 0q, 0n, 0m, 0f, 2u
262  gpg: depth: 1  valid:   1  signed:   0  trust: 0-, 0q, 0n, 1m, 0f, 0u
With line 253 we update the host key/certificate
10A8068FD530ACBC13921A05027E3BCDE00C6FA8 for wks-ve5 that we have
stored locally on our workstation.
263  sa@wks:~$ gpg --check-sigs E00C6FA8
264  pub   8192R/E00C6FA8 2009-03-22
265  sig!   R     E00C6FA8 2009-03-26  ssh://foo.bar.com:18689
266  uid                  ssh://foo.bar.com:18689
267  sig!3        E00C6FA8 2009-03-22  ssh://foo.bar.com:18689
268  sig!         C0EC7E38 2009-03-22  Markus Gattol () <[email protected]>
269
270  sa@wks:~$ gpg --fixed-list-mode --with-colons --check-sigs E00C6FA8
271  tru::1:1238087182:0:3:1:5
272  pub:f:8192:1:027E3BCDE00C6FA8:1237730598:::m:::aA:
273  rvk:::17::::::F6F78566432A78A90D39CDAE48E94AC6C0EC7E38:80:
274  sig:!::1:027E3BCDE00C6FA8:1238070799::::ssh\x3a//foo.bar.com\x3a18689:1fx:
275  uid:f::::1237730598::CA020D08768F6C3244B3AE727F3034842C96988E::ssh\x3a//foo.bar.com\x3a18689:
276  sig:!::1:027E3BCDE00C6FA8:1237730598::::ssh\x3a//foo.bar.com\x3a18689:13x:
277  sig:!::17:48E94AC6C0EC7E38:1237732642::::Markus Gattol (http\x3a//www.markus-gattol.name) <[email protected]>:10x:
278  sa@wks:~$ gpg --export E00C6FA8 | gpg --list-packets
279  :public key packet:
280          version 4, algo 1, created 1237730598, expires 0
281          pkey[0]: [8192 bits]
282          pkey[1]: [6 bits]
283  :signature packet: algo 1, keyid 027E3BCDE00C6FA8
284          version 4, created 1238070799, md5len 0, sigclass 0x1f
285          digest algo 2, begin of digest 91 03
286          hashed subpkt 2 len 4 (sig created 2009-03-26)
287          hashed subpkt 12 len 22 (revocation key: c=80 a=17 f=F6F78566432A78A90D39CDAE48E94AC6C0EC7E38)
288          hashed subpkt 7 len 1 (not revocable)
289          subpkt 16 len 8 (issuer key ID 027E3BCDE00C6FA8)
290          data: [8190 bits]
291  :user ID packet: "ssh://foo.bar.com:18689"
292  :signature packet: algo 1, keyid 027E3BCDE00C6FA8
293          version 4, created 1237730598, md5len 0, sigclass 0x13
294          digest algo 2, begin of digest 25 14
295          hashed subpkt 2 len 4 (sig created 2009-03-22)
296          hashed subpkt 27 len 1 (key flags: 20)
297          hashed subpkt 11 len 5 (pref-sym-algos: 9 8 7 3 2)
298          hashed subpkt 21 len 3 (pref-hash-algos: 2 8 3)
299          hashed subpkt 22 len 3 (pref-zip-algos: 2 3 1)
300          hashed subpkt 30 len 1 (features: 01)
301          hashed subpkt 23 len 1 (key server preferences: 80)
302          subpkt 16 len 8 (issuer key ID 027E3BCDE00C6FA8)
303          data: [8191 bits]
304  :signature packet: algo 17, keyid 48E94AC6C0EC7E38
305          version 4, created 1237732642, md5len 0, sigclass 0x10
306          digest algo 2, begin of digest 0d e6
307          hashed subpkt 2 len 4 (sig created 2009-03-22)
308          subpkt 16 len 8 (issuer key ID 48E94AC6C0EC7E38)
309          data: [157 bits]
310          data: [160 bits]
Line 265 is new because of updating our local version of the host
key/certificate. Also, lines 273 and 274 are new. And last but not
least, lines 283 to 290 are new as well.
I will not go into detail here — what those lines in essence tell us
is that our host key/certificate got a revoker ID assigned to it.
Detailed information can be found by reading RFC (Request for
Comments) 4880, /usr/share/doc/gnupg/DETAILS.gz and
/usr/share/doc/gnupg2/DETAILS.gz.
311  sa@wks:~$ ssh testing_sec
312
313
314  [skipping a lot of lines...]
315
316
317  sa@wks-ve5:~$ su
318  Password:
319  wks-ve5:/home/sa# monkeysphere-host revoke-key
320  This will generate a revocation certificate for your host key
321  (fingerprint: 10A8068FD530ACBC13921A05027E3BCDE00C6FA8) and
322  dump the certificate to standard output.
323
324  It can also directly publish the new revocation certificate
325  to the public keyservers via pool.sks-keyservers.net if you want it to.
326
327  Publishing this certificate will IMMEDIATELY and PERMANENTLY revoke
328  your host key!
329
330  Publish the certificate after generation? (y/n/Q) n
331
332  sec  8192R/E00C6FA8 2009-03-22 ssh://foo.bar.com:18689
333
334  Create a revocation certificate for this key? (y/N) y
335  Please select the reason for the revocation:
336    0 = No reason specified
337    1 = Key has been compromised
338    2 = Key is superseded
339    3 = Key is no longer used
340    Q = Cancel
341  (Probably you want to select 1 here)
342  Your decision? 0
343  Enter an optional description; end it with an empty line:
344  > Creating a revocation certificate just in case...
345  >
346  Reason for revocation: No reason specified
347  Creating a revocation certificate just in case...
348  Is this okay? (y/N) y
349  NOTE: This key is not protected!
350  Revocation certificate created.
351
352  Please move it to a medium which you can hide away; if Mallory gets
353  access to this certificate he can use it to make your key unusable.
354  It is smart to print this certificate and store it away, just in case
355  your media become unreadable.  But have some caution:  The print system of
356  your machine might store the data and make it available to others!
357  -----BEGIN PGP PUBLIC KEY BLOCK-----
358  Version: GnuPG v1.4.9 (GNU/Linux)
359  Comment: A revocation certificate should follow
360
361  iQRRBCjBjgj7BQJJy8/cNB0jQ3JlYXRpbmcgYSBxxxxZvY2F0aW9uIGNlcnRpZml
362  YXRlIGp1c3QgaW4gY2FzZSjuLi4jCgkQjn47zejxxxxgwpCjjgTcvaLyt3ls0Yb9
363  qfPgC92IhWxxxxxxxjIljlh3iRoP21QHqx5BgkFxxxxlqlBMicPBCxJxy7r/TxRc
364  gLJpVusyTDxxxxxxx9QvjEljfPOmi7iyHERx8Tcxxxxi5c7IhIDh9T2nZiV0wulj
365  C/RMVef+ikxxxxxxxn0DKZ/0OhfK8yXisrg4CNXxxxxDj1TiQl4meTkNi0eshgbe
366  sCiXy1grN6xxxxxxxWTdgalE+MDZEcQjJjfcjMcxxxxPr8FTZPCMtYqRkv7j2z8M
367  cMRmfjiI2xxxxxxxxoxIMIQ5NDnWbX5v1r4sVMcxxxxB6XaugCbKJTh3nBbDjQZr
368  tSSZTBBIJVxxxxxxxG5uL39yJEEI7tymK4IWKIVxxxxkjvQ7WNox/M+0MY1nFEGb
369  mzGtvVmi/5xxxxxxxr3fC5CKIEpB9ISwtdMvrF0xxxxZCCXjbut2xIJ9rHCQKjVY
370  I4iK7mQoqcxxxxxxxyMp9f/zgaKhukyndXIvZ7TxxxxxOr12F3vNjryiYT1sGiii
371  yLZBOR4maoxxxxxxxDWSN5kEi4pGsiMiHRgV9WExxxxX5i3V8FiqpLi0HF78Lk1i
372  otqIIQl0OxxxxxxxxVaLuwS60XzdxingekoaExbxxxxGZg4SyHho/1iR2c+19dCm
373  DvNk3icD/bxxxxxxxrklBnubpvOfkZPWn79h4PfxxxxztoatPlwNTYoF3bBMiaTL
374  FHFfTPscKmxxxxxxxOxBexG3eF8RnI3pOLNBxnSxxxxIl26a6vja2iKQYNyVN9FE
375  FPNt5sN1JnxxxxxxxvQ92XY9eGHrh/iTvo6B2wnxxxxHY+T0cDKXVZPtS0wIw4dM
376  8jXtE+uJeexxxxxxxfiW5KSzCQio6Mi3PpOCx5dxxxxhhuBkjfeig4ol6BoC6qj6
377  inLvExJn5Kxxxxxxx4HOZYyWZkbcQ3KMvJkyuXnxxxxymETkFjQCghi9fs7MeXjG
378  obvaXXoBRLxxxxxxx5iPEYZ6Zrznuxftkwdwx+q0B+EzyYCI7xOivrO1TWfiBXo9
379  v+0lusPsljxxxxxxxTrodcSTj9faX0hvP7RyfMnQbtw9v2Mt8zinJCm2Ighjx7Ml
380  +o00XrL1j4gVsw5Dgqi/hBoDr7iFj6twZoP62CosWGFTxrmXxhFBM2m0dqDlj7lt
381  4zlkNCRJKor3rf3WjQoiLob3JwODuincTJemnGo0+zHaGXsG7o61baeE8ifguvxp
382  h9LsGjdRb797H6MTH7NqpupVl+vraRYBwhRE3idvrOjnYK4sSJrGRGsSxwSd7noQ
383  HCZneIOCG1uRtj2n+FGxDHkiynhXorZvsjkwINI0MY9wDF/zWfMvjBlh+4FC5F5R
384  WARL5A==
385  =vFm0
386  -----END PGP PUBLIC KEY BLOCK-----
387  wks-ve5:/home/sa# exit
388  exit
389  sa@wks-ve5:~$ exit
390  logout
391  Connection to foo.bar.com closed.
In lines 311 to 391 we create a revocation certificate for our remote
machine using the subcommand revoke-key. It is important that we anser
n in line 330 otherwise our host key/certificate would be revoked
immediately after — we just want to create it and store it away in
case we need it some time.
The certificate is writen to stdout in lines 361 to 386 — I xed-out a
good portion of it and swapped a few characters using some GNU Emacs
magic like for example string-rectangle and replace-string.
We should then grab that output and store it to some file which we
keep somewhere save e.g. along with our
revocation certificate(s) for our GPG keypair(s).
Remote Machine Setup / User Verification
Remember, there are two angles how we can look at Monkeysphere...
As the administrator of some computer/gadget providing access via SSH,
we can take advantage of Monkeysphere in two ways — these two are
orthogonal/independent i.e. we can do one without the other:
- We can publish the host key of our remote machine to the WOT
(Web of Trust) so that our users can automatically verify it
(this is covered above), and/or
- We can set up a remote machine to automatically
identify/authenticate connecting users by their presence in the
WOT.
- Note that there are two parts to user authentication with
Monkeysphere — there is the part where we set up the remote
machine
- and then there is its counterpart where we enable a user's
OpenPGP key to authenticate the user against the
monkeysphere-enabled remote machine by creating an
authentication subkey.
A monkeysphere-enabled remote machine can maintain SSH-style
~/.ssh/authorized_keys files automatically for its users.
This frees us (the administrator(s)) from the task of manually
checking/transmitting SSH keys, and it also enables users to do
relatively painless key transitions, and to quickly and universally
revoke access if they find that their SSH key has become compromised.
We simply tell the monkeysphere-enabled system what person(s)
(identified by their OpenPGP UID) should have access to an account,
Monkeysphere takes care of generating the proper
~/.ssh/authorized_keys file and keeping it up-to-date, and sshd reads
the generated ~/.ssh/authorized_keys files directly.
392  sa@wks:~$ ssh testing_sec
393
394          / \      _-'
395        _/   \-''- _ /
396   __-' {            \
397       /              \
398       /       "o.  |o }
399       |            \ ;            YOU ARE BEING WATCHED!
400                     ',
401          \_         __\
402            ''-_    \.//
403              / '-____'
404             /
405           _'
406         _-'
407
408
409  This computer system is the private property of its owner, whether individual, corporate or government. It is
410  for authorized use only. Users (authorized or unauthorized) have no explicit or implicit expectation of
411  privacy.
412
413  Any or all uses of this system and all files on this system may be intercepted, monitored, recorded, copied,
414  audited, inspected, and disclosed to your employer, to authorized site, government, and law enforcement
415  personnel, as well as authorized officials of government agencies, both domestic and foreign.
416
417  By using this system, the user consents to such interception, monitoring, recording, copying, auditing,
418  inspection, and disclosure at the discretion of such personnel or officials.
419
420
421          UNAUTHORIZED OR IMPROPER USE OF THIS SYSTEM MAY RESULT
422          IN CIVIL AND CRIMINAL PENALTIES AND ADMINISTRATIVE OR
423          DISCIPLINARY ACTION, AS APPROPRIATE !!
424
425
426  By continuing to use this system you indicate your awareness of and consent to these terms and conditions of
427  use. LOG OFF IMMEDIATELY if you do not agree to the conditions stated in this warning. However, if you are
428  authorized personal with no bad intentions please continue. Have a nice day! :-)
429
430  sa@wks-ve5:~$ su
431  Password:
432  wks-ve5:/home/sa# monkeysphere-authentication list-id-certifiers
433  wks-ve5:/home/sa# monkeysphere-authentication add-id-certifier F6F78566432A78A90D39CDAE48E94AC6C0EC7E38
434  gpg: requesting key C0EC7E38 from hkp server pool.sks-keyservers.net
435  ms: key found:
436  pub   1024D/C0EC7E38 2009-02-06
437        Key fingerprint = F6F7 8566 432A 78A9 0D39  CDAE 48E9 4AC6 C0EC 7E38
438  uid       [ unknown] Markus Gattol () <[email protected]>
439  uid       [ unknown] Markus Gattol () <markus.gattol[at]foo.org>
440  sub   4096g/34233DEF 2009-02-06
441
442  Are you sure you want to add the above key as a certifier
443  of users on this system? (Y/n) Y
444  ms: Identity certifier added.
445  wks-ve5:/home/sa# monkeysphere-authentication list-id-certifiers
446  gpg: checking the trustdb
447  F6F78566432A78A90D39CDAE48E94AC6C0EC7E38:
448   :Markus Gattol (http\x3a//www.markus-gattol.name) <[email protected]>:1:120:
449   :Markus Gattol (http\x3a//www.markus-gattol.name) <markus.gattol[at]foo.org>:1:120:
450  wks-ve5:/home/sa# monkeysphere-authentication diagnostics
451  Checking for authentication directory...
452  Checking core GPG key...
453
454  Checking for Identity Certifiers...
455
456  Checking for Monkeysphere-enabled public-key authentication for users...
457  ! /etc/ssh/sshd_config does not point to monkeysphere authorized keys.
458   - Recommendation: add a line to /etc/ssh/sshd_config: 'AuthorizedKeysFile /var/lib/monkeysphere/authorized_keys/%u'
459  ! /etc/ssh/sshd_config refers to non-monkeysphere authorized_keys files:
460  AuthorizedKeysFile     %h/.ssh/authorized_keys
461   - Recommendation: remove the above AuthorizedKeysFile lines from /etc/ssh/sshd_config
462  When the above 2 issues are resolved, please re-run:
463    monkeysphere-authentication diagnostics
464
465
466  [ here we use nano to edit sshd_config... ]
467
468
At first we need to specify who will be authorized to give users
access to our monkeysphere-enabled remote machine wks-ve5. Those
persons are called Identity Certifiers — there needs to be at least
one such person — choosing the administrator of the remote machine in
order to get things going certainly is an appropriate choice.
Line 432 shows how to list existing Identity Certifiers — there are
none yet which is why we issue line 433 with my key ID of
F6F78566432A78A90D39CDAE48E94AC6C0EC7E38 because we want to make the
administrator (which is true for myself) an Identity Certifier as
well.
After we are done adding (and checking) our first identity certifier,
we run the diagnostics subcommand to get a look on the current status
with regards to user authentication on wks-ve5.
As can be seen, and as I mentioned it before, we only have to make a
tiny change to our existing PKA SSH setup — the only one necessary
though...
What we need to do is to modify our current /etc/ssh/sshd_config to
read AuthorizedKeysFile /var/lib/monkeysphere/authorized_keys/%u
instead of AuthorizedKeysFile %h/.ssh/authorized_keys
We also disable the AllowUsers keyword directive simply because
Monkeysphere is now taking care of who can and who cannot enter our
remote machine wks-ve5. The resulting /etc/ssh/sshd_config for our
monkeysphere-enabled remote machine can be seen below.
The last thing we change is MaxAuthTries — now that we have setup
Monkeysphere in addition to PKA we need at least MaxAuthTries 3 to
work.
Well, actually, this number might be different for the reader because
what happens is that all keys shown with ssh-add -l are tried in order
which means if we set MaxAuthTries 3 and our key is number four then
we will get something like this Received disconnect from UNKNOWN: 3:
Too many authentication failures for sa which means no more than three
authentication tries where allowed but in order to succeed we would
need four.
The point here is, setting MaxAuthTries to some very high number just
to make sure it always works is not the solution either because that
is less secure — right now, for this demonstration, for our three
keys, MaxAuthTries 3 is perfect.
An even better option however, is to use IdentitiesOnly and
IdentityFile (see man 5 ssh_config) in order to know ahead how much
authentication tries we are going to need and which key should be
offered to the remote machine in order to authenticate ourselves.
More information on this matter can be found below — the main
discussion on the matter can also be found below.
###_ main
#AllowUsers sa@*
#GSSAPIAuthentication no
#GSSAPICleanupCredentials yes
#IgnoreUserKnownHosts yes
#KerberosAuthentication no
#KerberosGetAFSToken no
#KerberosOrLocalPasswd yes
#KerberosTicketCleanup yes
#ListenAddress 0.0.0.0
#ListenAddress ::
#UseLogin no
AcceptEnv LANG LC_*
AuthorizedKeysFile /var/lib/monkeysphere/authorized_keys/%u
Banner /etc/issue.net
ChallengeResponseAuthentication no
ClientAliveCountMax 3
ClientAliveInterval 15
HostKey /etc/ssh/ssh_host_dsa_key
HostKey /etc/ssh/ssh_host_rsa_key
HostbasedAuthentication no
IgnoreRhosts yes
KeyRegenerationInterval 3600
LogLevel VERBOSE
LoginGraceTime 20
MaxAuthTries 3
MaxSessions 5
MaxStartups 5:50:20
PasswordAuthentication no
PermitEmptyPasswords no
PermitRootLogin no
Port 18689
PrintLastLog no
PrintMotd no
Protocol 2
PubkeyAuthentication yes
RSAAuthentication no
RhostsRSAAuthentication no
ServerKeyBits 768
StrictModes yes
Subsystem sftp /usr/lib/openssh/sftp-server
SyslogFacility AUTH
TCPKeepAlive yes
UsePAM no
UsePrivilegeSeparation yes
X11DisplayOffset 10
X11Forwarding no
###_ emacs local variables
# Local Variables:
# mode: conf
# allout-layout: (0 : 0)
# End:
469  wks-ve5:/home/sa# monkeysphere-authentication diagnostics
470  Checking for authentication directory...
471  Checking core GPG key...
472
473  Checking for Identity Certifiers...
474
475  Checking for Monkeysphere-enabled public-key authentication for users...
476  Everything seems to be in order!
477  wks-ve5:/home/sa# mkdir .monkeysphere
478  wks-ve5:/home/sa# echo 'Markus Gattol () <markus.gattol[at]foo.org>' >> .monkeysphere/authorized_user_ids
479  wks-ve5:/home/sa# cat !echo:3
480  cat .monkeysphere/authorized_user_ids
481  Markus Gattol () <markus.gattol[at]foo.org>
482  wks-ve5:/home/sa# monkeysphere-authentication update-users
483  wks-ve5:/home/sa# type lat; lat /var/lib/monkeysphere/authorized_keys/
484  lat is aliased to `ls -lath'
485  total 4.0K
486  drwxr-xr-x 2 root root   15 2009-03-27 14:44 .
487  -rw-r----- 1 root sa   1.5K 2009-03-27 14:44 sa
488  drwxr-xr-x 6 root root  141 2009-03-22 14:03 ..
489  wks-ve5:/home/sa# file /var/lib/monkeysphere/authorized_keys/sa
490  /var/lib/monkeysphere/authorized_keys/sa: ASCII text, with very long lines
491  wks-ve5:/home/sa# /etc/init.d/ssh reload
492  Reloading OpenBSD Secure Shell server's configuration: sshd.
493  wks-ve5:/home/sa# exit
494  exit
495  sa@wks-ve5:~$ exit
496  logout
497  Connection to foo.bar.com closed.
After our change to /etc/ssh/sshd_config, we run the diagnostics again
in line 469 and as can be seen, everything checks out to be fine now.
The next thing we are going to do is to actually grant some user(s)
access to wks-ve5 — after all, that is what we are trying to achieve
here in the end...
As can be seen, by issuing monkeysphere-authentication update-users in
line 482, Monkeysphere checks all user accounts for a
~/.monkeysphere/authorized_user_ids file containing OpenPGP UIDs and
if it turns out that this UID(s) lead(s) to a key in the WOT that is
signed by an identity certifier (lines 432 to 449), then a per-user
authorized-keys file is created for that user (line 487).
Finally, because of the change to /etc/ssh/sshd_config, we reload the
current configuration in line 491. Below is a summary of all things
necessary for somebody to access a monkeysphere-enabled remote
machine.
A user is granted access to a monkeysphere-enabled remote machine if
all of the following are true (logical AND):
- He has got a user account on the remote machine (which is
true for
sa)
- This account needs to have a
~/.monkeysphere/authorized_user_ids
file which has to list all OpenPGP UIDs (an exact full match of the
UID is required; see line 481) for all users who need/want access
to this account.
- At least one Identity Certifier has to sign the user's key so that
it has full validity (true for the above case; self-signed).
- The user has created an authentication-capable subkey on his
primary OpenPGP key which is then provided to SSH-agent via
monkeysphere subkey-to-ssh-agent.
- The rest of the SSH setup does not deny access to the user i.e.
there are many keywords within
/etc/ssh/sshd_config that could
prevent access for a user even though Monkeysphere would allow it.
For example, AllowUsers sa@64* would deny access for the system
user sa if he would connect from any IP address not starting with
64 no matter what Monkeysphere decides to do.
As I have mentioned above, we can run Monkeysphere in parallel to some
standard PKA (Public Key Authentication) setup which would allow folks
to log in under the afore mentioned circumstances and/or if their
public key where placed into ~/.ssh/authorized_keys.
However, optionally we can disable standard PKA login so that
Monkeysphere remains the only way to authenticate against our remote
machine wks-ve5:
498  sa@wks:~$ ssh testing_sec
499
500
501  [skipping a lot of lines...]
502
503
504  sa@wks-ve5:~$ su
505  Password:
506  wks-ve5:/home/sa# cd /var/lib/monkeysphere/authorized_keys/
507
508
509  [ here we use nano to edit sshd_config/etc/monkeysphere/monkeysphere-authentication.conf... ]
510
511
512  wks-ve5:/var/lib/monkeysphere/authorized_keys# grep RAW /etc/monkeysphere/monkeysphere-authentication.conf
513  #RAW_AUTHORIZED_KEYS="%h/.ssh/authorized_keys"
514  RAW_AUTHORIZED_KEYS=none
515  wks-ve5:/var/lib/monkeysphere/authorized_keys# monkeysphere-authentication update-users
516  wks-ve5:/var/lib/monkeysphere/authorized_keys# type la
517  la is aliased to `ls -la'
518  wks-ve5:/var/lib/monkeysphere/authorized_keys# la
519  total 4
520  drwxr-xr-x 2 root root  15 Mar 28 13:33 .
521  drwxr-xr-x 6 root root 141 Mar 22 14:03 ..
522  -rw-r----- 1 root sa   811 Mar 28 13:33 sa
523  wks-ve5:/var/lib/monkeysphere/authorized_keys# exit
524  exit
525  sa@wks-ve5:~$ exit
526  logout
527  Connection to foo.bar.com closed.
528  sa@wks:~$
Line 509 indicates we used nano in order to put line 514 into place —
this is the reason why, from now on, standard ~/.ssh/authorized_keys
is ignored by our monkeysphere-enabled SSH setup.
It is then also important to update the monkeysphere-controlled, per
user, authorized-keys file again as we do it in line 515.
Being back on our local machine in line 528, it would now we necessary
to provide the authentication subkey to SSH-agent if we wanted to log
into wks-ve5 — this is mandatory for anybody who does not use
standard PKA in parallel to Monkeysphere i.e. usually a user is
granted monkeysphere-controlled access only and thus he needs to
provide his subkey for authentication with the remote machine.
User Setup
How to set up a remote machine with Monkeysphere and administer it is
covered above.
This subsection is about being a user to some monkeysphere-enabled SSH
setup i.e. a remote machine running an sshd in combination with
Monkeysphere.
Any person who wants to access a monkeysphere-enabled remote machine
needs to have a uniquely verifiable digital identity of himself. With
regards to Monkeysphere, this is an OpenPGP UID in the WOT (Web of
Trust). How to acquire such a digital identity is covered here.
SSH ProxyCommand
The simplest way to identify remote machines with the help of the WOT
(Web of Trust) is to tell SSH to use Monkeysphere's ssh-proxycommand
to connect, instead of connecting to the remote machine/host directly
via standard SSH PKA (Public Key Authentication).
This command will make sure the ~/.ssh/known_hosts file is up-to-date
for the remote machine we are connecting to via SSH (Secure Shell).
We can try this out when connecting to a remote machine which has
published its host key/certificate to the WOT with ssh -o
ProxyCommand='monkeysphere ssh-proxycommand %h %p' foo.bar.com.
However, if we want to have SSH always do this (recommended way), then
we just add line 4 to ~/.ssh/config
1  sa@wks:~$ grep -A4 'Host \*' .ssh/config
2  Host *
3  User            sa
4  ProxyCommand    monkeysphere ssh-proxycommand %h %p
5  ControlMaster   auto
6  ControlPath     /tmp/ssh_connections_to_host(%h)_at_port(%p)_by_user(%r)
7  sa@wks:~$
Note that Monkeysphere will help us identify remote machines whose
host key/certificate has been published to the WOT, and which are
signed by people who we know and trust to correctly identify remote
machines.
If we are not connected to our administrator(s) through the WOT
already, we should talk to them and establish that relationship e.g.
by signing each others public key.
If we have already established that relationship (directly by signing
each others public key or indirectly via the WOT), but a remote
machine's host key/certificate is not published to the WOT, we might
suggest to our administrator(s) that they publish the host
key/certificate in question so users of that remote machine can trust
it.
Authentication Subkey
Above we have seen how to set up a remote machine for user
authentication on the remote site. This is the part where we are going
to look at the counterpart i.e. how to prepare the user's OpenPGP key
so he can log into a monkeysphere-enabled remote machine.
I already mentioned above that anyone who wants to use Monkeysphere as
a user needs to have an OpenPGP UID in the WOT. In order to log into a
monkeysphere-enabled remote machine we need to add an
authentication-capable subkey to our OpenPGP identity using
monkeysphere gen-subkey.
 1  sa@wks:~$ echo $DISPLAY
 2  :0.0
 3  sa@wks:~$ DISPLAY=""; export MONKEYSPHERE_LOG_LEVEL=DEBUG; time monkeysphere gen-subkey --length 4096 $(gpg --fingerprint --with-colons markus.gattol | awk -F: '/fpr/ {print $10}')
 4  ms: creating password fifo...
 5  ms: generating subkey...
 6  Please enter your passphrase for 48E94AC6C0EC7E38:
 7 ............+++++
 8 ......+++++
 9 ...+++++
10  ms: done.
11
12  real    1m45.554s
13  user    0m4.872s
14  sys     0m0.080s
15  sa@wks:~$ gpg --edit-key markus.gattol
16  Secret key is available.
17
18  pub  1024D/C0EC7E38  created: 2009-02-06  expires: never       usage: SC
19                       trust: ultimate      validity: ultimate
20  sub  4096g/34233DEF  created: 2009-02-06  expires: never       usage: E
21  sub  4096R/C3650930  created: 2009-03-28  expires: never       usage: A
22  [ultimate] (1). Markus Gattol () <[email protected]>
23  [ultimate] (2)  Markus Gattol () <markus.gattol[at]foo.org>
24
25  Command> q
26  sa@wks:~$ gpg --send-key $(gpg --fingerprint --with-colons markus.gattol | awk -F: '/fpr/ {print $10}')
27  gpg: sending key C0EC7E38 to hkp server keys.gnupg.net
28  sa@wks:~$ echo $DISPLAY
29
30  sa@wks:~$ export DISPLAY=:0.0
31  sa@wks:~$ echo $DISPLAY
32  :0.0
Lines 1 to 3 are supposed to look different under normal circumstances
but I am having an issue with ssh-askpass and X11 right now so I am
going to temporarily reset DISPLAY.
Line 3 is a bit heavy in this demonstration —
monkeysphere gen-subkey
<key ID>
is actually all that is needed. The key ID (which must only
be provided if the user has more than one primary key) is the one of
the user's primary OpenPGP key i.e.
F6F78566432A78A90D39CDAE48E94AC6C0EC7E38 in my case.
Line 6 prompts us for the password we specified when creating the
keypair in the first place. Lines 7 to 14 are indicators of collecting
enough entropy (see cat /proc/sys/kernel/random/entropy_avail) and how
long it took to do so.
Line 21 shows us the just created subkey — note its A flag which
determines authentication-capable. In line 26 we send the key back
onto the key servers — we may need to wait a few minutes for our new
key to propagate around the keyserver network, and another little
while for any monkeysphere-enabled remote machine to pick up the new
subkey.
Finally I reset DISPLAY to its old value from line 2 so other
applications will work properly. However, as stated above, that should
usually not be necessary.
Providing the Authentication Subkey to SSH-agent
33  sa@wks:~$ ssh-add -l
34  8192 e9:44:87:72:db:27:c7:34:ff:81:a3:9d:5a:26:7c:d3 Public Key (RSA)
35  8192 61:42:af:ea:d9:bf:b7:b5:4b:24:ad:1a:ad:49:80:70 Public Key (RSA)
36  sa@wks:~$ DISPLAY=''; monkeysphere subkey-to-ssh-agent
37  Enter passphrase for key Markus Gattol (http\x3awww.markus-gattol.name) <[email protected]>:
38  gpg: about to export an unprotected subkey
39  We only support RSA keys (this key used algorithm 17).
40  Identity added: Markus Gattol (http\x3awww.markus-gattol.name) <[email protected]> (Markus Gattol (http\x3awww.markus-gattol.name) <[email protected]>)
41  sa@wks:~$ ssh-add -l
42  8192 e9:44:87:72:db:27:c7:34:ff:81:a3:9d:5a:26:7c:d3 Public Key (RSA)
43  8192 61:42:af:ea:d9:bf:b7:b5:4b:24:ad:1a:ad:49:80:70 Public Key (RSA)
44  4096 7d:08:51:13:9e:5a:26:64:c2:df:01:d1:1b:96:81:33 Public Key (RSA)
45  sa@wks:~$ export DISPLAY=:0.0
46  sa@wks:~$ ssh testing_sec
47
48
49  [skipping a lot of lines...]
50
51
52  sa@wks-ve5:~$ exit
53  logout
54  Connection to foo.bar.com closed.
55  sa@wks:~$
As before, I only altered DISPLAY back and forth for this
demonstration (to avoid the popup window for the password prompt).
The yet existing public keys which SSH-agent remembers so far can be
seen in lines 34 and 35 — none of the is the
monkeysphere-authentication subkey we created earlier.
In line 36 we issue monkeysphere subkey-to-ssh-agent which puts the
former created subkey into the SSH-agent — we are prompted for our
primary key's password in line 37; on the CLI (Command Line
Interface), not via some popup window.
In line 44 we can see that SSH-agent now knows about our
monkeysphere-authentication subkey. The following test in lines 46 to
55 is successful. On the remote machine site, the setup at this point,
was as can bee seen above where we got until line 528 or line 497
respectively.
Keeping it up-to-date
WRITEME
triggered by cron
gpg --refresh-keysmonkeysphere-authentication update-users
monkeysphere update-known_hosts
- dkg: i can't think of a good reason that you'd need to run
monkeysphere update-known_hosts regularly if you are regularly
using monkeysphere ssh-proxycommand. the proxycommand triggers the
relevant known_hosts update just before it is needed
triggered by incron
monkeysphere update-authorized_keys
Obstacles
There are a few obstacles one might run into when for example using
Monkeysphere in conjunction with clusterssh. One I run into was the
notorious Connection timed out during banner exchange error.
More information about it can be found here. In short, making it go
away only requires to increase the timeout from 10 seconds to for
example 30 seconds
sa@wks:~$ grep ssh_args .csshrc
ssh_args= -x -o ConnectTimeout=30
sa@wks:~$
Best Practices
There are a few things we can do in order to elevate security step by
step. In more or less chronological order:
- Logging and a pre-login Banner are certainly not the first things
that come into mind but then they are certainly helpful.
- Use a strong passphrase.
- Prohibit root login.
- Make use of
AllowUsers and AllowGroups
- Move sshd listening port away from port
22 to a so-called high port
i.e. > 1023 (port 14701 for example).
- Set
ListenAddress 0.0.0.0 to a specific IP address (e.g.
private IP address if the server should only be accessible from our
LAN) if the server has several interfaces e.g. several NICs
(Network Interface Cards).
- Use PKA (Public Key Authentication) i.e. public/private key pair
with password protection for the private key.
- Use TCP wrappers.
- Make use of a packet filter and maybe accompanying tools/methods
like port knocking.
- Proactive approaches like
fail2ban, denyhosts, etc.
I have made very good experiences with the following
/etc/ssh/sshd_config file
sa@wks:~$ cat /etc/ssh/sshd_config
###_ main
#AuthorizedKeysFile     %h/.ssh/authorized_keys
#GSSAPIAuthentication no
#GSSAPICleanupCredentials yes
#IgnoreUserKnownHosts yes
#KerberosAuthentication no
#KerberosGetAFSToken no
#KerberosOrLocalPasswd yes
#KerberosTicketCleanup yes
#ListenAddress 0.0.0.0
#ListenAddress ::
#UseLogin no
AcceptEnv LANG LC_*
AllowUsers sa@*
Banner /etc/issue.net
ChallengeResponseAuthentication no
ClientAliveCountMax 3
ClientAliveInterval 15
HostKey /etc/ssh/ssh_host_dsa_key
HostKey /etc/ssh/ssh_host_rsa_key
HostbasedAuthentication no
IgnoreRhosts yes
KeyRegenerationInterval 3600
LogLevel VERBOSE
LoginGraceTime 20
MaxAuthTries 2
MaxSessions 5
MaxStartups 5:50:20
PasswordAuthentication yes
PermitEmptyPasswords no
PermitRootLogin no
Port 10874
PrintLastLog no
PrintMotd no
Protocol 2
PubkeyAuthentication no
RSAAuthentication no
RhostsRSAAuthentication no
ServerKeyBits 768
StrictModes yes
Subsystem sftp /usr/lib/openssh/sftp-server
SyslogFacility AUTH
TCPKeepAlive yes
UsePAM yes
UsePrivilegeSeparation yes
X11DisplayOffset 10
X11Forwarding no
###_ emacs local variables
# Local Variables:
# mode: conf
# allout-layout: (0 : 0)
# End:
sa@wks:~$
Note that /etc/ssh/sshd_config as it can be seen above uses password
authentication and not PKA (Public Key Authentication). Some settings
like for example MaxAuthTries might differ based on local
circumstances someone has.
The lines are alphabetically sorted (a single keystroke with GNU Emacs
does the trick ;-] ) and I have made a few additions and sensible
changes to Debian's standard installation. Most of the settings are
now explained below as a remainder of this section.
Logging
The default settings enable sshd logging to the AUTH facility of the
syslog daemon with the INFO level. If SSH (Secure Shell) will be the
primary remote access mechanism used to access our remote machine, we
should consider raising the logging level with the LogLevel directive
to VERBOSE, so we will have the most details available about all
attempted and successful SSH logins.
sa@rh0:~$ grep ^LogL /etc/ssh/sshd_config
LogLevel VERBOSE
sa@rh0:~$
Now all the details of successful SSH logins as well as potential
logins will be recorded into the AUTH context of /var/log/auth.log in
verbose manner.
Banner
- Want to log all user activities but your jurisdiction requires to
tell users they are being watched once they log in?
- Want to displaying an un-welcome message or warning to the curious,
or deliberate unauthorized visitors to your SSH service that remote
access to your computer is for authorized purposes and personal
only?
- Want to wish your employees a nice day?
- etc.
No problem. The Banner directive is just perfect to do all this.
Having a pre-login banner in place helps a great deal with
successfully prosecuting an attacker, or other unauthorized party who
attempts to gain access to our server via SSH or it might just say
something nice to the good guys.
Enabling the Banner Directive
At first we need to uncomment the Banner directive which is what I
already did
sa@rh0:~$ grep Bann /etc/ssh/sshd_config
Banner /etc/issue.net
sa@rh0:~$
Creating the pre-login Message
Now that the banner display is enabled in /etc/ssh/sshd_config, we
create the actual banner message but first we have to take some
precautions:
1  sa@rh0:~$ cd /etc/ && type pi
2  pi is aliased to `ls -la | grep'
3  sa@rh0:/etc$ pi issue
4  -rw-r--r--  1 root root     1535 2008-07-25 16:36 issue
5  lrwxrwxrwx  1 root root       10 2008-07-25 16:40 issue.net -> /etc/issue
6  -rw-r--r--  1 root root       27 2008-07-25 16:37 issue.net_orig
7  -rw-r--r--  1 root root       34 2008-07-25 16:35 issue_orig
8  sa@rh0:/etc$
The files /etc/issue and /etc/issue.net exist per default. We use cp
to backup them e.g. cp /etc/issue /etc/issue_orig. Next thing that
needs to be done is to put the actual banner message into /etc/issue
(ascii text) and finally create a symbolic link ln -s /etc/issue
/etc/issue.net. Once we have reloaded the sshd configuration with
sa@rh0:~$ su
Password:
rh0:/home/sa# /etc/init.d/ssh reload
Reloading OpenBSD Secure Shell server's configuration: sshd.
rh0:/home/sa# exit
exit
sa@rh0:~$
,all login attempts will be met with the message from /etc/issue,
followed by the login prompt. All unauthorized visitors will receive a
clear message that our server is for authorized personal and proper
usage only.
Getting the Result
The result can be seen below. The content of /etc/issue shows up after
issuing the command to log in via SSH and before providing the
password prompt:
sa@sub:~$ ssh rh0

        / \      _-'
      _/   \-''- _ /
 __-' {            \
     /              \
     /       "o.  |o }
     |            \ ;            YOU ARE BEING WATCHED!
                   ',
        \_         __\
          ''-_    \.//
            / '-____'
           /
         _'
       _-'


This computer system is the private property of its owner, whether individual, corporate or government. It is
for authorized use only. Users (authorized or unauthorized) have no explicit or implicit expectation of
privacy.

Any or all uses of this system and all files on this system may be intercepted, monitored, recorded, copied,
audited, inspected, and disclosed to your employer, to authorized site, government, and law enforcement
personnel, as well as authorized officials of government agencies, both domestic and foreign.

By using this system, the user consents to such interception, monitoring, recording, copying, auditing,
inspection, and disclosure at the discretion of such personnel or officials.


        UNAUTHORIZED OR IMPROPER USE OF THIS SYSTEM MAY RESULT
        IN CIVIL AND CRIMINAL PENALTIES AND ADMINISTRATIVE OR
        DISCIPLINARY ACTION, AS APPROPRIATE !!


By continuing to use this system you indicate your awareness of and consent to these terms and conditions of
use. LOG OFF IMMEDIATELY if you do not agree to the conditions stated in this warning. However, if you are
authorized personal with no bad intentions please continue. Have a nice day! :-)

[email protected]'s password:
Linux rh0 2.6.25-2-amd64 #1 SMP Mon Jul 14 11:05:23 UTC 2008 x86_64

The programs included with the Debian GNU/Linux system are free software;
the exact distribution terms for each program are described in the
individual files in /usr/share/doc/*/copyright.

Debian GNU/Linux comes with ABSOLUTELY NO WARRANTY, to the extent
permitted by applicable law.
Last login: Fri Jul 25 15:39:30 2008 from xxxxxxxxxxxxxxxxxxxxxxxxxxxxxxxxxxxx
sa@rh0:~$
All local console logins will also display the message from
/etc/issue, meaning that even those using the machine at the physical
level will receive our message.
If this is not the behavior one desires, then he could place the
banner content into /etc/issue.net rather than making a symbolic link
from /etc/issue. With no text in /etc/issue but only /etc/issue.net
the warning will be presented only to those attempting to access the
system remotely e.g. via SSH.
Strong Passwords
Here is some explanation what we consider a weak password. When we use
adduser to create a new user, we are also asked for a passphrase. That
is when we can make the decision for a strong password:
sa@sub:~$ type pwg
pwg is aliased to `pwgen -sncB 55 1'
sa@sub:~$ pwg
usFAtwH3ou4NXkrheFjrFzNCRpVbTHfaXjiwmtNjWgcTRb9TwayYXjg
sa@sub:~$ pwgen -sync 55 1
.:.2LRC=^h_LiJ^pBAeFLNTu`J3RO_:&\qCK)X`wEqipL2a_GD[=jzy
sa@sub:~$
Well, although those are very strong passwords, typing this on a
regular is like cursing some user. A no-go simply put. Instead of
using the CLI (Command Line Interface) and pwgen, one could also use
http://www.goodpassword.com/index.htm to get a good password.
A good idea is using something familiar. Something like
tina29redhairSW7London is quite strong... well, not perfect but
certainly not that guessable and certainly better than <firstname>
e.g. steve.
Another trivial change to actually elevate security a bit is to alter
the LoginGraceTime directive. By default, Debian's configuration of
the OpenSSH server allows for 120 seconds from the time the login
prompt is displayed until a user must finish the login process or the
connection is terminated by sshd.
sa@rh0:~$ grep ^Login /etc/ssh/sshd_config
LoginGraceTime 5
sa@rh0:~$
Now the sshd will only wait 5 seconds for a user to finish the login
process before disconnecting the remote connection. This may aid in
thwarting automated brute force attacks and denial of service style
attacks against our SSH service.
- Caution
-
In case of passwords like for example what I mentioned as strong above
5 seconds is certainly not enough i.e. if we are not able to enter the
password in 5 seconds then we have locked ourselves out. 20 seconds
sounds quite reasonable though...
Prohibit root login
We do not want to allow SSH login for the user root simply
because it is to dangerous i.e. it is bad if someone gains access via
a non-root user account but a total disaster if that person
gains access as root.
1  sa@rh0:~$ grep PermitRootLogin /etc/ssh/sshd_config
2  PermitRootLogin no
3  sa@rh0:~$
Line 2 shows how it should look like, if it does not, we need to edit
/etc/ssh/sshd_config on the server (where the sshd daemon runs) and
change yes to no. If we do so, we can see that a login attempt as root
(line 6) fails even though we provided the correct password for the
user root in line 5.
[exiting the server; back on local machine...]

4  sa@sub:~$ ssh [email protected]
5  [email protected]'s password:
6  Permission denied, please try again.
7  sa@sub:~$
Allow Users / Groups
The directive AllowUsers in /etc/ssh/sshd_config specifies and
controls which users can access the SSH services i.e. only users
explicitly listed with AllowUsers can access our server (this is known
as whitelisting).
The example below shows that only the user sa is allowed to
access the server — any other user is not allowed to access the
server.
sa@sub:~$ ssh rh0 grep AllowUsers /etc/ssh/sshd_config
[email protected]'s password:
AllowUsers sa
sa@sub:~$
-
At this point, by merely using
AllowUsers, brute-force attempts are
mitigated because the attacker needs not only to guess the correct
password, but also the correct user account. Any attempts to
log in as some user other than those are listed with AllowUsers will
result in failed login attempts, even if the correct password is
provided.
However, we can further tighten the security here by specifying not
only a username that can be permitted, but also the originating host
they can log in from by specifying a user@host pattern.
For example, if we specify [email protected] then access to the user account
sa will only be granted to connections originating from the IP address
10.0.5.1. Furthermore, we could specify various patterns here e.g.
[email protected].* to allow access from any system in the 10.0.0.0/16 network
range. The man 5 ssh_config has more details on allowable patterns
that can be used.
My personal preference is to use AllowUsers and AllowGroups in
/etc/ssh/sshd_config for the user only and specify the host
part with TCP wrappers i.e. /etc/hosts.allow respectively
/etc/hosts.deny. However, the latter is just a personal preference...
using something like AllowUsers user1@hostA *@networkA etc. is
perfectly fine too.
sshd listening Port
By default sshd listens on port 22 — we can check using sshd -T or
simply by looking into /etc/ssh/sshd_config. Automated procedures use
this fact in order to brute force our servers. By simply moving sshd's
listening port away from port 22 to some high port (> 1023), automated
login attempts either stop entirely or drop to a fraction of what we
got before on port 22.
-
The reasoning here is simple — if we were the bad guys attempting to
brute force on random IP addresses in order to gain access to some
computer, we would have to maximize our chances for success.
-
Since we would have limited resources (time, bandwidth, computing
power, etc.) we would simply scan random IP addresses for existence of
an SSH service on port
22 at first. Only if this would return a
positive result would we start brute forcing i.e. trying to login on
port 22 as root, admin, superuser and the like. We would spend a
fraction of our resources on that particular IP (port 22) but at some
point either had been successful already or not. If not successful, we
move on the next IP, again spend a fraction of our resources and so on
and so forth...
Long story told short, since automated procedures in 99% of all cases
only look for an SSH service on port 22 a simple
sa@sub:~$ ssh rh0 grep Port /etc/ssh/sshd_config
[email protected]'s password:
Port 17489
sa@sub:~$
is enough in order to avoid 99% percent of all automated procedures
targeted at the SSH service. After we added the line Port 17489, a
simple /etc/init.d/ssh reload reloads the new configuration into our
sshd and therefore the sshd on our remote server is listening on port
17489 from now on instead of port 22.
Specify particular listening Interface / Address
If we are running SSH on a box within our LAN (Local Area Network)
which is secured by a firewall from the insecure Internet then the
following information is probably not needed. If however, we are
running SSH on a firewall box or some kind of gateway with two or more
network interfaces, then this section is quite interesting.
Out of the box OpenSSH will bind to every available network address
sub:/home/sa# netstat -tulpen | egrep ^Proto\|ssh
Proto Recv-Q Send-Q Local Address           Foreign Address         State       User       Inode       PID/Program name
tcp6       0      0 :::17489                 :::*                    LISTEN      0          5797        2516/sshd
sub:/home/sa#
While convenient and suitable for most installations, this is far from
optimal. If our machine has two or more NICs (Network Interface Cards)
then the odds are that one is trusted (e.g. connected to our LAN) and
the other is untrusted (e.g. connected to the Internet). If this is
the case, and we do not need nor want SSH access coming in on the
untrusted interface, then we should configure OpenSSH to listen on a
specific interface (the trusted one that is) only. To have sshd only
bind to our internal interface with the IP address 10.0.4.56 we have
to set the ListenAddress directive
sa@sub:~$ ssh rh0 grep ListenAddress /etc/ssh/sshd_config
[email protected]'s password:
ListenAddress 10.0.4.56
sa@sub:~$
then we reload the configuration (see above) and we are done binding
sshd to some specific listening interface.
Public Key Authentication
It is very important that we control who has access to our servers —
using SSH with PKA (Public Key Authentication) is one great method to
get this job done. SSH with PKA can be used standalone or with a bunch
of other methods like for example port knocking, tcp wrappers,
ssh proxies, etc.
Even if used standalone, PKA with SSH creates a practically not to
overcome barrier for those (humans and software bots) who are not
allowed to access our servers. This is just one reason, aside from its
easy setup and maintenance, PKA is used a lot in practice. It is also
the most recommended method to automate the authentication procedure
to our servers in case it is needed for things like for example
automated backups.
In essence, PKA is working with a set of two keys:
- a private key (the one we keep secret, located on our local
machine) and
- a public key (the one we put on our server)
The public key resides on our server, and a private key that
corresponds with that public key resides on the user's computer. The
private key is a secret file that matches with the public key in order
to allow a connection to the remote server to be established —
only
those computers with the private key locally stored will be able to
connect to the remote server via SSH.
Private keys can be encrypted using a strength that varies (mostly
from 1024 bit to 4096 bit) in length. The algorithm/method used is
either RSA or DSA. These keys are so secure that it is believed, even
supercomputers would take years to break the least encrypted (1024
bit) keys if not hundreds of years in case keys with a length of 4096
or more bits are used. In short, if set up correctly and used
correctly, PKA makes it impossible for others to break into our
server.
Why does Public Key Authentication benefit me?
PKA keeps our businesses IT infrastructures and therefore our
livelihoods secure. Even if this seems not so important to most folks
at first glance (those who want quick results no matter what), keeping
things secure and under control is what everybody needs/wants in the
long run.
If we use PKA then no longer can our SSH password (the user
password on the remote machine) be used to access a server, be guessed
or cracked by hackers applying brute forcing and things like that.
If we decide to access our remote server/machine using both, our
private key and the password we choose to protect it (the one we used
when creating the keypair; not to be confused with the user
password on the remote machine used for password authentication), then
even if someone knows the password for our private key, he still needs
to obtain our private key in order to gain access to our server.
It is the same the other way around i.e. if someone managed to get our
private key, he still needs the password to unlock the private key in
order to successfully access our server.
If the reader is totally confused now, let me try again:
- we can use PKA (Public Key Authentication) and not protect our
private key with a password (not recommended) or
- we can use PKA and protect our private key with a password — this
is also known as two-factor authentication, only trumped by
multi-factor authentication of order three or higher. I recommend
two-factor authentication i.e. key plus password and not just the
key alone. Those worried about the extra labor of typing the
password should actually not be worried at all but take a look at
SSH-agent. In short, we only need to provide the password once per
session i.e. if we boot our computer and let it run for a week or
so, then we only need to provide the password to unlock the private
key once and SSH-agent remembers it throughout the whole session.
Using PKA with SSH not just increases security for the person/company
who ultimately owns and/or administers the server but also for
everyone else on the server i.e. with SSH PKA all user accounts are
more secure which in turn reduces the risk of server-wide problems and
keeps user accounts and therefore the whole server more secure from
hostile activities.
Things to note when enabling PKA:
As with most things in life, there are advantages and disadvantages to
enabling PKA (Public Key Authentication):
- Additional Difficulty for Users
-
Users need be instructed on how to create public and private keys and
how to protect their private key. Once they have their private key
created and configured in their SSH program, there is no extra work
involved. However, from my point of view, the extra security PKA
provides is definitely worth the added level of difficulty. However,
this additional difficulty/burden can be hidden if we decide to use an
SSH proxy — this way, the benefit of PKA with SSH remains but is made
transparent for users.
- Private keys are precious
-
We and our users must treat private keys as highly secret items. They
should never be given out as they are a key to accessing our server
and anyone with access to a private key can access our server. Because
of this potential problem, I recommend password protecting private
keys so that only those who have both, the private key and the
password, can connect to our remote server running the sshd also known
as SSH server. However, users simply loose stuff all the time e.g. a
simply HDD (Hard Disk Drive) failure with one of our user's computers
may cause major troubles. Again, SSH proxies can provide relief as
they allow for centralization of our PKA infrastructure.
Setting up PKA
As of now we have a working SSH setup where we can login to our server
(running the sshd) from our client (running an SSH client; preferably
OpenSSH) via password authentication. Our plan now is to set up PKA,
test it and only if it works do we disable password authentication —
otherwise we might accidentally lockout ourselves from the server.
Enabling PKA
In the example below, wks-ve5 is considered the remote machine running
the sshd (actually it is an OpenVZ VE (Virtual Environment)) and wks
is considered our local machine (my workstation actually).
The user I work with is my standard user called sa. The
readers setup may deviate but then the principle remains the same —
we use PKA to login to some remote machine via SSH.
As of now (March 2009) Debian ships with PKA enabled but that might be
different depending on what local settings we have. So, just to be
sure, we check the current status on PKA.
 1  wks-ve5:/etc/ssh# egrep ^RSA\|^Pub\|^Protoc\|^Passwo\|AuthorizedKeysFile sshd_config
 2  #AuthorizedKeysFile     %h/.ssh/authorized_keys
 3  PasswordAuthentication yes
 4  Protocol 2
 5  PubkeyAuthentication no
 6  RSAAuthentication no
 7  wks-ve5:/etc/ssh# egrep ^RSA\|^Pub\|^Protoc\|^Passwo\|AuthorizedKeysFile sshd_config
 8  AuthorizedKeysFile     %h/.ssh/authorized_keys
 9  PasswordAuthentication yes
10  Protocol 2
11  PubkeyAuthentication yes
12  RSAAuthentication no
As we can see in lines in lines 2, 5 and 6, PKA is currently disabled.
Although we also tested for RSAAuthentication (SSH protocol version 1)
only PubkeyAuthentication is of interest to us since we use SSH
protocol version 2 as can be seen in line 4. To enable PKA we set
PubkeyAuthentication yes and uncomment line 2 so that the result looks
like lines 8 to 12.
Creating the Keypair
After we configured the remote machine to allow for both, password
authenticated login using the user password for sa as well as
PKA (Public Key Authentication) login via SSH, we still need to create
a keypair used for PKA.
13  wks-ve5:/etc/ssh# hostname
14  wks-ve5
15  wks-ve5:/etc/ssh# whoami
16  root
17  wks-ve5:/etc/ssh# exit
18  exit
19  sa@wks-ve5:~$ whoami
20  sa
21  sa@wks-ve5:~$ pwd
22  /home/sa
23  sa@wks-ve5:~$ type pi; pi ssh
24  pi is aliased to `ls -la | grep'
25  sa@wks-ve5:~$ exit
26  logout
27  Connection to 192.168.1.104 closed.
28  sa@wks:~$ whoami
29  sa
30  sa@wks:~$ hostname
31  wks
32  sa@wks:~$ pwd
33  /home/sa
34  sa@wks:~$ cd .ssh/
35  sa@wks:~/.ssh$ pi Markus
In lines 13 to 22 we just take a look around on the remote machine and
ensure who we are and what machine/host this is — sometimes, when
working with dozens of SSH sessions in parallel, this is necessary
because only believing in the shell prompt may be fatal ;-]
One important thing to note here is the result of line 23 — not the
fact that pi is an alias in my ~/.bashrc but that there actually is no
output from pi ssh. In other words, at this point there is no ~/.ssh
on the remote machine. More on that later...
After logging out from the remote machine we change into ~/.ssh on the
local machine and check if there is a file or directory containing the
string wks-ve5. There is no output so there is none.
36  sa@wks:~/.ssh$ ssh-keygen -t rsa -b 8192 -f /home/sa/.ssh/ssh_pka_key_for_user_Markus_Gattol -C 'PKA keypair for user Markus Gattol; reach me at [email protected]'
37  Generating public/private rsa key pair.
38  Enter passphrase (empty for no passphrase):
39  Enter same passphrase again:
40  Your identification has been saved in /home/sa/.ssh/ssh_pka_key_for_user_Markus_Gattol.
41  Your public key has been saved in /home/sa/.ssh/ssh_pka_key_for_user_Markus_Gattol.pub.
42  The key fingerprint is:
43  a6:2c:b6:3b:52:06:3c:7f:29:69:64:5f:c1:6d:ea:23 PKA keypair for user Markus Gattol; reach me at [email protected]
44  The key's randomart image is:
45  +--[ RSA 8192]----+
46  |   .       . .   |
47  |    +       o o  |
48  |     +   .   o . |
49  |      + =   .   .|
50  |     o =So .   . |
51  |    .. o+ .  E ..|
52  |    o.o.      . .|
53  |   ..o           |
54  |    oo           |
55  +-----------------+
56  sa@wks:~/.ssh$ pi Markus
57  -rw-------  1 sa sa 6431 2009-03-08 20:42 ssh_pka_key_for_user_Markus_Gattol
58  -rw-r--r--  1 sa sa 1481 2009-03-08 20:42 ssh_pka_key_for_user_Markus_Gattol.pub
The reason why we issued line 35 can be seen in line 36 — we create
the new keypair and name it appropriately (ssh_pka_key_for_user_Markus_Gattol). Line
35 was about checking if there may have been a keypair already...
The switches in line 36 are pretty much self-explanatory. I used -b
8192 in order to increase the key length from its default value of
2048 bits.
Lines 38 and 39 are important. Remember what I said above about
protecting the private key using a passphrase? Well, this is it.
Lines 40 to 55 contain additional information like for example the
keys fingerprint (a keys unique identifier) and the comment message we
supplied in line 36. There is also a visual representation of the keys
fingerprint which is... well, nice to have I guess ;-]
The same command we issued in line 35, issued again in line 56 now
provides us with the keypair we just created — the private
(ssh_pka_key_for_user_Markus_Gattol) as well as the public key for the
person Markus Gattol.
Note that this keypair mentions the user Markus Gattol, not the remote
machines hostname wks-ve5 nor Markus's user account sa — more on
that later.
Also note that an SSH keypair has nothing to do with some GPG (GNU
Privacy Guard) keypair.
Transferring the Public Key to the remote Machine
Next thing to do is to move the public key onto the remote machine so
PKA can work.
The Internet is full of documentation about this step including all
kinds of mystical magic like for example transferring the key with
scp, manually creating ~/.ssh and ~/.ssh/authorized_keys just to find
out it does not work because StrictModes yes is used etc. I strongly
recommend to ssh-copy-id in order to avoid all that potential
problems.
59  sa@wks:~/.ssh$ ssh-copy-id -i /home/sa/.ssh/ssh_pka_key_for_user_Markus_Gattol '-p 18689 [email protected]'
60
61
62  [skipping a lot of lines...]
63
64
65  [email protected]'s password:
66  Now try logging into the machine, with "ssh '-p 18689 [email protected]'", and check in:
67
68    .ssh/authorized_keys
69
70  to make sure we haven't added extra keys that you weren't expecting.
71
72  sa@wks:~$ ssh -p 18689 [email protected]
73
74
75  [skipping a lot of lines...]
76
77
78  [email protected]'s password:
79  Linux wks-ve2 2.6.26-1-openvz-amd64 #1 SMP Sat Jan 10 18:52:53 UTC 2009 x86_64
80
81  The programs included with the Debian GNU/Linux system are free software;
82  the exact distribution terms for each program are described in the
83  individual files in /usr/share/doc/*/copyright.
84
85  Debian GNU/Linux comes with ABSOLUTELY NO WARRANTY, to the extent
86  permitted by applicable law.
87  sa@wks-ve5:~$ su
88  Password:
89  wks-ve5:/home/sa# /etc/init.d/ssh reload
90  Reloading OpenBSD Secure Shell server's configuration: sshd.
91  wks-ve5:/home/sa# exit
92  exit
93  sa@wks-ve5:~$ exit
94  logout
95  Connection to 192.168.1.104 closed.
In line 59 we use ssh-copy-id in order to copy the public key onto the
remote machine. I had to enclose the target IP address in single
quotes to specify a non-standard SSH port of 18689 — as of now (March
2009), there is a bug with ssh-copy-id which would make it go belly up
if we just used -p 18689 [email protected].
In line 65 we are still asked for the sa's user password
because ssh-copy-id needs to log into wks-ve5, create ~/.ssh as well
as ~/.ssh/authorized_keys and modify the access permissions so it will
work with StrictModes yes. If we recall, we checked for the existence
of ~/.ssh in line 23 — it did not exist back then.
Lines 72 to 95 are just because we have not reloaded
/etc/ssh/sshd_config since we changed it in lines 1 to 12. Only after
we did so in line 89 is PKA be enabled.
At this point both, password as well as PKA login to the remote
machine is enabled. The rationale here is simple —
only after we made
sure that PKA login works do we disable the standard user
password login.
If we would have disabled password login using the users
password for sa by now already, then if PKA login would not work for
some reason, we would have locked out ourselves from wks-ve5 after
issuing line 93.
This is no problem with our current setup as wks-ve5 actually is an
OpenVZ VE (Virtual Environment) running on my workstation i.e. I can
enter it without the need for SSH at all. However, what if we would
have taken wks-ve5 and live-migrated it as is to a remote server in
some datacenter already? Or what if it were no VE at all but a
non-virtualized box in a remote datacenter?
Testing PKA enabled Login
 96  sa@wks:~$ ssh -i ~/.ssh/ssh_pka_key_for_user_Markus_Gattol -p 18689 [email protected]
 97
 98
 99  [skipping a lot of lines...]
100
101
102  Enter passphrase for key '/home/sa/.ssh/ssh_pka_key_for_user_Markus_Gattol':
103  Linux wks-ve5 2.6.26-1-openvz-amd64 #1 SMP Sat Jan 10 18:52:53 UTC 2009 x86_64
104
105  The programs included with the Debian GNU/Linux system are free software;
106  the exact distribution terms for each program are described in the
107  individual files in /usr/share/doc/*/copyright.
108
109  Debian GNU/Linux comes with ABSOLUTELY NO WARRANTY, to the extent
110  permitted by applicable law.
111  sa@wks-ve5:~$ su
112  Password:
In line 96 we specify the identity/keypair we would like to use for
PKA login to our remote machine which is of course the one we created
in lines 36 to 55. Line 99, as the others before, is just an indicator
that I skipped the banner message.
Line 102 is important as we are prompted for the password that
protects our private key, the one we provided in lines 38 and 39.
After providing the correct password, we are successfully logged into
the remote machine, this time using PKA. This is the proof which we
were looking for in order to turn of the standard password
authentication using a user's password.
Disable PAM and Password Authentication
This is optional but strongly recommended. After we set up PKA, we can
disable PAM (Pluggable Authentication Modules) as well as password
authentication because we do not need them anymore now that PKA works,
besides, PKA is way more secure and comfortable than using password
authentication.
113  wks-ve5:/home/sa# cd /etc/ssh/
114  wks-ve5:/etc/ssh# egrep ^UsePAM\|^Password sshd_config
115  PasswordAuthentication yes
116  UsePAM yes
117  wks-ve5:/etc/ssh# nano sshd_config
118
119
120  [ here we use nano to edit sshd_config... ]
121
122
123  wks-ve5:/etc/ssh# egrep ^UsePAM\|^Password sshd_config
124  PasswordAuthentication no
125  UsePAM no
126  wks-ve5:/etc/ssh# /etc/init.d/ssh reload
127  Reloading OpenBSD Secure Shell server's configuration: sshd.
128  wks-ve5:/etc/ssh# exit
129  exit
130  sa@wks-ve5:~$ exit
131  logout
132  Connection to 192.168.1.104 closed.
133  sa@wks:~$ ssh -p 18689 [email protected]
134
135
136  [skipping a lot of lines...]
137
138
139  Permission denied (publickey).
In order to so, we need to change lines 115 and 116 to 124 and 125 and
reload /etc/ssh/sshd_config.
In line 133 we test if password authentication is still working — it
is not as line 139 indicates but instead the remote machine requires
us to use PKA from now on.
We are done now setting up a rock-solid PKA (Public Key
Authentication) login environment in order to log into our remote
machine wks-ve5 safely and, as we will see below, automatically.
We started with my standard /etc/ssh/sshd_config file for user
password enabled authentication from above. The PKA enabled flavor in
its final state (as we have now created it) can be seen below:
###_ main
#GSSAPIAuthentication no
#GSSAPICleanupCredentials yes
#IgnoreUserKnownHosts yes
#KerberosAuthentication no
#KerberosGetAFSToken no
#KerberosOrLocalPasswd yes
#KerberosTicketCleanup yes
#ListenAddress 0.0.0.0
#ListenAddress ::
#UseLogin no
AcceptEnv LANG LC_*
AllowUsers sa@*
AuthorizedKeysFile     %h/.ssh/authorized_keys
Banner /etc/issue.net
ChallengeResponseAuthentication no
ClientAliveCountMax 3
ClientAliveInterval 15
HostKey /etc/ssh/ssh_host_dsa_key
HostKey /etc/ssh/ssh_host_rsa_key
HostbasedAuthentication no
IgnoreRhosts yes
KeyRegenerationInterval 3600
LogLevel VERBOSE
LoginGraceTime 20
MaxAuthTries 1
MaxSessions 5
MaxStartups 5:50:20
PasswordAuthentication no
PermitEmptyPasswords no
PermitRootLogin no
Port 18689
PrintLastLog no
PrintMotd no
Protocol 2
PubkeyAuthentication yes
RSAAuthentication no
RhostsRSAAuthentication no
ServerKeyBits 768
StrictModes yes
Subsystem sftp /usr/lib/openssh/sftp-server
SyslogFacility AUTH
TCPKeepAlive yes
UsePAM no
UsePrivilegeSeparation yes
X11DisplayOffset 10
X11Forwarding no
###_ emacs local variables
# Local Variables:
# mode: conf
# allout-layout: (0 : 0)
# End:
Automating the PKA Login
I already mentioned it above, we can use SSH-agent to bring a lot more
comfort into our lives. In our current case we want to only provide
the password used to unlock our private key once per session i.e. all
subsequent PKA logins to the remote machine will not prompt us (the
user) for the password anymore because the SSH-agent will intercept
the call and provide the password for us.
140  sa@wks:~$ ssh-add /home/sa/.ssh/ssh_pka_key_for_user_Markus_Gattol
141  Enter passphrase for /home/sa/.ssh/ssh_pka_key_for_user_Markus_Gattol:
142  Identity added: /home/sa/.ssh/ssh_pka_key_for_user_Markus_Gattol (/home/sa/.ssh/ssh_pka_key_for_user_Markus_Gattol)
143  sa@wks:~$ ssh -i /home/sa/.ssh/ssh_pka_key_for_user_Markus_Gattol -p 18689 [email protected]
144
145
146  [skipping a lot of lines...]
147
148
First however we need to tell the SSH-agent about the particular
identity to use for logging into wks-ve5 (line 140). In line 141, we
provide the password in order to unlock the private key — same thing
as we did in line 102 but then this time it is the SSH-agent that we
provide it to and not directly the SSH login process itself.
In line 143 we give it a try and as if it were magic, we are logged
into the remote machine instantly without being required to type the
password to unlock our private key as we had to in line 102 before.
Let us recap: we have a working PKA SSH setup, password authentication
as well as PAM is disabled and last but not least, the SSH-agent takes
away the burden of providing the password to unlock the private key
over and over again any time we want to log into the remote machine.
This whole setup is very cool and good already but then, perfect is
what we want. The distinction between good and perfect in this regard
is if we could somehow wrap that overly complex line 143 into
something nice to remember like ssh wks-ve5 for example.
149  sa@wks-ve5:~$ exit
150  logout
151  Connection to 192.168.1.104 closed.
152  sa@wks:~$ grep -A5 wks-ve5 .ssh/config
153  ###_ , wks-ve5
154  # description:  remote host wks-ve5
155  Host            wks-ve5
156  HostName        192.168.1.104
157  Port            18689
158  User            sa
159  ###_ , sub
160  sa@wks:~$ ssh wks-ve5
161
162
163  [skipping a lot of lines...]
164
165  sa@wks-ve5:~$ exit
166  logout
167  Connection to 192.168.1.104 closed.
168  sa@wks:~$
We can get rid of the complex and tedious-to-type command sequence
from line 143 by putting all that information into ~/.ssh/config on
the machine where the SSH connection originates from i.e. the
client side which happens to be wks (my workstation) in our current
case — there can be multi-hop scenarios but then that is another
story ;-]
Anyway, what I have in my ~/.ssh/config on wks can be seen in lines
153 to 158. Once in place, line 160 is all we need to log into a
remote machine using PKA — no password to unlock the private key will
be required once SSH-agent knows about it. Further down I provide a
bit more of additional information on SSH shortcuts and why for
example the IdentityFile keyword might replace the -i switch from
line 143.
We have now finished setting up a PKA (Public Key Authentication)
setup which not just provides superior security to all of its users,
all of the data stored onto a remote machine and all user accounts on
this remote machine. Aside from superior security we have also created
a super-comfortable way to log into a remote machine (line 160), so
comfortable even that all sorts of daemons and programs might use it
to, for example, carry out automated backups and things like that.
TCP Wrapper
This subsection can be found on another page.
Port Knocking
Go here.
Proactive Approaches
WRITEME
Iptables / Recent Module
Go here.
fail2ban
This subject is covered on another page.
SSHGuard
- sshguard - Protects from brute force attacks against ssh
denyhosts
Nice to Know / Have
This section covers things which are generally considered
non-mandatory knowledge but which most people might find useful to
know about.
SSH Agent
Although optional it is highly recommended to use SSH-agent because it
brings a great deal of comfort to the table we all want to enjoy.
SSH-agent is shipped with the openssh-client package as can be seen
sa@wks:~$ type afs; afs ssh-agent | grep bin
afs is aliased to `apt-file search'
openssh-client: /usr/bin/ssh-agent
sa@wks:~$
So what is it that SSH-agent does? Well, in a nutshell, he remembers
stuff for us and talks to a bunch of SSH related services on our
behalf — it does all the repetitive and tedious talking for us.
To be more precise, the SSH-agent is a program to hold private keys
used for public key authentication — RSA and DSA that is.
The idea is that SSH-agent is started in the beginning of an X-session
or a login session, and all other windows or programs are started as
clients to the SSH-agent program.
Throughout this session, by using environment variables, the SSH-agent
can be located and automatically used for authentication when logging
into other machines using SSH.
For example, if we use GIThub in order to manage source code or if we
log into a remote machine using automatic PKA login then SSH-agent
would provide the password to unlock the particular private key on our
behalf so we are not bothered by it.
However, for that to work we need to tell SSH-agent about our
identities/keypairs once per session — we do so using ssh-add (see
links above).
Once done, we can take a look at the identities currently known by the
SSH-agent
sa@wks:~$ ssh-add -l
8192 e9:88:82:22:fb:22:c2:38:ff:81:a3:9f:5a:26:2c:f3 Public Key (RSA)
8192 61:82:af:ea:f9:bf:b2:b5:8b:28:af:1a:af:89:80:20 Public Key (RSA)
sa@wks:~$
As can be seen, I have currently two identities known by SSH-agent.
From left to right, each line shows, length in bits, fingerprint in
hexadecimal and key type.
We could now use ssh-add to add more identities, ssh-add -d to delete
some or we could use the -t switch to impose time limits on particular
identities. We could further choose to lock the SSH-agent with some
password using -x etc. More information can be found at man 1 ssh-add
and man 1 ssh-agent.
Keychain
The SSH-agent as well as GPG-agent keep information about our
identities for as long as our current session period lasts — this
information is kept in RAM (Random Access Memory) and is never written
to the HDD (Hard Disk Drive).
Once we end our current session e.g. by logging out, this information
is lost as well and has to be provided again when we log on next time.
This is bad for two reasons:
- This is not just time consuming if we have to look up the password
to unlock the private keys in some GPG (GNU Privacy Guard)
encrypted file or if we have to ask
pwsafe and utilities like
that. About that, I hope that anybody keeps passwords for private
keys etc. safe like this i.e. encrypted on the file system.
- Second to that, if we log out or end a particular session, then
cron jobs and other background jobs and the like would also not be
able to ask the SSH-agent for credentials in order to perform, for
example, automated backups or do some other unattended work that
would normally be interactive.
There is a tool called keychain which can ease this pain. Keychain is
a manager for SSH-agent as well as GPG-agent. It allows our shells and
cron jobs to share a single SSH-agent/GPG-agent process.
In case of SSH, when keychain is run, it checks for a running
SSH-agent, otherwise it starts one. It saves the SSH-agent environment
variables to files like for example ~/.keychain/${HOSTNAME}-sh (line
27), so that subsequent logins and non-interactive shells such as cron
jobs can source the file and make passwordless SSH connections.
In addition, when keychain runs, it verifies that the key files
specified on the command-line are known to SSH-agent (which is the
case below), otherwise it loads them, prompting us for a password if
necessary.
 1  sa@wks:~$ ssh-keygen -l -f .ssh/ssh_pka_key_for_user_Markus_Gattol
 2  8192 e9:44:87:72:db:27:c7:34:ff:81:a3:9d:5a:26:7c:d3 .ssh/ssh_pka_key_for_user_Markus_Gattol.pub (RSA)
 3  sa@wks:~$ ssh-add -l
 4  8192 e9:44:87:72:db:27:c7:34:ff:81:a3:9d:5a:26:7c:d3 Public Key (RSA)
 5  sa@wks:~$ keychain
 6
 7  KeyChain 2.6.8; http://www.gentoo.org/proj/en/keychain/
 8  Copyright 2002-2004 Gentoo Foundation; Distributed under the GPL
 9
10   * Inheriting ssh-agent (4601)
11   * Initializing /home/sa/.keychain/wks-sh file...
12   * Initializing /home/sa/.keychain/wks-csh file...
13   * Initializing /home/sa/.keychain/wks-fish file...
14   * Inheriting gpg-agent (4904)
15   * Initializing /home/sa/.keychain/wks-sh-gpg file...
16   * Initializing /home/sa/.keychain/wks-csh-gpg file...
17   * Initializing /home/sa/.keychain/wks-fish-gpg file...
18
19  sa@wks:~$ la .keychain/
20  total 32
21  drwx------  2 sa sa  102 2009-03-14 01:56 .
22  drwxr-xr-x 67 sa sa 4096 2009-03-14 01:56 ..
23  -rw-------  1 sa sa   73 2009-03-14 01:56 wks-csh
24  -rw-------  1 sa sa   58 2009-03-14 01:56 wks-csh-gpg
25  -rw-------  1 sa sa  129 2009-03-14 01:56 wks-fish
26  -rw-------  1 sa sa   87 2009-03-14 01:56 wks-fish-gpg
27  -rw-------  1 sa sa  103 2009-03-14 01:56 wks-sh
28  -rw-------  1 sa sa   74 2009-03-14 01:56 wks-sh-gpg
29  sa@wks:~$ keychain ssh_pka_key_for_user_Markus_Gattol
30
31  KeyChain 2.6.8; http://www.gentoo.org/proj/en/keychain/
32  Copyright 2002-2004 Gentoo Foundation; Distributed under the GPL
33
34   * Found existing ssh-agent (4557)
35   * Found existing gpg-agent (4896)
36   * Known ssh key: /home/sa/.ssh/ssh_pka_key_for_user_Markus_Gattol
37
In line 5 we start keychain, then we take a look at its files in lines
20 to 28. Now we want to tell it about one particular identity which
keychain should remember for us — we do so by manually issuing
keychain <ssh/gpg_identifier> on the CLI (Command Line Interface).
Line 2 shows the fingerprint of this particular identity which is the
same that SSH-agent currently knows about already — I had SSH-agent
running already and the identity added to SSH-agent (lines 3 and 4)
before I fired up keychain in line 5.
If SSH-agent would not have known the identity specified in line 29,
then keychain would ask us for the password at this point and take
care SSH-agent stores it.
38  sa@wks:~$ grep keychain .bashrc
39  eval '/usr/bin/keychain /home/sa/.ssh/github_id_rsa /home/sa/.ssh/ssh_pka_key_for_user_Markus_Gattol C0EC7E38'
40  sa@wks:~$ source ~/.bashrc
41
42  KeyChain 2.6.8; http://www.gentoo.org/proj/en/keychain/
43  Copyright 2002-2004 Gentoo Foundation; Distributed under the GPL
44
45   * Found existing ssh-agent (4614)
46   * Found existing gpg-agent (9394)
47   * Known ssh key: /home/sa/.ssh/github_id_rsa
48   * Known ssh key: /home/sa/.ssh/ssh_pka_key_for_user_Markus_Gattol
49   * Adding 1 gpg key(s)...
50
51  sa@wks:~$
In lines 1 to 38 we triggered all actions with keychain manually.
Starting with line 39 however, we can automate things a little bit by
putting line 39 or something similar our ~/.bashrc file.
The example above prompts us for the passwords of two SSH keys and one
OpenPGP key automatically at startup/login in case the key is not
already known to keychain from an earlier session.
By default, the SSH-agent started by keychain is long-running and will
continue to run, even after we have logged out from the system. If we
want to change this behavior, i.e. make it more secure but less
uncomfortable then --clear and --timeout can help.
However, from my point of view, using keychain with --clear somewhat
defeats the whole purpose of using keychain — one could run without
it and just use SSH-agent which would pretty much cater for the same
result.
However, using keychain with --clear would still be somewhat better
than compared to not using it at all because, when we log out from
some session, keychain would still provide credentials to cron jobs
and other background processes which would not be the case if we were
solely using SSH-agent — remember, all information kept by SSH-agent
get flushed once we end our current session.
As mentioned above, keychain also supports GPG-agent in the same ways
that SSH-agent is supported. By default keychain attempts to start all
available agents but will fall back to only GPG-agent or only
SSH-agent if either is unavailable.
SSH Agent Forwarding
There is one thing about SSH-agent that is concerning with regards to
security. When SSH-agent is running on a machine that cannot be
trusted, someone with access to that system could extract the
decrypted keys hold by SSH-agent at the time.
Even though extracting the keys would be somewhat difficult, it is
within the skills of professional crackers. And the mere fact that
private key theft is possible means that we should take steps to guard
against it happening in the first place.
To formulate a strategy to protect our private SSH keys, we must first
put the machines we access into one of two categories:
- If a particular host is well-secured and/or isolated — making
successful root exploits against it quite unlikely — then that
machine should be considered a trusted host.
- If, however, a machine is used by many other people as well or we
have some doubts about the security of the system, then the
machine should be considered an untrusted host.
I have even stricter rules in this regard i.e. I consider any other
hosts but my workstation and subnotebook untrusted hosts — even the
various security enhanced OpenVZ VEs I use for various tasks like for
example to drive my mail system.
The fact that I am the only one with access to those remote machines
does not change the fact that I consider them untrusted. The fact that
they run on my own hardware does not change the fact that I consider
them untrusted and neither does the fact that I am only using
free software from Debian's official repositories.
The mere fact that such hosts run software like for example an MTA
(Mail Transfer Agent) which is directly connected to the Internet is
enough to consider it an untrusted host.
To guard our private SSH keys against extraction, SSH-agent (and
thus keychain) should never be run on an untrusted host. That way,
even if the system's security is compromised, there will be no
SSH-agent around for the intruder to extract keys from in the first
place.
However, this creates a problem. If we cannot run SSH-agent on
untrusted hosts, then how do we establish secure, passwordless (PKA
that is) SSH connections from these systems?
The answer is to only use SSH-agent and keychain on trusted hosts, and
to use OpenSSH's authentication forwarding abilities to extend
passwordless authentication to any untrusted hosts. In a nutshell,
SSH-agent authentication forwarding works by allowing remote SSH
sessions to contact an SSH-agent running on a trusted system. We will
see a more example below:
Advantages of SSH-agent Connection forwarding
SSH-agent authentication forwarding offers a number of security
advantages like for example:
- The private key is stored only on the trusted machine's HDD (Hard
Disk Drive). This prevents malicious users from grabbing our
encrypted key from disk on untrusted machines and attempting to
crack the encryption.
- SSH-agent runs only on the trusted machine. This prevents an
intruder from doing a memory dump of a remote SSH-agent process and
then extracting our decrypted private SSH keys from that memory
dump. Also, even though passphrases are provided to the SSH-agent
in encrypted manner, no passphrase ever goes over the wire which is
even better than sending encrypted passphrases to some remote
SSH-agent.
- Since we only need to type in the passphrase on our trusted
machine, we prevent any keystroke loggers from stealthily grabbing
our passphrase as it is entered.
The one drawback to relying on SSH-agent forwarding is that it does
not solve the problem of allowing cron jobs to take advantage of PKA
(RSA/DSA that is) authentication.
A solution to this problem is to use keychain on our local and trusted
machine and to set up all cron jobs that need PKA authentication so
that they execute from our local trusted machine e.g. our workstation.
If necessary, these cron jobs can use SSH to connect to remote systems
to automate backups, synchronize files, and so on.
Depicting SSH-agent forwarding
Usually an SSH client converses with an SSH-agent on the same machine
e.g. both running locally on my workstation for example. Now, by using
SSH-agent forwarding, some remote SSH client can communicate with a
local SSH-agent i.e. the SSH client and the SSH-agent are not running
on the same machine.
This is both a convenience feature, permitting our SSH clients on
multiple machines to work with a single SSH-agent, and a means for
enhancing security.
Let us now take a look at an example in order to better understand
what SSH-agent forwarding is and what it might be used for.
Suppose we want to connect from our home computer (H), to a remote
machine at work (W). Like many corporate computers, W is behind a
network firewall and not directly accessible from the Internet, so we
cannot create establish an SSH connection from H to W directly.
Hmm... what can we do? We call technical support and for once, they
have good news. They say that our company maintains a gateway also
known as bastion host (B), which is accessible from the Internet and
runs an sshd also known as SSH server.
This means we should be able to reach W by establishing an SSH
connection from H to B, and then make another hop from B to W, since
the firewall permits SSH traffic. Tech support gives us a user
account on the bastion host B, and the problem seems to be solved...
or is it?
For security reasons, the company permits access to its computers only
by PKA (Public Key Authentication). So, by using our private SSH key
on our local home machine H, we successfully connect to bastion host
B. And now we run into a roadblock — also for security reasons, the
company prohibits users from storing their private SSH keys on the
exposed bastion host B, since they can be stolen if B were
compromised.
That is bad news, since the SSH client on B needs a private SSH key to
connect to our user account on W but our private key is with
the SSH-agent at home on H. What now? Well, SSH-agent forwarding to
the rescue we say...
SSH-agent forwarding allows a program (such as an SSH client) running
on a remote machine, such as B, to access our SSH-agent on H
transparently i.e. as if the SSH-agent were running on B itself.
Thus, a remote SSH client running on B can now use the private keys
stored held by the SSH-agent running on our local, trusted machine H
as shown above. As a result, we can invoke an SSH session from B to
our remote machine at work W, solving the problem.
Setup SSH-agent forwarding
The prerequisite for SSH-agent forwarding to work is an up and running
PKA setup. Once this is done, we have to touch two files, namely
/etc/ssh/sshd_config and /etc/ssh/ssh_config and/or ~/.ssh/config
respectively.
Before we start however, let us introduce the players on the field
first:
wks is my local workstation, a trusted machine, which runs the
SSH-agent that will be used by remote SSH clients.wks-ve2 is an OpenVZ VE (Virtual Environment) running locally on my
workstation but then, for this demonstration, it can be assumed to
be an untrusted remote machine because it behaves and it treated as
such.
Both, wks and wks-ve2, have an up and running PKA setup set up already
so that the user sa can log in via PKA because his public SSH
key has been placed in /home/sa/.ssh/authorized_keys on both machines.
What we are going to do is to start out locally on my workstation
(wks), then we will re-connect to it via SSH — this is actually a
loop, our first out of two SSH hops. After we made the first hop (we
connected from non-ssh wks to ssh wks and thus end up logged into wks
via SSH) we initiate our second hop from wks to wks-ve2.
 |
| non-ssh wks <-- 1st Hop --> ssh wks <-- 2nd Hop --> wks-ve2 |
Disabled SSH-agent forwarding
This example shows Debian's default setting which is to disallow
SSH-agent forwarding.
 1  sa@wks:~$ echo $SSH_CONNECTION
 2
 3  sa@wks:~$ grep AllowAgentForwarding /etc/ssh/sshd_config
 4  AllowAgentForwarding no
 5  sa@wks:~$ grep ForwardAgent {/etc/ssh/ssh_,.ssh/}config
 6  /etc/ssh/ssh_config:#   ForwardAgent no
 7  .ssh/config:ForwardAgent   no
 8  sa@wks:~$ ssh wks
 9  Debian GNU/Linux squeeze/sid
10
11  sa@wks:~$ echo $SSH_CONNECTION
12  192.168.1.4 59506 192.168.1.4 1235
13  sa@wks:~$ ssh testing
14
15  Permission denied (publickey).
16  sa@wks:~$ exit
17  logout
18  Connection to 192.168.1.4 closed.
In lines 2 and 12 we take a look at the current
SSH connection parameters — line 2 does not show anything because
there is no active SSH connection up and running. Line 12 on the other
hand shows that wks has the IP address 192.168.1.4 with an sshd
running/listening on port 1235.
Lines 3 to 7 show the current settings with regards to SSH-agent
forwarding — note that those are local settings i.e. the ones active
on wks and not on wks-ve2.
Line 4 is also worth a note — here we have explicitly set
AllowAgentForwarding no but then openssh-server ships with
AllowAgentForwarding yes set per default (at least as of now April
2009). In other words, usually we would not need to touch this keyword
within /etc/ssh/sshd_config at all in case we want to enable SSH-agent
forwarding.
Lines 6 and 7 show the settings that we would need to alter in case we
wanted to enable SSH-agent forwarding. As can be seen, I used the
per-user file to explicitly set ForwardAgent no. However, as with
AllowAgentForwarding, this one has a default setting of no which is
active even if not set explicitly as we did above.
The reason I set both explicitly even though the settings made are the
same as their usual defaults is simply to provide a coherent example
with all parts to the equation being present.
What follows in lines 8 to 19 is exactly what we would expect — the
second hop fails (line 15) because the (at that point; ssh wks) remote
SSH client on ssh wks could not reach back to the SSH-agent on non-ssh
wks because we prohibited it with our settings from lines 4 and 7
respectively.
Enabled SSH-agent forwarding
Now is the time to show what needs to be done in order to enable
SSH-agent forwarding and also how it is done once all settings are
made to enable it.
19  sa@wks:~$ grep AllowAgentForwarding /etc/ssh/sshd_config
20  AllowAgentForwarding yes
21  sa@wks:~$ echo $SSH_CONNECTION
22
23  sa@wks:~$ ssh wks
24  Debian GNU/Linux squeeze/sid
25
26  sa@wks:~$ pwd; whoami; hostname; echo $SSH_CONNECTION
27  /home/sa
28  sa
29  wks
30  192.168.1.4 34647 192.168.1.4 1235
31  sa@wks:~$ ssh testing
32
33  sa@wks-ve2:~$ pwd; whoami; hostname; echo $SSH_CONNECTION
34  /home/sa
35  sa
36  wks-ve2
37  192.168.1.4 34726 192.168.1.101 18689
38  sa@wks-ve2:~$ exit
39  logout
40  Connection to 192.168.1.101 closed.
41  sa@wks:~$ exit
42  logout
43  Connection to 192.168.1.4 closed.
44  sa@wks:~$
Line 20 shows the sshd setting — we changed it from no in line 4 to
yes in line 20 in order to explicitly show that the sshd on wks allows
for SSH-agent forwarding. As I mentioned above, openssh-server ships
with AllowAgentForwarding yes per default but then explicitly showing
it here makes things more clear.
The settings for /etc/ssh/ssh_config and/or ~/.ssh/config respectively
are shown in context with a few other things with regards to
client side configuration files.
Whereas the second hop failed above (line 15) it is now working
perfectly fine as can be seen from lines 31 to 37. It may be
interesting to compare the SSH connection parameters to the settings
in my ~/.ssh/config below which we can see, are a perfect match.
For example, line 30 shows that the first hop really is just a loop on
wks because the IP address (192.168.1.4) for source and destination is
the same but then the SSH client port where our SSH connection
originates from is 34647 and the one where it finally ends after two
hops is on wks-ve2 (line 37) with IP address 192.168.1.101 and sshd
listening port 18689 (see image below).
 |
| now with Source/Destination parameters for SSH connections |
SSH Keys
This subsection provides information with regards to SSH keys in
general.
Recreate SSH Keypairs for sshd
There are reasons when we want/need to recreate the SSH keypair used
by an sshd on the remote machine. For example, whenever I
clone an OpenVZ VE (Virtual Environment), I want each VE have its own
set of SSH keypairs.
This was one reasons, however, there may be other reasons like for
example when we want a stronger (longer, more bits) keypair. Anyway,
whatever the reason may be, how it is done is shown below.
At first, a bit theory on SSH keys with sshd: The HostKey keyword from
/etc/ssh/sshd_config specifies a file containing a private host key
used by SSH.
The default is /etc/ssh/ssh_host_key for protocol version 1, and
/etc/ssh/ssh_host_rsa_key and /etc/ssh/ssh_host_dsa_key for protocol
version 2. Note that sshd will refuse to use a file if it is
group/world-accessible. It is possible to have multiple host key
files —
rsa1 keys are used for version 1 and dsa or rsa are used
for version 2 of the SSH protocol.
 1  wks-ve2:/home/sa# cd /etc/ssh
 2  wks-ve2:/etc/ssh# la
 3  total 156
 4  drwxr-xr-x  2 root root    154 2009-03-08 00:24 .
 5  drwxr-xr-x 54 root root   4096 2009-03-07 23:56 ..
 6  -rw-r--r--  1 root root 125749 2008-11-23 15:13 moduli
 7  -rw-r--r--  1 root root   1595 2008-11-23 15:13 ssh_config
 8  -rw-r--r--  1 root root   1895 2009-03-07 23:09 sshd_config
 9  -rw-------  1 root root    668 2009-03-08 00:24 ssh_host_dsa_key
10  -rw-r--r--  1 root root    602 2009-03-08 00:24 ssh_host_dsa_key.pub
11  -rw-------  1 root root   3239 2009-03-08 00:24 ssh_host_rsa_key
12  -rw-r--r--  1 root root    734 2009-03-08 00:24 ssh_host_rsa_key.pub
13  wks-ve2:/etc/ssh# rm ssh_host_*
14  wks-ve2:/etc/ssh# ssh-keygen -b 4096 -t rsa -f /etc/ssh/ssh_host_rsa_key
15  Generating public/private rsa key pair.
16  Enter passphrase (empty for no passphrase):
17  Enter same passphrase again:
18  Your identification has been saved in /etc/ssh/ssh_host_rsa_key.
19  Your public key has been saved in /etc/ssh/ssh_host_rsa_key.pub.
20  The key fingerprint is:
21  3d:02:f4:54:f5:cf:bf:23:8f:3d:59:49:e2:f0:ec:12 root@wks-ve2
22  The key's randomart image is:
23  +--[ RSA 4096]----+
24  |   ...          |
25  |   .   .         |
26  |  .   . .        |
27  | .   . . +.   .  |
28  |  . .   S.=+ . o |
29  |   .     .Eo+ +  |
30  |           o.+   |
31  |           o+.   |
32  |          o+=.   |
33  +-----------------+
34  wks-ve2:/etc/ssh# ssh-keygen -t dsa -f /etc/ssh/ssh_host_dsa_key
35  Generating public/private dsa key pair.
36  Enter passphrase (empty for no passphrase):
37  Enter same passphrase again:
38  Your identification has been saved in /etc/ssh/ssh_host_dsa_key.
39  Your public key has been saved in /etc/ssh/ssh_host_dsa_key.pub.
40  The key fingerprint is:
41  24:8b:25:3d:72:97:2b:11:2b:93:a7:22:57:d2:67:1e root@wks-ve2
42  The key's randomart image is:
43  +--[ DSA 1024]----+
44  |                 |
45  |       .         |
46  |      o o E      |
47  |     o * + o     |
48  |    B @ S .      |
49  |   . % * .       |
50  |    + o .        |
51  |     . .         |
52  |                 |
53  +-----------------+
54  wks-ve2:/etc/ssh# exit
55  exit
56  sa@wks-ve2:~$
As we can see from lines 9 to 12, those are the keypairs for protocol
version 2 which we are going to recreate/replace now. At first we
remove them in line 13, then we start creating the RSA keypair in line
14 and thereby specify to create a stronger keypair as is the current
default (2048 bit long). We do not specify a passphrase so we just hit
RET in lines 16 and 17.
The same process is then repeated for the DSA keypair in lines 34
to 53. At this point we have successfully recreated the SSH keypairs
for sshd. Depending on the SSH history of this sshd and its clients
there may be some more work to do...
In case we had already connected to some remote machine running this
sshd with the old keypairs, our local SSH client probably put
information about it into ~/.ssh/known_hosts and might then complain
about a changed identity of the remote machine once we try to connect
to it again.
Well, nothing bad or malicious happened — we just swapped the
machines identity by replacing its SSH keypairs used by sshd. Anyway,
our local machine has to learn about this new identity anew. In order
to so, we remove the particular line (the one indicating the old
identity for the remote machine) from ~/.ssh/known_hosts and start
another connection attempt — we will be asked to add a new identity
which we accept. All fine now, we are done for real...
SSH Host Keys
In order to authenticate (verify if some entity is who it claims to
be) a remote machine we use SSH keypairs as well. Each remote
machine's sshd keeps a pair of SSH keys, namely
sa@wks:~$ ls -la /etc/ssh | grep ssh_host
-rw-------   1 root root    668 2008-10-23 18:02 ssh_host_dsa_key
-rw-r--r--   1 root root    598 2008-10-23 18:02 ssh_host_dsa_key.pub
-rw-------   1 root root   1675 2008-10-23 18:02 ssh_host_rsa_key
-rw-r--r--   1 root root    390 2008-10-23 18:02 ssh_host_rsa_key.pub
sa@wks:~$
which are used to uniquely identify and authenticate each remote
machine. Note that this is the reverse procedure to PKA — with PKA
(Public Key Authentication) we make sure to authenticate the user who
is about to connect to a remote machine.
Once we connect to some remote machine for the first time, we get
asked to check the host key fingerprint.
However, how do we know if we can trust the remote machine's public
host key to correctly identify the remote machine or in other words,
how can we be sure the remote machine is the one it claims to be and
not some machine used for an man-in-the-middle attack attempt?
There are basically four choices we have, starting with the best one:
- Using Monkeysphere is by far the best thing that can be done in
this regard.
- Store fingerprints in DNS by using tools like for example
sshfp.
While this is a little less error prone, I think it is very
inflexible and also to much work to administer in the lone run when
compared to Monkeysphere.
- The remote machine administrator(s) could store SSH host key
IDs/fingerprints online like for example Debian does it with its
infrastructure. This way users about to connect to a remote machine
can compare the key IDs once the are presented with the dialog
message where they are asked to check the host key fingerprint. One
might for example use
ssh-keyscan to build up a global
fingerprint list of all his remote machines and put it on-line.
However, in the end a human has to verify the correctness of the
presented fingerprints i.e. its not just manual labor but also
potentially error prone.
- Not verifying the identity of the remote machine at all. Anybody
has done that already i.e. just typing
yes RET when asked to
verify the host key fingerprint. Well, there is no need to say more
about that only so much that with Monkeysphere one would not even
be asked to verify the host key ID but instead Monkeysphere would
do it for us... fast, save and sound...
A few Hints with regards to SSH host Keys
- The files where SSH host keys are kept locally i.e. at the users
machine are
/etc/ssh/ssh_known_hosts: the global host keys file~/.ssh/known_hosts: the per-user host keys file
ssh-keygen -l -F <hostname> can be used to find a hostname entry in
the known host files. This comes in handy if the entries are hashed
(default) and we would like to delete a particular entry from that
file- in order to enable/disable hashed entries to either one of the
known_hosts files, HashKnownHosts in /etc/ssh/ssh_config is the
keyword to use.
Number of SSH Keypairs for PKA
The number of SSH keypairs that we have to administer should not be
increasing with the number of remote hosts but rather with the number
of users that can enter them.
In other words, each user (and by user I mean person, not user
account) should have one and only one public/private keypair and not
one keypair for each remote host/account.
If we recap, above we choose to name a keypair with regards to the
person who would use it for PKA (Public Key Authentication).
The ideal scenario is that every user has one particular SSH keypair
i.e. ssh_pka_key_user(<user_name>) and
ssh_pka_key_user(<user_name>).pub respectively that he uses for PKA.
Then every time he boots his computer, he loads his private key into
the SSH-agent by providing his password to unlock it.
The user or the system administrator should place the user's unique
public key in ~/.ssh/authorized_keys of all user accounts he
should have access to.
That way the user can log into all of his user accounts an
remote machines by using PKA and the SSH-agent. He can also go from
one account/machine to another without providing the password to
unlock his private key.
Some folks claim that they rather use one keypair for each remote
machine instead of one keypair per person because it is more secure.
Well, if done correctly then using one keypair per person for all of
this accounts on possible many remote machines is not any less secure.
I rather think/know because doing so (one keypair per person) we have
a scalable principle at work whereas on the other hand, each person
having different keys for each account/host does not scale and
therefore is unmanageable which then becomes insecure.
Let us do a mind game. Let us assume there is a project (cross-company
or cross-agency to make it more fun) which has 600 servers and 20
persons with SSH access to those remote machines.
- (one keypair per person): we got 20 identities to manage
- (each person has one keypair for each machine/account): we got (at
minimum; assuming each user has only one system account on each
machine) 12000 identities to manage; how long until this turns
into some fucking-filthy-chaos and security is gone out the window
for good?
What mostly happens is something that can best be described as a
mixture of #1 and #2 which makes it even worse because it tells us
that whoever did this, has never ever spend a second thinking about
that kind of thing... it just happened...
In the end obeying #1 plus using a multi-user SSH setup on top or in
addition to it certainly seems to be the best way to go...
~/.ssh/authorized_keys
Although PKA is superior compared to authentication via a users
password, both, in terms of comfort and in terms of security, there is
one problem left we should deal with.
PKA allows anyone in possession of the private key and the password to
unlock it, to establish any kind of SSH connection (login, remote
command execution, port forwarding, etc.) to the remote machine where
the ~/.ssh/authorized_keys file is stored and PubkeyAuthentication yes
as well as AuthorizedKeysFile %h/.ssh/authorized_keys is set in its
/etc/ssh/sshd_config file.
However, there are a number of things that can be done with regards to
~/.ssh/authorized_keys in order to further restrict access to our
remote machine which is setup to use PKA. The things we can do are all
arranged by prefixing the line containing the public key by a single
phrase of comma-separated options.
What Commands can be executed on the remote Machine
WRITEME... just notes so far
- http://troy.jdmz.net/rsync/index.html use this to secure the backup
VE with PermitRootLogin forced-commands-only instead of
PermitRootLogin yes
- put
command=<command_issued_when_public_key_authentication_is_ok>
into public key file(s)
- reference to GITosis example as it is a good practical example
Who has Access to our remote Machine
Assuming the very unlikely case happens and someone manages to acquire
not just the private key (what we posses) but also the password to
unlock it (what we know), then usually that means that this person has
access to all remote machines using this PKA keypair for SSH
authentication. I leave it to the reader to imagine what the
consequences of that might be...
However, we can take measures to protect us from such thing simply by
using an options phrase preceding the particular public key within
~/.ssh/authorized_keys.
If the options phrase at the beginning of a line contains the keyword
from="string", then this restricts the use of the
particular key on that line to sessions that originate from hosts that
match string i.e. we can do whitelisting. Let us take a look:
sa@wks:~$ head -n1 .ssh/authorized_keys
from="*.sunoano.foo,!untrusted.sunoano.foo" ssh-rsa AAAAB  [skipping a lot of characters...]  k2NQ== PKA SSH keypair for user Markus Gattol; reach me at [email protected]
sa@wks:~$
The hostname used will need to be the hostname reported when the IP
address of the connecting machine is looked up in the DNS (Domain Name
System). As usual, the * wildcard matches one or more characters,
while the ? wildcard matches a single character. If the connecting
hostname matches an entry prefixed by !, then it will be rejected.
For the example above, only if all three of the following are true
(logical AND) can we access the remote machine with this particular
public key in ~/.ssh/authorized_keys
- we need the private key physically stored on our computer (what we
posses)
- we need to know the password to unlock it (what we know) but still,
- only if we connect from a computer within the domain of
sunoano.foo
(except for untrusted.sunoano.foo) (a light form of who we are) are
we granted access to the remote machine
The sole purpose of this phrase is to optionally increase security
because, PKA by itself does not trust the network or name servers or
anything but the keypair (Monkeysphere addresses this problem on a big
scale). However, if somebody somehow steals the private key, the key
permits an intruder to log in from anywhere in the world.
This additional phrase makes using a stolen private key a lot more
difficult because name servers and/or routers would have to be
compromised too in order to gain access to our remote machine.
More nifty Options
Although from="string" certainly is the most
powerful/important phrase to precede a public key in
~/.ssh/authorized_keys, there are a few others too which I find very
useful:
sa@wks:~$ head -n1 .ssh/authorized_keys
from="*.sunoano.foo,!untrusted.sunoano.foo",no-pty,no-port-forwarding,no-agent-forwarding,no-X11-forwarding ssh-rsa AAAAB  [skipping a lot of characters...]  k2NQ== PKA SSH keypair for user Markus Gattol; reach me at [email protected]
sa@wks:~$
I leave it to the reader to take a look at man 8 sshd himself and
figure out more about that kind of additional measures to elevate
security.
I would also like to note that with any SSH setup, some settings might
be redundant e.g. take for example X11Forwarding no from
/etc/ssh/sshd_config and no-X11-forwarding from the preceding phrase
in ~/.ssh/authorized_keys from above.
In my opinion this kind of redundancy is acceptable/good since, what
happens if we copy the public key (with its preceding phrases) onto
some remote machine which might default to or have X11Forwarding yes
set explicitly because of its /etc/ssh/sshd_config... in this case
that tiny bit of redundancy would ensure that no X11 forwarding is
allowed.
SSH Shortcuts
I have already mentioned the use of client side configuration files
above. We are now going to take a closer look at them. Before we do
so, I would like to mention that I am usually not the emotional kind
of person, but when it comes to SSH shortcuts, oh lord... ;-]

/etc/ssh/ssh_config respectively ~/.ssh/config
/etc/ssh/ssh_config is the global configuration file for the SSH
client whereas ~/.ssh/config is the user-specific one.
On some machines where I am part of a group of folks doing stuff
there, we keep common SSH shortcuts in /etc/ssh/ssh_config. In
addition to that, I keep all my individual SSH shortcuts in
~/.ssh/config — depending on which computer I am (mostly my
workstation or subnotebook) or if I do a multi-machine SSH hoop,
keeping my SSH shortcuts in ~/.ssh/config is perfectly fine since it
overrides /etc/ssh/ssh_config anyway.
So, let us take a nose dive right away and take a look at my
~/.ssh/config — I am just showing a few relevant portions here
because, well, for once this file is a few hundred lines long plus...
guess what the other reasons are ;-]
 1  sa@wks:~$ cat .ssh/config
 2  ###_ main
 3  ###_. common settings
 4  Host *
 5  User            sa
 6  ControlMaster   auto
 7  ControlPath     /tmp/ssh_connections_to_host(%h)_at_port(%p)_by_user(%r)
 8
 9
10  [skipping a lot of lines...]
11
12
13  ###_. local
14
15
16  [skipping a lot of lines...]
17
18
19  ###_ , wks-ve2
20  # description:  wks-ve2; testing
21  Host            testing
22  HostName        192.168.1.101
23  Port            18689
24
25
26  [skipping a lot of lines...]
27
28
29  ###_ , wks-ve5
30  # description:  wks-ve5; testing_sec
31  Host            testing_sec
32  HostName        192.168.1.104
33  Port            18689
34  IdentityFile    %d/.ssh/ssh_pka_key_for_user_Markus_Gattol
35  ###_. remote
36
37
38  [skipping a lot of lines...]
39
40
41  ###_ emacs local variables
42  # Local Variables:
43  # mode: conf
44  # allout-layout: (0 : 0)
45  # End:
In lines 4 to 7 we have those settings which are common for all
further host specifier blocks. This helps us with keeping a rather
small ~/.ssh/config without much redundancy.
We might set ControlPath to something shorter such as ControlPath
/tmp/%r@%h:%p to make established connections look like this:
sa@wks:/tmp$ type ll; ll | grep example
ll is aliased to `ls -lh -I "*\.pyc"'
srw-------  1 sa      sa         0 Jun  8 09:32 [email protected]:15973
sa@wks:/tmp$
which is probably more intuitive as it follows the pattern of
<user>@<host>:<port>.
Of course, we can override any of those settings i.e. if we choose to
put User wally within the testing host block (lines 19 to 23),
then it would override the setting from line 5.
If we take a look at line 4 then we can see that I used * to match any
hostname — DNS (Domain Name System) names as well as IP addresses
that is. This is nothing else but the usual regular expression stuff
that we use on the CLI (Command Line Interface) on a daily basis. More
information on that can be found at the Pattern section of man 5
ssh_config.
Alias
The real benefit that comes with SSH shortcuts is that we can do the
following:
46  sa@wks:~$ ssh -p 18689 [email protected]
47
48
49  [skipping a lot of lines...]
50
51
52  [email protected]'s password:
53  Linux wks-ve2 2.6.26-1-openvz-amd64 #1 SMP Sat Jan 10 18:52:53 UTC 2009 x86_64
54
55  The programs included with the Debian GNU/Linux system are free software;
56  the exact distribution terms for each program are described in the
57  individual files in /usr/share/doc/*/copyright.
58
59  Debian GNU/Linux comes with ABSOLUTELY NO WARRANTY, to the extent
60  permitted by applicable law.
61  sa@wks-ve2:~$ exit
62  logout
63  Connection to 192.168.1.101 closed.
64  sa@wks:~$ ssh testing
65
66
67  [skipping a lot of lines...]
68
69
70  [email protected]'s password:
71
72
73  [skipping a lot of lines...]
74
75
76  sa@wks-ve2:~$ exit
77  logout
78  Connection to 192.168.1.101 closed.
79  sa@wks:~$
Instead of issuing line 46, with all that information put into
~/.ssh_config in lines 5 and 21 to 23 respectively, we can issue line
64 which caters for the exact same result as does line 46. The syntax
used in line 64 is more concise, better to remember and last but not
least, those aliases work with anything that works based on SSH e.g.
scp, sftp, cssh, etc.
Specifying Identities
With IdentityFile in line 34 we can specify a particular identity
(keypair) to use. In particular, we specify the identity we created
above in order to enable automatic PKA login for the remote machine
wks-ve5.
Note that for it (IdentityFile) to work, the private key still has to
be unlocked either anytime we connect or, even better, using the
SSH-agent as shown above as well.
Shared Network Connection
Last but not least, lines 6 and 7 show something that can be used to
have more than one SSH sessions share a single network connection. How
does that benefit us?
Well, for example, if we use a basic SSH setup i.e. we authenticate
ourselves using a user's password, we only have to provide the
password once for several SSH sessions as long as the initially
established network connection is still active — it gets closed as
soon as we close the last remaining SSH session routed through that
particular network connection/socket.
In order to demonstrate that, I am going to log into the remote
machine wks-ve2 from two different terminals in parallel, /dev/pts/4
and /dev/pts/2 respectively.
 1: /dev/pts/4  sa@wks:/tmp$ tty
 2: /dev/pts/4  /dev/pts/4
 3: /dev/pts/4  sa@wks:/tmp$ pi ssh_connections
 4: /dev/pts/4  sa@wks:/tmp$ ssh testing
 5: /dev/pts/4
 6: /dev/pts/4          / \      _-'
 7: /dev/pts/4        _/   \-''- _ /
 8: /dev/pts/4   __-' {            \
 9: /dev/pts/4       /              \
10: /dev/pts/4       /       "o.  |o }
11: /dev/pts/4       |            \ ;            YOU ARE BEING WATCHED!
12: /dev/pts/4                     ',
13: /dev/pts/4          \_         __\
14: /dev/pts/4            ''-_    \.//
15: /dev/pts/4              / '-____'
16: /dev/pts/4             /
17: /dev/pts/4           _'
18: /dev/pts/4         _-'
19: /dev/pts/4
20: /dev/pts/4
21: /dev/pts/4  This computer system is the private property of its owner, whether individual, corporate or government. It is
22: /dev/pts/4  for authorized use only. Users (authorized or unauthorized) have no explicit or implicit expectation of
23: /dev/pts/4  privacy.
24: /dev/pts/4
25: /dev/pts/4  Any or all uses of this system and all files on this system may be intercepted, monitored, recorded, copied,
26: /dev/pts/4  audited, inspected, and disclosed to your employer, to authorized site, government, and law enforcement
27: /dev/pts/4  personnel, as well as authorized officials of government agencies, both domestic and foreign.
28: /dev/pts/4
29: /dev/pts/4  By using this system, the user consents to such interception, monitoring, recording, copying, auditing,
30: /dev/pts/4  inspection, and disclosure at the discretion of such personnel or officials.
31: /dev/pts/4
32: /dev/pts/4
33: /dev/pts/4          UNAUTHORIZED OR IMPROPER USE OF THIS SYSTEM MAY RESULT
34: /dev/pts/4          IN CIVIL AND CRIMINAL PENALTIES AND ADMINISTRATIVE OR
35: /dev/pts/4          DISCIPLINARY ACTION, AS APPROPRIATE !!
36: /dev/pts/4
37: /dev/pts/4
38: /dev/pts/4  By continuing to use this system you indicate your awareness of and consent to these terms and conditions of
39: /dev/pts/4  use. LOG OFF IMMEDIATELY if you do not agree to the conditions stated in this warning. However, if you are
40: /dev/pts/4  authorized personal with no bad intentions please continue. Have a nice day! :-)
41: /dev/pts/4
42: /dev/pts/4  [email protected]'s password:
43: /dev/pts/4  Linux wks-ve2 2.6.26-1-openvz-amd64 #1 SMP Sat Jan 10 18:52:53 UTC 2009 x86_64
44: /dev/pts/4
45: /dev/pts/4  The programs included with the Debian GNU/Linux system are free software;
46: /dev/pts/4  the exact distribution terms for each program are described in the
47: /dev/pts/4  individual files in /usr/share/doc/*/copyright.
48: /dev/pts/4
49: /dev/pts/4  Debian GNU/Linux comes with ABSOLUTELY NO WARRANTY, to the extent
50: /dev/pts/4  permitted by applicable law.
51: /dev/pts/4  sa@wks-ve2:~$ w
52: /dev/pts/4   19:49:28 up  4:40,  1 user,  load average: 0.00, 0.00, 0.00
53: /dev/pts/4  USER     TTY      FROM              LOGIN@   IDLE   JCPU   PCPU WHAT
54: /dev/pts/4  sa       pts/0    192.168.1.4      19:48    0.00s  0.00s  0.00s w
55: /dev/pts/4  sa@wks-ve2:~$ w
56: /dev/pts/4   19:50:03 up  4:40,  2 users,  load average: 0.00, 0.00, 0.00
57: /dev/pts/4  USER     TTY      FROM              LOGIN@   IDLE   JCPU   PCPU WHAT
58: /dev/pts/4  sa       pts/0    192.168.1.4      19:48    0.00s  0.04s  0.04s w
59: /dev/pts/4  sa       pts/1    192.168.1.4      19:49   18.00s  0.00s  0.00s -sh
60: /dev/pts/4  sa@wks-ve2:~$ exit
61: /dev/pts/4  logout
62: /dev/pts/4  Connection to 192.168.1.101 closed.
63: /dev/pts/4  sa@wks:/tmp$
As can be seen, the screendump from /dev/pts/4 shows where it starts.
At first we take a look if there is a socket in place already (line 3:
/dev/pts/4) as we specified it in line 7 — there is of course none in
place because we have not yet initiated an SSH session and thus no
network connection has been established either.
Then we use ssh testing to initiate an SSH connection (the
first one that is) in line 4: /dev/pts/4 and after the banner shows,
we are prompted for the password in line 42: /dev/pts/4 which we
provide and therefore end up at the command line on wks-ve2 in line
51: /dev/pts/4.
There we use w in order to see who is currently logged into wks-ve2.
It is just us, and no one else — there is also no second us i.e. no
second SSH session at this point (until line 54: /dev/pts/4 that is).
In other words, at this point in time, we have not even started using
the second terminal (/dev/pts/2) in order to create another SSH
session using the same network connection.
Switching to /dev/pts/2 now...
After issuing line 51: /dev/pts/4 we start using the second terminal
window. Line 4: /dev/pts/2 shows that there is a network socket in
place now — compare this line with line 7 from ~/.ssh/config from
above; note that the placeholders (e.g. %h) got replaced with the
network parameters from ~/.ssh/config. This network socket is now used
by all SSH sessions going from our local machine wks to the remote
machine wks-ve2.
The real deal is with line 5: /dev/pts/2 — after hitting RET, neither
are we prompted for the password again as in line 42: /dev/pts/4 nor
does the banner show again! If we do w in line 6: /dev/pts/2 again now
we can see that there are actually two sa logged in now ;-]
 1: /dev/pts/2  sa@wks:~$ tty
 2: /dev/pts/2  /dev/pts/2
 3: /dev/pts/2  sa@wks:~$ ls -l /tmp/ | grep ssh_con
 4: /dev/pts/2  srw------- 1 sa   sa           0 2009-03-11 20:48 ssh_connections_to_host(192.168.1.101)_at_port(18689)_by_user(sa)
 5: /dev/pts/2  sa@wks:~$ ssh testing
 6: /dev/pts/2  sa@wks-ve2:~$ w
 7: /dev/pts/2   19:49:45 up  4:40,  2 users,  load average: 0.00, 0.00, 0.00
 8: /dev/pts/2  USER     TTY      FROM              LOGIN@   IDLE   JCPU   PCPU WHAT
 9: /dev/pts/2  sa       pts/0    192.168.1.4      19:48   10.00s  0.00s  0.00s -sh
10: /dev/pts/2  sa       pts/1    192.168.1.4      19:49    0.00s  0.00s  0.00s w
11: /dev/pts/2  sa@wks-ve2:~$ exit
12: /dev/pts/2  logout
13: /dev/pts/2  Shared connection to 192.168.1.101 closed.
14: /dev/pts/2  sa@wks:~$ ls -l /tmp/ | grep ssh_con
15: /dev/pts/2  sa@wks:~$
Switching back to /dev/pts/4 now...
Then we issued line 55: /dev/pts/4, same result as for line 6:
/dev/pts/2. Finally we exit from wks-ve2 with line 60: /dev/pts/4. At
this point the socket still exists — we still have one SSH session
open.
Switching back to /dev/pts/2 now...
As we have exit wks-ve2 in terminal /dev/pts/4, we exit wks-ve2 as
well in terminal /dev/pts/4 in line 11: /dev/pts/2. Now we have closed
the last remaining SSH session to wks-ve2 and thus the shared network
connection gets closed as well as we can see in line 13: /dev/pts/2 —
compare this line to line 62: /dev/pts/4, the one where we closed one
of two SSH connections, leaving a the other one (last one in this
case) established.
Global Overrides and Global Defaults
The sshd configuration file /etc/ssh/sshd_config and its user
counterparts ~/.ssh/config and /etc/ssh/ssh_config respectively, need
to match.
For example, the sshd listening port specified with Port 10874 in
/etc/ssh/sshd_config might have a matching entry of Port 10874 in
~/.ssh/config as well.
The version of ~/.ssh/config below is the final version after several
evolutionary steps with regards to /etc/ssh/sshd_config ranging from
 1  sa@wks:~$ cat .ssh/config
 2  ###_ main
 3  ###_. global overrides
 4  Host *
 5  User            sa
 6  ProxyCommand    monkeysphere ssh-proxycommand %h %p
 7  ControlMaster   auto
 8  ControlPath     /tmp/ssh_connections_to_host(%h)_at_port(%p)_by_user(%r)
 9  ###_. local
10
11
12  [skipping a lot of lines...]
13
14
15  ###_ , wks
16  # description:  workstation
17  Host            wks
18  HostName        192.168.1.4
19  Port            1235
20  ForwardAgent    yes
21  ###_ , wks-ve2
22  # description:  wks-ve2; testing
23  Host            testing
24  HostName        192.168.1.101
25  Port            18689
26  ###_ , wks-ve5
27  # description:  wks-ve5; testing_sec
28  Host            testing_sec
29  HostName        foo.bar.com
30  Port            18689
31  IdentitiesOnly  no
32  ###_. remote
33
34
35  [skipping a lot of lines...]
36
37
38  ###_. global defaults
39  Host *
40  ForwardAgent    no
41  IdentitiesOnly  yes
42  IdentityFile    %d/.ssh/keypairs/ssh_pka_key_for_user_Markus_Gattol
43  ###_ emacs local variables
44  # Local Variables:
45  # mode: conf
46  # allout-layout: (0 : 0)
47  # End:
48
49  sa@wks:~$
What we can see in lines 2 to 47 is the current/final version of my
~/.ssh/config file. In addition to what we have seen before, it
features a few additions like for example a global overrides as well
as an global defaults stanza.
The rationale for those two stanzas is simple: The matching algorithm
that applies to user client side configuration files is first-match
i.e. any configuration value is only changed the first time it is set.
Thus, global overrides should be at the beginning of the configuration
file, followed by host-specific definitions and defaults at the end.
Both global stanzas need to have a leading Host * line of course. Line
5 then ensures that no matter what, we are always trying to
authenticate as user sa. Any other User keyword further down
would be overridden by line 5.
The opposite is the case for global defaults as we have a good example
with lines 20 and 40 — only for host wks do we enable
SSH-agent forwarding, for any other host shown above (wks,
testing and testing_sec), SSH-agent forwarding is
disabled.
Another pretty nice-to-have global default can be seen in line 42.
This one saves us a lot troubles with the notorious MaxAuthTries
keyword plus it makes actually a lot of sense to have one, and
only one, default UID for PKA.
ssh-argv0
This one also allows for shortcut behavior. For it to work, we create
a symbolic link from our hostname to the binary ssh-argv0 (line 1).
The link target can be anything that specifies a remote host/machine
e.g. an IP address, a host specifier (testing_sec) taken from
my ~/.ssh/config (see above) etc.
 1  sa@wks:/tmp$ ln -s $(which ssh-argv0) testing_sec
 2  sa@wks:/tmp$ pi testing
 3  lrwxrwxrwx  1 sa   sa        18 2009-03-12 14:01 testing_sec -> /usr/bin/ssh-argv0
 4  sa@wks:/tmp$ ./testing_sec uptime
 5
 6
 7  [skipping a lot of lines...]
 8
 9
10   13:02:46 up 21:53,  0 users,  load average: 0.00, 0.00, 0.00
11  sa@wks:/tmp$ ssh testing_sec uptime
12
13
14  [skipping a lot of lines...]
15
16
17   13:03:00 up 21:53,  0 users,  load average: 0.00, 0.00, 0.00
18  sa@wks:/tmp$
We use an alias in my ~/.bashrc in line 2 to take a closer look at the
just created symbolic link. Line 4 shows how to use it — we execute
the symbolic link with a command (uptime) as its parameter.
Note that this is equal to line 11 where we use standard ssh syntax
with an alias from ~/.ssh/config.
As a result, lines 10 and 17, both show the uptime on the remote
machine wks-ve5 — remember, we have a working PKA setup in place with
wks-ve5 and already unlocked the private key plus told SSH-agent about
it i.e. we are not asked for a user password nor to provide the
password to unlock the private key.
If our username is different on the remote SSH machine as compared to
the local machine, then we would use ln -s /usr/bin/ssh-argv0
username@server_or_host_alias_from_ssh/config.
We are done. Last thing for me to say is that I mostly use
~/.ssh/config shortcuts instead of ssh-argv0 simply because the former
method is way more powerful and flexible.
Miscellaneous
This section is used to drop anything SSH related here but which on
its own does not deserve a section on its own. The subsections here
must not necessarily have anything to do with each another, except for
the fact that SSH may be the only thing they have in common.
Check default Configuration
What do we do if we want to know the default and/or current sshd
configuration? Well, aside from looking into the configuration file
(/etc/ssh/sshd_config) we can issue sshd -T which not just checks the
validity of the configuration file but also outputs the effective
configuration to stdout and then exits.
Reload vs Restart
If we make changes to the server-side configuration and want them to
become active, there are two things we can do:
- Restart
sshd or
- telling it to reread its configuration.
The latter is preferable since it keeps existing connections alive
e.g. if we mirror tons of data using Unison or rsync/scp. What happens
can be seen if we take a look at /etc/init.d/ssh:
sa@wks:~$ grep -A4 -m1 reload /etc/init.d/ssh
  reload|force-reload)
        check_for_no_start
        check_config
        log_daemon_msg "Reloading OpenBSD Secure Shell server's configuration" "sshd"
        if start-stop-daemon --stop --signal 1 --quiet --oknodo --pidfile /var/run/sshd.pid --exec /usr/sbin/sshd; then
sa@wks:~$
As we can see, --signal 1 is used. Those familiar with signals will
know that 1 corresponds to SIGHUP whereas 15 corresponds to SIGTERM.
By convention, programs/daemons are to be programmed so that if
received SIGHUP, they reread their configuration whereas with SIGTERM
the process stops whatever it is doing and ends itself.
When we do not specify any signal in particular, SIGTERM is send per
default. Generally, for any process, it should be fairly safe to
perform SIGTERM but it may sometimes be better to send 1 respectively
SIGHUP. For SSH that is
- if we want to reload the configuration and keep existing
connections alive
/etc/init.d/ssh reload is the way to go whereas
- if we want to stop and afterwards start
sshd, /etc/init.d/ssh
restart is what we do
Figuring Source and Destination IP and Port
Sometimes we want to know the basic connection parameters for some
established SSH connection:
sa@rh0:~$ echo $SSH_CONNECTION
233.89.77.43 24456 126.32.55.45 35678
sa@rh0:~$
233.89.77.43 source IP i.e. our SSH clients machine respectively
LAN (Local Area Network) gateway IP24456 Source port126.32.55.45 destination IP i.e. the IP of the remote server
running our sshd35678 destination port
Getting rid of post-login Messages
This is how it looks like by default when we login to some machine via SSH:
 1  sa@sub:~$ ssh rh0
 2
 3  [email protected]'s password:
 4  Linux rh0 2.6.25-2-amd64 #1 SMP Mon Jul 14 11:05:23 UTC 2008 x86_64
 5
 6  The programs included with the Debian GNU/Linux system are free software;
 7  the exact distribution terms for each program are described in the
 8  individual files in /usr/share/doc/*/copyright.
 9
10  Debian GNU/Linux comes with ABSOLUTELY NO WARRANTY, to the extent
11  permitted by applicable law.
12  Last login: Mon Jul 28 09:41:59 2008 from xxxxxxxxxxxxxxxxxxxxxxxxxxxxxxxxxxxxxx
13  sa@rh0:~$
As can be seen in lines 4 to 11 we get the message from /etc/motd
after a successful login. Line 12 also shows a timestamp of our last
login and information about source IP etc. Some folks find that
annoying and want to turn it off. To turn this post-login messages
off we have to alter both of the following directives to no
sa@rh0:~$ grep ^Print /etc/ssh/sshd_config
PrintMotd no
PrintLastLog no
sa@rh0:~$
Non-interactive SSH Password Authentication
This is just mentioned for the sake of completeness. There is this
package called sshpass which allows for making interactive logins
non-interactive.
In short, making password authentication using a user's
password somewhat work/look like PKA (Public Key Authentication) is
what it does. While this works, it is not recommended... SSH has good
reasons to make password based authentication interactive!
Those who would like to have a non-interactive SSH setup should rather
use PKA instead of using sshpass to make their password based
authentication non-interactive or, if PKA is not an option or somebody
is short in time, then using a shared network connection is a good
alternative too.
Scan Network for sshd Versions
sa@sub:~$ acs scanssh
scanssh - get SSH server versions for an entire network
sa@sub:~$
ScanSSH scans the given addresses and networks for running services.
It mainly allows the detection of open proxies and Internet services.
For known services, ScanSSH will query their version number and
displays the results in a list.
autossh
autossh can be used to automatically restart SSH sessions and tunnels.
See man 1 autossh for more information.
sshm
Another, rather lightweight, shortcut thingy. See man 1 sshm.
Securing SCP and SFTP
The packages scponly and scponly-full can be used to tighten security
surrounding certain protocols and applications which work on top of
the SSH protocol and suite respectively.
What they do in a nutshell are basically restricting the commands
available to SCP and SFTP users. For example what we can do, amongst
other things, is providing access to remote users to both read and
write local files but without providing them any remote execution
privileges.
SSHFS
Please go here for an example of how to use SSHFS (Secure SHell
FileSystem). Note that SSHFS makes use of FUSE (Filesystem in
User-space).
SSH Tunneling
WRITEME
SOCKS
TOR
WRITEME
|


