Security - Technology and Humans
Last changed: Saturday 2015-01-10 18:31 UTC
Abstract:
"Security", a term which means different things to different people. Many claim to know what security is but in the end, no one really knows. Ask ten people and you will probably get ten different answers about what security is. Security in its most general understanding is a state and/or actions taken to prevent something bad from happening. The term security can be divided into subareas e.g. physical security, home security, information security, network security, computing security, application security, financial security, etc. The thing with ICT (Information Communication Technology) security is, most are not contained within just one domain but stretch across two or more. This page will discuss measures that can be taken and the theory behind them in order to create and manage a "more secure" ICT infrastructure.
|
Table of Contents
|
 |
| There would be no more monkeys in the Jungle if it were that simple... |
Before we start, there are a few things we shall never forget:
- Security is an ongoing process, it is not a one-time thing we do
and then we are secure.
- Security is not a single action that takes place but rather a whole
range of actions.
- Security is not just technology but humans too — the best
technology is worthless without security awareness amongst its
users.
- There needs to be a long-term strategy and dedicated resources in
order to create and maintain security.
- There is no one fits all approach/strategy with security — it is
such a fast-moving target, one of absurd complexity and volume,
which in the end will always be specific to a particular use case
and setup.
Philosophical Warm-up
This section is pretty much just about non-technical chatter. Feel
free to skip it...
Are we at War?
Is this Cyberwarfare and what about Cybercrime? The short story is
that any entity (individual person, institution, etc.) connected to
some sort of net capable of exchanging digital information (e.g.
Internet) becomes a potential target for malicious activities.
Hell is empty and all the devils are here (Internet).
— Wm. Shakespeare, "The Tempest"
Nowadays media confuses normal folks and scares them by telling
Hollywood-like nightmare stories about all the dangers coming from
using modern communications. However, that is nonsense since those
experts are mostly pretenders since they only have limited knowledge
— they are simply good talkers.
As ever, knowledge is power and so I am telling the reader right now
that there really is no reason to be scared at all — modern
communication technology is a blessing but there are of course a few
things you should know in order to be safe.
By saying so, let us use a metaphor — let us think about a city and
pedestrians. It is clear to anyone not to try crossing a 6 lane
motorway but to wait until the traffic light shows the green walk.
Everybody knows that because it is simply. Not knowing about it might
make the difference about something awful happening or getting home in
one piece. It is exactly the same with modern communications — nobody
stays at home just because the streets are full of cars — it is
knowledge that takes the fear away and makes heaven open up angels
singing.
So, anybody can be safe if he is willing to learn a little bit — same
as the kid with traffic lights. It is important to understand that
there is no single thing or a bunch of things that need to be done and
after that one is secure. That is just what marketers tell you After
you installed our... with a single click... secure forever.
Bullshit! Liars!
Security is a process not a product.
— The cognisant man
I have decided to put the spotlight on two distinct spots. The first
one (Cybercrime) mainly of interest to the individual and the second
one (Cyberwarfare) to whole nations, companies and such huge/complex
compounds. Although the borders between those two spots are blurred,
it is a sane approach to discuss the whole security subject in that
manner.
Cybercrime
Although the term cybercrime is usually restricted to describing
criminal activity in which the computer or network is an essential
part of the crime, this term is also used to include traditional
crimes in which computers or networks are used to enable the illicit
activity.

I draw the line between cybercrime and cyberwarfare like this — with
cyberwarefare, the bad girls and boys know exactly what/who they want
to go after. With cybercrime the girls and boys just want to be bad on
someone. This is exactly where I feel comfortable creating the
connection between the individual (you, me, your cat) and the
cybercrime topic.
All one has to do in order not to draw the attention of the bad girls
and boys onto himself is to know a thing or two and to take a look to
the right and to the left before crossing a street. It really is
simple to not become a victim of cybercrime — if you do not make
yourself a target, then you do not get shoot... its as simple as
this.
Cyberwarefare on the other hand is a lot more fun since we are talking
grown up games here — that is where the real heavy players on both
sides enter the playground. There is no hiding on both sides. The only
question remaining with cyberwarefare is who can perform better when
the bullets start flying, who has the better moves and which team has
the greater rock stars.
Hot Spots with Cybercrime
Now, that we put the spotlight on the cybercrime corner, we can spot
several distinct areas of interest which I am going to discuss further
down. Below is a list/index that links to all places on this page that
I consider belong in the cybercrime corner for the most part.
Cyberwarefare
Yes, we are at war. It is just that losses are measured in falling
stock markets instead of body counts, failing infrastructure like
knocked out power plants etc. Modern bullets come with emails, VoIP
(Voice over IP) and by clicking buttons on websites. Modern soldiers
carry out their attacks by sitting on desks next the circling goldfish
in his aquarium. Fighter planes that go twice the speed of sound do
not help against such threats since crackers act with about 2/3 the
speed of light.
However, usually the individual is not directly confronted with this
kind of attack since it simply is not worth it — the haul by
attacking Ebay, Myspace, Amazon, YouTube or similar targets seems more
like the right thing to do for bad boys and girls. Practically every
company that has something valuable (technology, data, etc.),
governmental department, financial institutes, etc. are subject to
attacks on a daily basis.
We are at war... this war is global, takes places 24/7/365,
no bullets fly but looses are enormous...

Hot Spots with Cyberwarfare
Now, that we put the spotlight on the cyberwarfare corner, we can spot
several distinct areas of interest which I am going to discuss further
down. Below is a list/index that links to all places on this page that
I consider belong in the cyberwarfare corner for the most part.
The big Picture
This page is not just technical but also philosophical and
non-technical. Folks need to be told that there is a war taking place
— the sooner they realize it, the higher are chances they will get
away unharmed and never be bothered but just walk the bright side.
There are many ways to be secure respectively more secure than with so
called turnkey solutions or out of the box solutions — do not believe
marketers! This breed usually talks a lot but do not say anything...
Talk to experts if you are capable of telling the difference between
pretenders and the real experts — ask around, experts exist but they
are sought after so be either prepared to wait or provide some
compelling offers.
- DebianGNU/* and the big Picture
-
I am not saying DebianGNU/Linux is the only way to build secure IT
(Information Technology) environments because it is simply wrong —
there are many ways. There is also a lot of commercial non-free hard
and software out there that is pretty good. In the end, a solution is
like a chain — what makes the difference between a disaster happening
or not is how strong the weakest part of the whole chain is.
DebianGNU/* (next to other OSes (Operating Systems)) is well suited to
build secure IT environments or integrate into an existing
heterogeneous environment.
-
In the end this is what this page is all about — I am going to
discuss certain subjects from different points of view (setups for
the individual up to fortune 500 environments) and show how and why
Debian fits into a particular solution or why it does not.

In the end, what counts is the human component. Thereby I am not just
talking about the technicians setting up and monitoring some computers
and the like. I am also talking about constant end-user training in
order to teach them basics what to do in certain cases — if a company
manages to bring their non IT (Information Technology) staff to a
level where they call for an expert whenever they think they might
have come across something weird or suspicious then that is perfect —
the expert can then drop by or even better, remotely log into the
workstation and for example take a look at the local screen and
instantly tell what is going on. That way the IT staff is always
up-to-date — human sensors are a thousand times better than intrusion
detection system — and the non technician staff learns constantly
which motivates them and therefore is pure money for the company since
happy folks work a lot better.
Philosophical Aspects
WRITEME
Good versus Evil? Is it really that simple?
No. It is not that simple. It is as complex as real life. There are
just good deeds and evil deeds — anybody is good and evil at the same
time. But then what is good and what is evil? Is it what the majority
of us thinks/does? That is not necessarily true... well, for example,
for the most part, we agree that murder belongs in the evil corner
whereas helping someone who needs help is a good thing. That is easy
and the majority of us ticks this way but what about planet earth? The
right thing to do would be to really change our lifestyles because not
destroying this planet is good so what the majority does is evil. See?
Not that easy at all to define Good and Bad.

Finding an answer about What is good and What is evil becomes easier
when we chose to discuss things within limited subjects like IT
(Information Technology) security. It then becomes as easy to identify
good deeds as well as evil deeds with IT security as with good/evil
deeds in real life.
Knowing about what is good and what is evil is mandatory in order to
plan in the long-term. It is about moral as well as ethic values with
humans since highly educated and trained humans can do so much good
things but... as with a hammer, that knowledge and skills can be used
to build or to destroy.
It is thus important to make folks aware of the fact that it is vital
to us all that being able tell the difference between good and evil,
more than ever before, is utterly important for highly skilled humans.
Often such highly skilled and smart humans lack the capability to
distinguish Good from Evil and thus there is a lot at stake here —
such humans are weapons these days if they decide to take the wrong
turn in their lives or even worse if they are sort of directed by
someone else just because they never really thought about The
difference between doing good and doing evil with modern IT.
The only thing necessary for the triumph of evil is for good men to do nothing.
— Edmund Burke
I am not going to explicitly tell what is good and what is evil but
the reader might get to know it simply by walking around on my website
and particularly on this page.
Implications for the Life of an Individual
The first thing to learn about security is to be aware of the fact
that you should not trust anybody or anything nor believe anything you
sense, what somebody or something (a technical system, software, etc.)
tells you and the like. Sure, in the end you have to make your peace
with some sort of relation that you establish with your environment —
it only becomes dangerous when folks stop questioning the world they
are living in. The downside is, if you take it to serious with
security you might get paranoid over time. Some where born with
paranoia and others prefer the process of feeding their paranoia like
a little pet until paranoia has grown up and finally decides to eat
his master ;-]
- Paranoia
-
Paranoia is a disturbed thought process characterized by excessive
anxiety or fear, often to the point of irrationality and delusion.
Paranoid thinking typically includes persecutory beliefs concerning a
perceived threat. Paranoia is distinct from phobia, which is more
descriptive of an irrational and persistent fear, usually unfounded,
of certain situations, objects, animals, activities, or social
settings. By contrast, a person suffering paranoia or paranoid
delusions tends more to blame or fear others for supposedly
intentional actions that somehow affect the afflicted individual.
(Wikipedia)
- A psychotic disorder characterized by delusions of persecution
with or without grandeur, often strenuously defended with apparent
logic and reason.
- Extreme, irrational distrust of others. (The Free Dictionary)
I at least know a bit about that and therefore I can ensure the
reader, the sooner you accept the fact that a hundred percent security
is impossible, but you of course tried and in the end managed to
prepare your environment to provide a reasonable degree of security,
the more soulfulness and business related success will be in your
life.
The only truly secure system is one that is powered off, cast
in a block of concrete and sealed in a lead-lined room with armed
guards - and even then I have my doubts.
— Eugene H. Spafford
There is a simple but genius way to determine — at the point, where
more security means bad implications for your physical and/or mental
health, you know you got to the point where it is enough — you did
all you where able to do. More security is of no good when you are dead or
ill... The thing is, most security threats will not get even close to
harm you even when you do not overstretch the paranoia parameter in
the afore mentioned manner.
My advice is to identify the most critical issues with your IT setup
and then act on that priority list starting with the item that has
been assigned the highest priority and so forth until you run out of
time and/or money or even worse, human capital — but keep
in mind that once an issue has been addressed it has to be constantly
monitored (this is a 24-7 job).
Why do we fear?
What do we fear?
- hi-tech criminals
- espionage
- etc.
What it seems to be and what it actually is
The random non security expert, sitting at his computer, always thinks
all is fine, life is great suits him well and no threats are present.
The laymen always thinks all is a super-cute-little thing (left image)
but in fact it is not (right image). The situation is more like with
gamma radiation (that stuff that comes with the mushroom cloud) — you
do not smell it, can not see it and you can not hear or feel it —
fact is you are already fading away and you do not even know...
 
The random user might just check his firewall logs (what are you
talking about? I know ;-]), sort out the usual noise and take a look
at what remains — what remains is certainly not cute but mostly a
serious threat.
Common Attack Methods
WRITEME

Brute Force
MAC Flooding
ARP Spoofing
DoS (Denial of Service)
A Plan for Security
WRITEME
Policy
develop (together with staff) and enforce/take care of a security policy
Training
Educate staff and raise awareness of the fact that there are dangers
(clerk, administrators, etc.)
User Responsibilities
What is a users responsibility
- passwords
- do not talk to strangers about security measures that had been taken
Security Management
how to manage
- daily predictable
- unforeseen events
Physical Security
- what is it
- is there a need
- who as access under what conditions to which areas (can things be
done remotely instead of locally?)
- how to establish and manage it
Prevent Data Loss
Create a dedicated page that covers
- multi-site data replication/backup e.g. dump/restore
- local backup
Security Domains
This section takes a detailed look at all domains within an IT setup,
the security threats they face, the risks involved and challenges that
arise when we address them and thus secure our ongoing IT operations.
Trust
A simple definition of trust:
- Trust
-
In order to trust an entity (e.g. a person) two things must be
true — we need to know that entity and we need to have a history
without bad experience with that entity.
-
Only if both can be answered yes (logical AND), do we have a trusted
relationship which allows us to assume (we cannot predict the future
but only rely on past experiences) only good will come out of it in
the future too.
The history part is simple. We know if we have suffered from a
relationship with some entity (e.g. a remote computer, person, etc.)
in the past or if we have benefited — plain and simple, we just know.
It is the know an entity part that creates the labor.
In order to know some entity it needs to be authenticated (verify if
some entity is who/what it claims to be). Real-world life has numerous
examples how this works or not:
-
Kimberly and Araid are friends. They have a history with no bad
experiences. When they meet for a drink in person, Kimberly tells
Araid something which Araid believes because the have a trusted
relationship.
-
What would happen if Kimberly told Araid the same thing not in person
but via a letter, with no signature or handwriting but only fresh out
of the printer?
-
Would Araid trust that story to be true too? How can she be sure it
was really Kimberly who send her this piece of paper with no signature
or handwriting whatsoever?
So, as we can see, except for situations where ultimate trust can be
assumed (e.g. when Kimberly and Araid, two long-standing mates, meet
in person) a trust relationship erodes more and more until it vanishes
entirely and there simply is no trust left.
If we look at Kimberly and Araid's situation and stretch it to a
common pig picture view plus add the notion of modern communications,
then it becomes obvious that there will be situations where we will
deal with entities which we do not know at all, we have no history
with, or even if we know them and have history with, we simply cannot
meet in person because the other person might live thousands of
kilometers away...
No worries, we can help ourselves manage those situations with the
help of a view principles and tools.
In the following I am going to show how to use proven concepts and
methods in order to establish trust-relationships with human as well
as machine entities without the need to be in the same room with them
and without the need to already know them i.e. have a history with
them.
The tools we are going to use (e.g. GPG (GNU Privacy Guard)) are all
free software and so they are available with DebianGNU/Linux. The
methods and principles we are going to use are OpenPGP, Web of Trust,
PKI (Public Key Infrastructure), etc.
Once we have managed to establish trusted relationships by the means
of the just mentioned tools and concepts we can use them to
- sign and en/decrypt data like for example emails, PDF (Portable
Document Format) documents, data transfers through an insecure WAN
(Wide Area Network) like for example the Internet (take IM (Instant
Messaging) conversations as an example), etc.
- create/manage our/others digital identities via so-called digital
keys
- create/manage certificates e.g. for web servers in order to provide
SSL (Secure Sockets Layer) encryption (the
https thingy that is)
- create/manage chipcards for various kinds of access control (e.g.
building access) or the permission to trigger some action (e.g.
start the engine of some race car), etc.
- verify (authenticate; see above) entities e.g. the Debian package
repositories respectively their human administrators, a SSH (Secure
Shell) setup including its users, administrators and remote
machines, etc.
- etc.
GNU Privacy Guard
GPG (GNU Privacy Guard) is the GNU project's complete and free
implementation of the OpenPGP standard as defined by RFC 4880, which
is the current IETF (Internet Engineering Task Force) standards track
specification of OpenPGP.
GPG allows to encrypt and sign our data and communication, features
a versatile key management system as well as access modules for all
kind of public key directories.
GPG is a command line tool with features for easy integration with
other applications. A wealth of frontend applications and libraries
are available. Current versions of GPG also provide support for
S/MIME.
Below, I am going to provide examples, starting with the most basic
ones about how to use GPG for day to day work in a secure and
comfortable fashion.
Metaphor
First thing we need to do towards the goal of establishing trusted
relationships for all sorts of modern communications is to create a
digital identity of ourselves others can verify and thus authenticate
us.
We do so by creating digital data which is, roughly speaking, unique.
Also, once this data is known by others, it becomes a perfect digital
second us to verify.
It helps the novice to think of this digital second us as of a paint
that is unique — no one else possesses the same paint and no one else
can recreate it but ourselves.
Now, if we paint something (e.g. an email) with our paint and send it
off to someone, he can make sure that email was send by us when he
looks up the senders name (our name) that particular paint is
associated with.
If the From field would say we are the sender but the paint the email
comes with would not match our particular name at the look up table,
then the receiver would know someone has tampered with that email and
thereby altered the color of the paint.
With GPG we have no paint but instead we have digital keys. We also
have no color look up table but we have key servers. What does not
change is the fact that there is, for example, email with some sender
and its receiver(s).
So, when creating a digital key (the second digital us that is), we
create our own unique paint which we can use to paint all kinds of
digital data like for example emails, documents, music, videos, etc.
While the just mentioned example is a metaphor with regards to GPG's
digital signing capability, GPG can do a lot more as we already know
from above.
Preparations
Before we can start we need to have a few packages installed
1  sa@wks:~$ type dpl; dpl gnupg* | grep ii
2  dpl is aliased to `dpkg -l'
3  ii  gnupg              1.4.9-4            GNU privacy guard - a free PGP replacement
4  ii  gnupg-agent        2.0.11-1           GNU privacy guard - password agent
5  ii  gnupg-doc          2003.04.06+dak1-0. GNU Privacy Guard documentation
6  ii  gnupg2             2.0.11-1           GNU privacy guard - a free PGP replacement (new v2.x
7  sa@wks:~$
Line 3 and 6 are actually the same but then gnupg2 is the successor to
gnupg although this is not a linear line of development but both, for
the foreseeable future, are going to co-exist in parallel.
gnupg is the monolithic version of GPG whereas gnupg2 is based on a
modular architectural approach. Also, gnupg2 provides a few additional
features like for example smartcard support and support for MIME
(Multipurpose Internet Mail Extensions) which are not found in gnupg.
Overall, there are a bunch of small goodies and improvements that come
with gnupg2 which makes it probably the better choice for desktop
systems. I am going to use gnupg2 below — I made a symmetric link
from /usr/bin/gpg pointing at /usr/bin/gpg2.
Those who want to use gnupg can do so — actually gnupg and gnupg2 are
interchangeable at any point down the road...
Creating a GPG Keypair
GPG uses public-key cryptography so that users may communicate
securely. In a public-key system, each user has a pair of keys
consisting of a private key and a public key.
- Marginal Note:
-
Note that GPG (GNU Privacy Guard) keypairs have nothing to do with SSH
keypairs (neither those used for PKA (Public Key Authentication) nor
those used to authenticate a remote machine).
-
Neither their creation process/tools nor their usage is comparable on
a technical level. The only thing in common is the fact that there is
a keypair for both, GPG and SSH, consisting of a private as well as
public key.
A user's private key is kept secret i.e. it must never be revealed to
someone else. The public key may be given to anyone with whom the user
wants to communicate.
In addition, GPG uses a pretty sophisticated scheme in which a user
has a primary keypair and then zero or more additional subordinate
keypairs. The primary and subordinate keypairs (more on that later)
are bundled to facilitate key management and the bundle can often be
considered simply as one keypair.
Finally, go here for a real-world example and return afterwards.
Generating a Revocation Certificate
After our keypair is created we should immediately generate a
revocation certificate for the primary public key. Why is this a good
idea?
If we forget our passphrase or if our private key is compromised, lost
or superseded, this revocation certificate may be published to notify
others that our public key should no longer be used.
A revoked public key can still be used to verify signatures made by us
in the past, but it cannot be used to encrypt future messages directed
at us.
It also does not affect our ability to decrypt messages sent to us in
the past if we still have access to the private key.
Let us take a closer look at how to create a revocation certificate
for a public key (I am using my primary keypair to demonstrate
things):
 1  sa@wks:~$ gpg --fingerprint --with-colons Markus | grep fpr
 2  fpr:::::::::F6F78566432A78A90D39CDAE48E94AC6C0EC7E38:
 3  sa@wks:~$ pi asc
 4  sa@wks:~$ gpg --output revocation_certificate_for_F6F78566432A78A90D39CDAE48E94AC6C0EC7E38.asc --gen-revoke F6F78566432A78A90D39CDAE48E94AC6C0EC7E38
 5
 6  sec  1024D/C0EC7E38 2009-02-06 Markus Gattol () <foo[at]bar.org>
 7
 8  Create a revocation certificate for this key? (y/N) y
 9  Please select the reason for the revocation:
10    0 = No reason specified
11    1 = Key has been compromised
12    2 = Key is superseded
13    3 = Key is no longer used
14    Q = Cancel
15  (Probably you want to select 1 here)
16  Your decision? 0
17  Enter an optional description; end it with an empty line:
18  > Creating a revocation certificate just in case...
19  >
20  Reason for revocation: No reason specified
21  Creating a revocation certificate just in case...
22  Is this okay? (y/N) y
23
24  You need a passphrase to unlock the secret key for
25  user: "Markus Gattol () <foo[at]bar.org>"
26  1024-bit DSA key, ID C0EC7E38, created 2009-02-06
27
28  ASCII armored output forced.
29  Revocation certificate created.
30
31  Please move it to a medium which you can hide away; if Mallory gets
32  access to this certificate he can use it to make your key unusable.
33  It is smart to print this certificate and store it away, just in case
34  your media become unreadable.  But have some caution:  The print system of
35  your machine might store the data and make it available to others!
36  sa@wks:~$ pi asc
37  -rw-r--r--  1 sa   sa      332 2009-03-17 14:43 revocation_certificate_for_F6F78566432A78A90D39CDAE48E94AC6C0EC7E38.asc
38  sa@wks:~$ mkdir .gnupg/my_revocation_certificates
39  sa@wks:~$ mv revocation_certificate_for_F6F78566432A78A90D39CDAE48E94AC6C0EC7E38.asc .gnupg/my_revocation_certificates/
40  sa@wks:~$
I prefer to specify a keys unique fingerprint for its UID (User ID) on
the CLI (Command Line Interface) which is why I issued line 1. Line 3
is an alias in my ~/.bashrc — to check if there is an ASCII armored
revocation certificate around already — there is none as we can see.
With line 4, we use the fingerprint from line 2 in order to create our
revocation certificate for that particular keypair. Lines 5 to 23 are
straight forward.
In line 24 we are prompted for the password used when
creating the key. Line 36 is the same as line 3 except that now we
find our just created revocation certificate.
I have a few of them for several GPG keys so I put them all in one
place (line 39) save (block-layer encryption on top RAID 6 + I do mirror
the whole shebang).
- Hints
-
Since the certificate is short, one may wish to print a hardcopy of
the certificate to store somewhere safe such as a safe deposit box.
-
The certificates should not be stored where others can access it since
anybody can publish the revocation certificate and render the
corresponding public key useless.
Using the Revocation Certificate to revoke a Key
When using/activating the just created revocation certificate because
we need it (e.g. key has been compromised; see lines 10 to 13 above),
we need to be aware that most key servers do not accept a bare
revocation certificate on its own i.e. sending just
revocation_certificate_for_F6F78566432A78A90D39CDAE48E94AC6C0EC7E38.asc
in order to revoke my key with the key ID
F6F78566432A78A90D39CDAE48E94AC6C0EC7E38 is going to fail in most cases.
In order to make it work, we have to import the certificate into GPG
first (gpg --import <certificate_name>.asc) then
send the revoked key to the key servers as usual i.e. gpg --keyserver
certserver.pgp.com --send-keys <ID> for example.
-
Note that the following example assumes we have already performed all
the steps below (send the revoked key to the key servers,
signing keys, etc.) using the keypair we are now going to revoke — I
am writing this addition about revoking a key a few months after the
entire rest of GPG (GNU Privacy Guard) article had been written.
The reason for that is that I/we needed to make new keys using an RSA
primary key instead of the default DSA key because the former default
for DSA was to use the SHA1 cipher which is now (June 2009) considered
insecure.
Note that we (Debian developers and GPG folks) have already switched
to RSA for creating primary keys — in other words, those creating new
GPG keypairs after June 2009 do not have to worry about anything but
can use all my articles about security, GPG and SSH (Secure Shell)
without the need to create a new GPG keypair. Others simply
create a new keypair, this time having GPG use RSA for the primary key
per default already.
 1  sa@wks:~$ whoami; pwd; date -u; gpg --search-keys 0xF6F78566432A78A90D39CDAE48E94AC6C0EC7E38
 2  sa
 3  /home/sa
 4  Wed Jun 10 13:27:44 UTC 2009
 5  gpg: searching for "0xF6F78566432A78A90D39CDAE48E94AC6C0EC7E38" from hkp server keys.gnupg.net
 6  (1)     Markus Gattol () <markus.gattol[at]foo.org>
 7          Markus Gattol () <website[at]foo.name>
 8            1024 bit DSA key C0EC7E38, created: 2009-02-06
 9  Keys 1-1 of 1 for "0xF6F78566432A78A90D39CDAE48E94AC6C0EC7E38".  Enter number(s), N)ext, or Q)uit > Q
10  sa@wks:~$ gpg --import .gnupg/my_revokation_certificates/revocation_certificate_for_F6F78566432A78A90D39CDAE48E94AC6C0EC7E38.asc
11  gpg: key C0EC7E38: "Markus Gattol () <[email protected]>" revocation certificate imported
12  gpg: Total number processed: 1
13  gpg:    new key revocations: 1
14  gpg: 3 marginal(s) needed, 1 complete(s) needed, PGP trust model
15  gpg: depth: 0  valid:   4  signed:   1  trust: 0-, 0q, 0n, 0m, 0f, 4u
16  gpg: depth: 1  valid:   1  signed:   0  trust: 0-, 0q, 0n, 1m, 0f, 0u
17  sa@wks:~$ gpg --keyserver pgp.mit.edu --send-key 0xF6F78566432A78A90D39CDAE48E94AC6C0EC7E38
18  gpg: sending key C0EC7E38 to hkp server pgp.mit.edu
19  sa@wks:~$ gpg --keyserver pgp.mit.edu --search-keys 0xF6F78566432A78A90D39CDAE48E94AC6C0EC7E38
20  gpg: searching for "0xF6F78566432A78A90D39CDAE48E94AC6C0EC7E38" from hkp server pgp.mit.edu
21  (1)     Markus Gattol () <website[at]foo.name>
22          Markus Gattol () <markus.gattol[at]foo.org>
23            1024 bit DSA key C0EC7E38, created: 2009-02-06 (revoked)
24  Enter number(s), N)ext, or Q)uit > Q
25  sa@wks:~$
With line 1 we basically get an idea about some relevant things plus
we can see that the key F6F78566432A78A90D39CDAE48E94AC6C0EC7E38 is on
the Internet and ready for anybody to use.
Line 10 is where we take the first of two steps in order to revoke the
key — we import the revocation certificate which we created earlier
(see above) into the local keyring/key.
Next we send the key with its revocation certificate onto the
keyservers (lines 17 and 18). That is it...
A final check in line 19, which is the same command as in line 1,
gives us proof as we can see the change between line 8 and line 23.
Uploading the Public Key to some Key Server
 1  sa@wks:~$ grep keyserver .gnupg/gpg.conf
 2  keyserver hkp://keys.gnupg.net
 3  sa@wks:~$ gpg --search-key Markus Gattol
 4  gpg: searching for "Markus Gattol" from hkp server keys.gnupg.net
 5  gpg: key "Markus Gattol" not found on keyserver
 6  sa@wks:~$ gpg --fingerprint --with-colons Markus | grep fpr
 7  fpr:::::::::F6F78566432A78A90D39CDAE48E94AC6C0EC7E38:
 8  sa@wks:~$ gpg --with-colons --fingerprint Markus | awk -F: '/fpr/ {print $10}'
 9  F6F78566432A78A90D39CDAE48E94AC6C0EC7E38
10  sa@wks:~$ gpg --list-key $(gpg --with-colons --fingerprint Markus | awk -F: '/fpr/ {print $10}')
11  pub   1024D/C0EC7E38 2009-02-06
12  uid                  Markus Gattol () <foo[at]bar.org>
13  sub   4096g/34233DEF 2009-02-06
14
15  sa@wks:~$ gpg --send-key $(gpg --with-colons --fingerprint Markus | awk -F: '/fpr/ {print $10}')
16  gpg: sending key C0EC7E38 to hkp server keys.gnupg.net
17  sa@wks:~$ gpg --search-keys Markus Gattol
18  gpg: searching for "Markus Gattol" from hkp server keys.gnupg.net
19  (1)     Markus Gattol () <foo[at]bar.org>
20            1024 bit DSA key C0EC7E38, created: 2009-02-06
21  Keys 1-1 of 1 for "Markus Gattol".  Enter number(s), N)ext, or Q)uit > Q
22  sa@wks:~$
In order to not have to type --keyserver <key_server_URL> anytime, I
put some default entry into my ~/.gnupg/gpg.conf (see
/usr/share/gnupg/options.skel for more information) as can be seen in
line 2.
With line 3 we query a key server for a particular identity —
Markus
Gattol
in this case. However, it could be any substring of the key UID
e.g. a part of the email address.
As can be seen in line 5, at the time line 3 was issued there was no
key with some UID that would match our search pattern. In lines 6 to 9
we just look for a way to get the fingerprint and only the fingerprint
of the public GPG key we are about to upload to the key server. This
is optional i.e. any other UID will do.
The real deal is with line 15 where we upload the key to
keys.gnupg.net but not before verifying the fingerprint points to the
correct key (lines 10 to 13).
After we did successfully upload the key, we issue line 17 which is
the same as line 3 but then now we find our key.
Digitally sign and verify Data
Go here for a real-world example and return afterwards.
Signing Keys
Hint: it might be a good idea to run gpg --refresh-keys before we
start just to be sure we have up-to-date keys on our keyring. I use
sa@wks:~$ alias | grep refresh-keys
alias mls='gpg --refresh-keys; mlnet &'
sa@wks:~$
simply because I am not interested in remembering such stuff and
manually triggering it automatically whenever I launch the donkey is
... well... somewhat funky... Of course, a user cron job
would do too but that would clearly be to ordinary ;-]
To sign a public key using GPG, we can use the command gpg --sign-key
<name> where <name> is the UID of the key or any substring of it which
specifies it uniquely.
GPG will then select the first key that it finds in our keyring which
matches the given specification and will ask whether we really want to
sign it. If we have two or more keys with the same user ID, we can use
the key ID (e.g. fingerprint) instead of the UID to specify the key
uniquely.
Note that GPG (unlike PGP (Pretty Good Privacy)) will not accept any
substring of the key ID for this purpose i.e. if we opt for the
fingerprint then we need to specify the entire fingerprint and not
just a portion of it.
Unlike PGP, GPG has an option for creating local signatures. A local
signature is one that cannot be exported together with the public key
to which it applies. This prevents our signature from being propagated
if we send a copy of the signed key to anyone else. To create a local
signature, we use --lsign-key instead of --sign-key.
 1  sa@wks:~$ head -n2 .gnupg/gpg.conf
 2  no-greeting
 3  default-key F6F78566432A78A90D39CDAE48E94AC6C0EC7E38
 4  sa@wks:~$ gpg --with-colons --fingerprint Markus Gattol | grep fpr
 5  fpr:::::::::F6F78566432A78A90D39CDAE48E94AC6C0EC7E38:
 6  sa@wks:~$ gpg --list-sig tim.blake
 7  pub   1024D/BA65A133 2009-03-19
 8  uid                  Tim Blake () <[email protected]>
 9  sig 3        BA65A133 2009-03-19  Tim Blake () <[email protected]>
10  sub   4096g/91C1E9AC 2009-03-19
11  sig          BA65A133 2009-03-19  Tim Blake () <[email protected]>
12
13  sa@wks:~$ gpg --sign-key Tim
14
15  pub  1024D/BA65A133  created: 2009-03-19  expires: never       usage: SC
16                       trust: undefined      validity: unknown
17  sub  4096g/91C1E9AC  created: 2009-03-19  expires: never       usage: E
18  [unknown] (1). Tim Blake () <[email protected]>
19
20
21  pub  1024D/BA65A133  created: 2009-03-19  expires: never       usage: SC
22                       trust: undefined      validity: unknown
23   Primary key fingerprint: 8D8C 2445 6DC2 C3CE B397  BBDA E8CC 14AD BA65 A133
24
25       Tim Blake () <[email protected]>
26
27  Are you sure that you want to sign this key with your
28  key "Markus Gattol () <foo[at]bar.org>" (C0EC7E38)
29
30  Really sign? (y/N) y
31
32  You need a passphrase to unlock the secret key for
33  user: "Markus Gattol () <foo[at]bar.org>"
34  1024-bit DSA key, ID C0EC7E38, created 2009-02-06
35
36
37  sa@wks:~$ gpg --list-sig tim.blake
38  gpg: checking the trustdb
39  gpg: 3 marginal(s) needed, 1 complete(s) needed, PGP trust model
40  gpg: depth: 0  valid:   2  signed:   0  trust: 0-, 0q, 0n, 0m, 0f, 2u
41  pub   1024D/BA65A133 2009-03-19
42  uid                  Tim Blake () <[email protected]>
43  sig 3        BA65A133 2009-03-19  Tim Blake () <[email protected]>
44  sig          C0EC7E38 2009-03-19  Markus Gattol () <foo[at]bar.org>
45  sub   4096g/91C1E9AC 2009-03-19
46  sig          BA65A133 2009-03-19  Tim Blake () <[email protected]>
47
Lines 2 and 3 show two nice settings in order to not get the copyright
and version information each time plus, I also have a default key ID
which saves a lot of typing in the long-run.
The fingerprint of lines 3 and 5 match — I just wanted the reader to
see where the key ID belongs to and why it is chosen automatically
further down in line 28.
With line 6 we just look up an arbitrary key from my keyring which I
have not signed yet. We are going to do so starting with line 13 where
we specify a substring (Tim) of the key's UID.
In line 32 we are prompted for the password used when
creating the key.
In line 37 we issue the same command as we did in line 6 but this time
the output looks different — we can see the added signature on Tim's
key in line 44 which we just created using my default key with the key
ID/fingerprint F6F78566432A78A90D39CDAE48E94AC6C0EC7E38.
Another nifty utility to check for who signed a key comes with the
package signing-party and is called gpglist. It is used like this
gpglist tim.blake for example.
In lines 38 to 40 shows some lines indicating some information about
trust. More on that later...
We have now successfully signed somebodies key and should probably
send the key to some key servers again, effectively merging our
changes (the signing) back into this key on the key servers in order
for the key to fulfill its purpose in the WOT (Web of Trust).
As already mentioned, the package signing-party contains a bunch of
useful tools one might find handy at some point — especially in
preparation or participation of some key signing party e.g. if we
wanted to make sure that a particular person is actually
in control of the key which we are about to sign.
sa@wks:~$ dlocate signing-party | grep bin/
signing-party: /usr/bin/keyanalyze
signing-party: /usr/bin/gpgdir
signing-party: /usr/bin/gpg-key2ps
signing-party: /usr/bin/keylookup
signing-party: /usr/bin/sig2dot
signing-party: /usr/bin/gpgparticipants
signing-party: /usr/bin/gpgsigs
signing-party: /usr/bin/gpglist
signing-party: /usr/bin/process_keys
signing-party: /usr/bin/caff
signing-party: /usr/bin/gpg-mailkeys
signing-party: /usr/bin/gpgwrap
signing-party: /usr/bin/pgp-clean
signing-party: /usr/bin/pgp-fixkey
signing-party: /usr/bin/pgpring
signing-party: /usr/bin/springgraph
sa@wks:~$
Deleting a Signature from our Key
48  sa@wks:~$ gpg --edit-key Tim
49  Secret key is available.
50
51  pub  1024D/BA65A133  created: 2009-03-19  expires: never       usage: SC
52                       trust: undefined      validity: unknown
53  sub  4096g/91C1E9AC  created: 2009-03-19  expires: never       usage: E
54  [unknown] (1). Tim Blake () <[email protected]>
55
56  Command> check
57  uid  Tim Blake () <[email protected]>
58  sig!3        BA65A133 2009-03-19  [self-signature]
59  sig!         C0EC7E38 2009-03-19  Markus Gattol () <foo[at]bar.org>
60
61  Command> uid 1
62
63  pub  1024D/BA65A133  created: 2009-03-19  expires: never       usage: SC
64                       trust: undefined      validity: unknown
65  sub  4096g/91C1E9AC  created: 2009-03-19  expires: never       usage: E
66  [unknown] (1)* Tim Blake () <[email protected]>
67
68  Command> delsig
69  uid  Tim Blake () <[email protected]>
70  sig!3        BA65A133 2009-03-19  [self-signature]
71  Delete this good signature? (y/N/q)N
72  uid  Tim Blake () <[email protected]>
73  sig!         C0EC7E38 2009-03-19  Markus Gattol () <foo[at]bar.org>
74  Delete this good signature? (y/N/q)y
75  Deleted 1 signature.
76
77  Command> check
78  uid  Tim Blake () <[email protected]>
79  sig!3        BA65A133 2009-03-19  [self-signature]
80
81  Command> q
82  Save changes? (y/N) y
83  sa@wks:~$
Assuming that for some reason we want to delete a signature from a
key, we can of course do so. In particular, we are going to delete the
signature we created in lines 13 to 34.
We start with changing into interactive mode in line 48. Line 56
provides us with all signatures on Tim's key — he signed it himself
in addition to our signature which we did with my default key.
Line 61 is important — we need to switch to the correct UID on Tim's
key in order to carry out certain actions otherwise we would get a You
must select at least one user ID error message.
Since there is only one UID associated with this key we choose 1 i.e.
the first UID on the key. The * in line 66 shows that this UID is now
active, ready to be worked with.
We do not want to delete Tim's self-signature (line 71) but the one we
created (line 74). A check in line 77 confirms that we just
successfully deleted the signature we created in lines 13 to 34.
We could remove any number of signatures we wanted, the ones we
created plus those of others. In fact there is a tool called pgp-clean
which comes with the package signing-party package. It can be used to
remove all signatures but a key's self-signature.
With line 81 we are done which means we can leave the interactive mode
and save our changes.
What are Trust, Validity and Ownertrust?
With GPG, the term ownertrust is used instead of trust to help clarify
that this is the value we have assigned to a key (by signing it with
our private key) to express how much we trust the owner of this key to
correctly sign and thereby possibly introduce other keys/certificates
in case the key is new.
The validity (a calculated trust value) is a value which indicates how
much GPG considers a key as being valid i.e. that it really belongs to
the entity (e.g. person, remote machine, etc.) who claims to be the
owner of the key.
The difference between trust/ownertrust and validity is, that the
latter is computed at the time it is needed. This is one of the
reasons for the trust-database (~/.gnupg/trustdb.gpg) which holds a
list of valid key signatures. If we are not running in batch mode we
will be asked to assign a trust parameter (ownertrust) to a key.
It is important to understand those concepts and their interconnection
in order to understand how the trust thing, and especially the WOT
(Web of Trust), works. Let us summarize and clarify:
- We all have a common understanding what trust means in a common
sense.
- Ownertrust is a trust parameter (some value e.g. a number) a person
can assign to some key. This parameter is remembered by the trust
database — each one of us has a trust database on his local
computed i.e. each one of us has his own, individual, trust
database.
- Based on all ownertrust parameters for all keys found in the trust
database, the validity for an entity (e.g. a person, remote
machine, etc.) is calculated by the time it is needed (in realtime
that is). For example, if the validity for some entity would be
m
(see below) right now, after using gpg --refresh-keys it might show
f simply because one or more keys have been updated (e.g. from the
key servers) and one or more of them now carry an ownertrust
parameter of f for this particular entity. Yes, let us say hello to
the WOT (Web of Trust) because that is exactly how it works...
Ownertrust
We can get a list of the assigned ownertrust parameters (how much we
trust the owner to correctly sign another person's key) with gpg
--export-ownertrust and also with gpg --list-trustdb.
1  sa@wks:~$ gpg --export-ownertrust | grep $(gpg --with-colons --fingerprint Markus Gattol | awk -F: '/fpr/ {print $10}')
2  F6F78566432A78A90D39CDAE48E94AC6C0EC7E38:6:
3  sa@wks:~$ gpg --list-trustdb | grep C7E38
4  rec    30, trust F6F78566432A78A90D39CDAE48E94AC6C0EC7E38, ot=6, d=0, vl=31
The first field in line 2 is the fingerprint (key ID) of the primary
key, the second field is the assigned ownertrust value where a number
(6) is then mapped to one of the flags which can be seen below (also
see line 6, field 9, where a mapped result, namely u, is shown):
-: No ownertrust value yet assigned or calculated.n: Never trust this keyholder to correctly verify others signatures.m: Have marginal trust in the keyholders capability to sign other keys.f: Assume that the key holder really knows how to sign keys.u: No need to trust ourself because we have the secret key.
We should keep these parameters (the ownertrust we assigned to keys)
confidential because they express our opinions about others.
PGP (Pretty Good Privacy) implementations of OpenPGP store the
ownertrust information with the keyring thus it is not a good idea to
publish a PGP keyring. GPG is a bit smarter here — it stores the
ownertrust parameters for each key in ~/.gnupg/trustdb.gpg so it is
okay to give the public GPG keyring (~/.gnupg/pubring.gpg) away or
show it to others.
Validity
We can see the validity using gpg --list-keys --with-colons. If the
first field is pub or uid, the second field shows the validity:
5  sa@wks:~$ gpg --list-keys --with-colons Markus Gattol | grep pub
6  pub:u:1024:17:48E94AC6C0EC7E38:2009-02-06:::u:Markus Gattol (http\x3a//www.markus-gattol.name) <foo[at]bar.org>::scESC:
7  sa@wks:~$
o: Unknown (this key is new to the system)-: Unknown validity (i.e. no value assigned)e: The key has expiredq: Undefined (no value assigned); - and q may safely be treated as
the same value for most purposesn: Don't trust this key at allm: There is marginal trust in this keyf: The key is full trustedu: The key is ultimately trusted; this is only used for keys for
which the secret key is also available.r: The key has been revokedd: The key has been disabled
The value in the pub record is the best one amongst all uid records
belonging to a particular key. In the example above we got a validity
of u because it is my own key, self-signed, with an ownertrust of u
(ninth field) — remember, validity is calculated based on all
ownertrust values assigned to one particular entity.
Web of Trust
Wanting to use GPG ourselves is not enough. In order to communicate
securely with others we must have a so called web of trust. At first
glance, however, building a web of trust is a daunting task.
The people with whom we communicate need to use GPG as well, and there
needs to be enough key signing so that keys can be considered valid
enough to be trusted.
These are not technical problems — they are social problems.
Nevertheless, we must overcome these problems if we want to use GPG or
any other OpenPGP implementation out there.
When getting started using GPG it is important to realize that we need
not securely communicate with everyone of our correspondents. We can
start with a small circle of people, perhaps just ourselves and one or
two others who also want to exercise their right to privacy.
We generate our keys and sign each other's public keys. This is our
initial web of trust. By doing this we will appreciate the value of a
small, robust web of trust and will be more cautious as we grow our
web in the future.
In addition to those entities (those one or two individuals) in our
initial web of trust, we may want to communicate securely with others
who are also using GPG. Doing so, however, can be awkward for two
reasons:
- we do not always know when someone uses or is willing to use GPG,
and
- if we do know of someone who uses it, we may still have trouble
validating their key.
The first reason occurs because people do not always advertise that
they use GPG. The way to change this behavior is to set the example
and advertise that we use GPG. There are at least three ways to do
this:
- we can sign messages we mail to others or post to message boards or
- we can put our public key on our web page, or
- if we put our key on a key server we can put our key ID in our
email signature.
If we advertise our key then we make it that much more acceptable for
others to advertise their keys. Furthermore, we make it easier for
others to start communicating with us securely since we have taken the
initiative and made it clear that we use GPG.
Key validation is more difficult. If we do not personally know the
person whose key we want to sign, then it is not possible to sign the
key ourselves. In such case we have to rely on the signatures of
others and hope to find a chain of signatures leading from the key in
question back to our own.
To have any chance of finding a chain, we must take the initiative and
get our key signed by others outside of our initial web of trust.
An effective way to accomplish this is to participate in
key signing parties. For example, if we are about to attend a
conference we can look ahead of time for a key signing party, and if
we do not see one being held, offer to hold one.
We can also be more passive and carry our key ID (fingerprint) with us
for impromptu key exchanges. In such a situation the person to whom we
gave the fingerprint would verify it and sign our public key once he
returned to a computer with is GPG installation.
However, keep in mind, though, that all this is optional. We have no
obligation to either publically advertise our key or sign other
people's keys. The power with GPG is that it is flexible enough to
adapt to our security needs whatever they may be.
The social reality, however, is that we will need to take the
initiative if we want to grow our web of trust and use GPG for as much
of our communication as possible.
Internals
OpenPGP identity certificates (which includes their public key(s) and
owner information) can be digitally signed by other users who, by that
act, endorse the association of that public key with the person or
entity listed in the certificate.
OpenPGP-compliant implementations such GPG also include a vote
counting scheme which can be used to determine which public key <—>
owner association a user will trust while using GPG.
For instance, if three partially trusted endorsers have vouched for a
certificate (and so its included public key <—> owner binding), or
if one fully trusted endorser has done so, the association between
owner and public key in that certificate will be trusted to be
correct.
The parameters are user-adjustable (e.g. no partials at all, or
perhaps 6 partials etc. can be chosen) and can be completely bypassed
if desired.
The scheme is flexible, unlike most PKI designs, and leaves trust
decision(s) in the hands of individual users. It is not perfect and
requires both caution and intelligent supervision by users.
Comparing the WOT (Web of Trust) approach and the PKI (Public Key
Infrastructure) approach, we can generally say that PKI designs are
less flexible and require users to follow the trust endorsement of the
PKI generated, certificate authority (CA)-signed, certificates/keys.
Since, with PKI, intelligence is normally neither required nor
allowed, these arrangements are not perfect either, and require both
caution and care by users.
For instance, let us take a look at the following output which I made
up for demonstration purposes:
sa@wks:~$ gpg --update-trustdb
gpg: 3 marginal(s) needed, 1 complete(s) needed, PGP trust model
gpg: depth: 0  valid:   1  signed:   7  trust: 0-, 0q, 0n, 0m, 0f, 1u
gpg: depth: 1  valid:   7  signed:   3  trust: 0-, 0q, 4n, 3m, 0f, 0u
sa@wks:~$
The first line shows us the actual trust policy (PGP trust model) used
by our GPG installation, and which we can modify at our needs. It
states that a key in our keyring is valid if it has been signed by at
least 3 marginally trusted keys, or by at least one fully trusted key.
The second line describes the key of level 0, that is the key owned by
ourselves. It states that in our keyring we have one level zero key,
which is signed by 7 keys. Furthermore among all the level zero keys,
we have
- 0 of them for which we have not yet evaluated the trust level.
- 0 of them are the keys for which we have no idea of which validity
level to assign (q = I do not know or will not say). We also have
- 0 keys that we do not trust at all (n = I do NOT
trust),
- 0 marginally trusted keys (m = I trust marginally),
- 0 fully trusted keys (f = I trust fully) and 1 ultimately trusted
keys (u = I trust ultimately).
The third line analyzes the keys of level 1 in our keyring. We have 7
fully valid keys, because we have personally signed them. Furthermore,
among the keys that are stored in our keyring, we have
- 3 of them that are not signed directly by us, but are at least
signed by one of the fully valid keys.
The trust status counters have the same meaning of the ones in the
second line. This time we have
- 4 keys signed by us but for which we do not trust at all the owner
as signer of third party's keys. On the other side,
- 3 of the 7 keys that we have signed are marginally trusted. This
means that we are only marginally confident that the owners of
those keys are able to correctly verify the keys that they sign.
Key Signing Party
WRITEME
Privacy and Identity
WRITEME

Basics
This subsection is of interest for anybody who uses a device (e.g.
computer, PDA (Personal Digital Assistant), cell phone, etc.) that is
somehow connected to some net e.g. the Internet.
Secure/Anonymous Hosting
How to be Anonymous
Local Machine
WRITEME
Basic Steps
Bash History
I have an article about tuning Bash history under the aspect of
security concerns.
Creating an encrypted and compressed tar archive
Update: gpg-zip can be used instead of the combination of tar and
aespipe shown below.
Often you just want to quickly put some files on a remote machine or
onto storage media like a DVD (Digital Versatile Disc) or USB (Universal
Serial Bus) stick or some other storage media. Thus you want to have
two things in place
- the data should be compressed to speed up things — maybe you need to
upload from a very remote area with limited bandwidth
- you want your data to be encrypted since the world is full of
weirdos
Please note, if you need to encrypt more than just a file or a
directory you are better of with block-layer encryption.
Before we start, make sure you have the tools needed installed on your
system
sa@pc1:~$ dpl {aespip*,tar*} | grep ^ii
ii  aespipe        2.3b-4         AES-encryption tool with loop-AES support
ii  tar            1.16.1-1       GNU tar
sa@pc1:~$
If not yet installed, go ahead and install them using either one of
the CLI (Command Line Interface) front-ends e.g. aptitude install
<package_name(s)> or apt-get install <package_name(s)> or if you have
a liking for the slower but neat looking GUIs (Graphical User
Interfaces) then use something like gnome-apt. As a side note — I
have a comparison between those two interfaces in place.
Just compression
First let us create a compressed tar archive (no encryption yet):
sa@pc1:~$ l .sec/
emacs_secrets
passwords.gpg
README
sa@pc1:~$ tar -cjvf /tmp/my_compressed_archive.tar.bz2 .sec/
.sec/
.sec/emacs_secrets
.sec/README
.sec/passwords.gpg
sa@pc1:~$
Let us check the contents of the just created archive
sa@pc1:~$ tar -tjf /tmp/my_compressed_archive.tar.bz2
.sec/
.sec/emacs_secrets
.sec/README
.sec/passwords.gpg
sa@pc1:~$
Compression and Encryption
Now, what has been the intention in the first place, the example with
compression and encryption. As of now (July 2007) aespipe prompts you
for a password which can be a mixture of special characters and
alphanumerical characters of 20 or more characters. For real-world
usage, get used to NOT use passwords as simple as fox for example but
rather use passwords like f<U&13Ka83hz:-jdu#+('#<)836hT% for good
security.
sa@pc1:~$ cd /tmp/
sa@pc1:/tmp$ tar -cjvf /tmp/my_compressed_archive.tar.bz2 ~/.sec/ && aespipe -T -C 1000 -e aes256 </tmp/my_compressed_archive.tar.bz2 >/tmp/my_secret_and_compressed_archive && rm /tmp/my_compressed_archive.tar.bz2
tar: Removing leading `/' from member names
/home/sa/.sec/
/home/sa/.sec/emacs_secrets
/home/sa/.sec/README
/home/sa/.sec/passwords.gpg
Password:
Retype password:
sa@pc1:/tmp$ pi my_
-rw-r--r--  1 sa sa  2000 2007-07-28 19:58 my_secret_and_compressed_archive
sa@pc1:/tmp$ tar -tjvf my_secret_and_compressed_archive
bzip2: (stdin) is not a bzip2 file.
tar: Child returned status 2
tar: Error exit delayed from previous errors
sa@pc1:/tmp$
You need to memorize the password for later decryption — without the
password you are unable to access your data after encryption! The
error with tar -tjvf is fine since the archive is encrypted at that
stage. The archive would now be ready to move it onto storage media
that cannot be trusted e.g. you could send it via email to your remote
email account to be keep in case your local HDD (Hard Disk Drive)
crashes or your house burns down and so in clouds of smoke your
computer and thus your secrete data goes... At this stage, I usually
launch Gnus and ship of the file my_secret_and_compressed_archive to a
remote place.
-
If you do so (ship the thing of with Gnus) be aware to choose an
attachment type which does not alter the attachment.
Content type
(default application/octet-stream):
as attachment type works fine. For
all other mail applications you have to take good care of this fact as
well although I cannot tell about details since I am with Gnus only.
Decryption
If you want to "read" your data again you have to decrypt the former
created archive my_secret_and_compressed_archive:
sa@pc1:/tmp$ aespipe -d -C 1000 -e aes256 </tmp/my_secret_and_compressed_archive >/tmp/my_compressed_archive.tar.bz2
Password:
sa@pc1:/tmp$ pi my_
-rw-r--r--  1 sa sa  2000 2007-07-28 20:17 my_compressed_archive.tar.bz2
-rw-r--r--  1 sa sa  2000 2007-07-28 20:15 my_secret_and_compressed_archive
sa@pc1:/tmp$
After decryption procedure the data can be read again thus the
archive reveals its contents. Do not worry about the bzip2 warning —
that is just because aespipe did some padding during the former
encryption.
sa@pc1:/tmp$ tar -tjf my_compressed_archive.tar.bz2

bzip2: (stdin): trailing garbage after EOF ignored
home/sa/.sec/
home/sa/.sec/emacs_secrets
home/sa/.sec/README
home/sa/.sec/passwords.gpg
sa@pc1:/tmp$
Decompression
Finally we extract the data from the compressed archive (again, the
bzip2 warning can be ignored):
sa@pc1:/tmp$ tar -xjvf my_compressed_archive.tar.bz2

bzip2: (stdin): trailing garbage after EOF ignored
home/sa/.sec/
home/sa/.sec/emacs_secrets
home/sa/.sec/README
home/sa/.sec/passwords.gpg
sa@pc1:/tmp$ ls -alR home/
home/:
total 20
drwxr-xr-x  3 sa sa  4096 2007-07-28 20:26 .
drwxrwxrwt 19 root         root         12288 2007-07-28 20:26 ..
drwxr-xr-x  3 sa sa  4096 2007-07-28 20:26 sa

home/sa:
total 12
drwxr-xr-x 3 sa sa 4096 2007-07-28 20:26 .
drwxr-xr-x 3 sa sa 4096 2007-07-28 20:26 ..
drwx------ 2 sa sa 4096 2007-06-19 23:23 .sec

home/sa/.sec:
total 20
drwx------ 2 sa sa 4096 2007-06-19 23:23 .
drwxr-xr-x 3 sa sa 4096 2007-07-28 20:26 ..
-rw------- 1 sa sa 1117 2007-06-19 20:50 emacs_secrets
-rw-r--r-- 1 sa sa  832 2007-06-19 21:10 passwords.gpg
-rw------- 1 sa sa  102 2007-05-09 16:21 README
sa@pc1:/tmp$
The more paranoid might have noticed that within the compressed and
encrypted archive there is a file called passwords.gpg — this file is
encrypted by itself as well, using another software (Gnu Privacy
Guard) and procedure. So an attacker would have to successfully crack
two different (three in case you store that archive on an encrypted
HDD (Hard Disk Drive) using block-layer encryption) levels of encryption
in order to "read" the contents of passwords.gpg — absolutely
impossible that is... at least for terrestrial species.
umask
The umask (user file creation mode mask) is a function in POSIX
environments which affects the default file system mode for newly
created files and directories of the current process. The permissions
of a file created under a given umask value are calculated using the
following bitwise operation (note that umasks are always specified in
octal).
The Maths
We are dealing with bitwise AND of the unary complement of the
argument (using bitwise NOT) and the full access mode.
Full access Mode
The full access mode is 0666 in the case of files, and 0777 in the
case of directories. Most Unix shells provide a umask command that
affects all child processes executed in this shell. Note, that most
folks do not even know about the existence of full access mode and
thus do not know that the umask affects files in another way than
directories.
Example
Assuming the umask has the value 174, any new file will be created
with the permissions 602 and any new directory will have permissions
603 because:
sa@pc1:~$ cd /tmp/
sa@pc1:/tmp$ umask
0022
sa@pc1:/tmp$ umask 0174
sa@pc1:/tmp$ umask
0174
sa@pc1:/tmp$ mkdir umask_dir
sa@pc1:/tmp$ touch umask_file
sa@pc1:/tmp$ ls -l | grep umask
drw-----wx 2 sa sa  4096 2007-07-24 15:17 umask_dir
-rw-----w- 1 sa sa     0 2007-07-24 15:17 umask_file
sa@pc1:/tmp$ umask 0022
sa@pc1:/tmp$ umask
0022
sa@pc1:/tmp$
Note, once there is drw-----wx and once -rw-----w- (it is not about
the d or - but about the execute-by-others bit). The reason why this
is, is with maths — the octal as well as binary representation for
one case (the directory) is

the umask is

Flipping the bits (NOT resp. ~) would be

then comes the bit AND operation

We could have also written it in base 8, doing it in just one step

since 603 in base 8 is 110 000 011 in base 2.
Sticky Bit
The most common use of the sticky bit is on directories where, when
set, items inside the directory can be renamed or deleted only by the
items owner, the directory owner, or the superuser.
Without the sticky bit set, a user with write and execute permissions
for the directory can rename or delete any file inside, regardless of
the file owner.
sa@pc1:/tmp$ umask
0022
sa@pc1:/tmp$ touch a_file
sa@pc1:/tmp$ pi a_file
-rw-r--r--  1 sa sa     0 2007-07-08 17:55 a_file
sa@pc1:/tmp$ chmod 1644 a_file
sa@pc1:/tmp$ pi a_file
-rw-r--r-T  1 sa sa     0 2007-07-08 17:55 a_file
sa@pc1:/tmp$ chmod 1645 a_file
sa@pc1:/tmp$ pi a_file
-rw-r--r-t  1 sa sa     0 2007-07-08 17:55 a_file
sa@pc1:/tmp$ cd
If the sticky-bit is set on a file or directory without the execution
bit set for the others category (non-user-owner and non-group-owner),
it is indicated with a capital T. Aside from my examples above, anyone
can find it on his system if he takes a look at
sa@sub:~$ ll /var/spool/cron/
total 12K
drwxrwx--T 2 daemon daemon  4.0K 2008-05-19 14:03 atjobs
drwxrwx--T 2 daemon daemon  4.0K 2008-01-27 06:34 atspool
drwx-wx--T 2 root   crontab 4.0K 2008-03-14 01:52 crontabs
sa@sub:~$
SUID and SGID
setuid and setgid (short for set user ID upon execution and set group
ID upon execution, respectively) are Unix access rights flags that
allow users to run an executable with the permissions of the
executable's owner or group.
On executable Files
SUID (set user ID) or SGID (set group ID), they are mostly used to
allow users on a computer system to execute executables binary files
with temporarily elevated privileges in order to perform a specific
task.
When the SUID or SGID bits are set on an executable, that program
executes with the UID or GID of owner of the file, as opposed to the
user executing it. This means that all executables with SUID bit set
and are owned by root are executed with the UID of root. This
situation is a huge security risk and should be minimized unless the
program is designed for this risk. In practice, I never needed to set
the root SUID bit on an executable and would strongly recommend to
anybody not to do so.
If you want a program to run with SUID bit set, that program must be
group-executable or other-executable for what should be obvious
reasons. In addition, the Linux kernel ignores the SUID and SGID bits
on shell scripts. These bits work only on binary (compiled)
executables. However, the command sudo, is a much better tool for
delegating root authority than fiddling with SUID or SGID bits on
binary executables.
To find all files on your file system that have the SUID or SGID bit
set, first put something like that in root's .bashrc:
alias fog='DUMP=find_suid_guid_`date +%s` && touch /tmp/$DUMP && find / -path /proc -prune -perm /6000 -a -type f -printf "%+13i %+6m %u %g %M %p\n" > /tmp/$DUMP'
then use it (you have to become root)
pc1:~# fog
pc1:~# exit
exit
sa@pc1:/tmp$ cat find_suid_guid_1183944504 | wc -l
215
sa@pc1:/tmp$
That command (fog) takes time to search through all your files
installed — I went off to bed after hitting RET. I am not sure how log
it took to finish since I did not use time but I am sure it took more
than an hour or so. If you prefer to wait, better send it to
background (fog & RET) and continue with some other work or use an
explicit terminal window. However, the file find_suid_guid_1183944504
contains what find found during his run. You can now investigate the
files contents and take actions (change permissions using chmod,
chown, etc.) or, after you got another find_suid_guid_<seconds_count>
compare them to see what changed. Therefore, any tool like diff should
do.
Of course, after a while, one always gets smarter. The above is the
home-made version of what comes out of the box with the package sxid.
This package also computes md5 checksums.
pc1:/var/log# sxid
pc1:/var/log# wc -l sxid.log
1029 sxid.log
pc1:/var/log#
Still, it is up to humans to make the final decision what to do with
the data reported by tools like sxid. However, it might be worth to
take a look at some other tools which provide similar functionality
...
On Directories
setuid and setgid flags on a directory have an entirely different
meaning.
Directories with the setgid permission will force all files and
sub-directories created in them to be owned by the directory group and
not the group of the user creating the file. The setgid flag is
inherited by newly created subdirectories.
The setuid permission set on a directory is ignored on UNIX and
GNU/Linux systems. FreeBSD can be configured to interpret it similarly
to setgid, namely, to force all files and sub-directories to be owned
by the top directory owner.
world-writeable files
Our home directory should not contain world-writable files. That is
files with permission to write not just for the file owner or special
groups but for anybody i.e. octal permission should not be 0777
respectively -rwxrwxrwx in symbolic mode.
sa@pc1:~$ cd /tmp/
sa@pc1:/tmp$ touch file_
sa@pc1:/tmp$ chmod 0777 file_
sa@pc1:/tmp$ pi file_
-rwxrwxrwx  1 sa sa     0 2007-07-07 21:34 file_
sa@pc1:/tmp$
Octal permissions 4602 for example also make a file world-writable —
every file is as long as 0002 is set.
pc1:/tmp# touch file
pc1:/tmp# ls -l | grep file
-rw-r--r-- 1 root         root             0 2007-07-08 17:01 file
pc1:/tmp# chmod 4602 file
pc1:/tmp# ls -l | grep file
-rwS----w- 1 root         root             0 2007-07-08 17:01 file
pc1:/tmp# exit
exit
sa@pc1:/tmp$ cat file
cat: file: Permission denied
sa@pc1:/tmp$ echo "some text" > file
sa@pc1:/tmp$ su
Password:
pc1:/tmp# cat file
some text
pc1:/tmp# exit
exit
sa@pc1:/tmp$ lsO file
name
file type
octal permissions
human readable permissions
group name owner
user name owner
size in bytes

file
regular file
602
-rw-----w-
root
root
10

sa@pc1:/tmp$ pi file
-rw-----w-  1 root         root            10 2007-07-08 17:02 file
sa@pc1:/tmp$
You noticed, the SUID bit vanished plus it was shown as S instead of s
— that is because it had not been executable so the SUID bit is
redundant in that particular case. lsO and pi are aliases in my
.bashrc.
The following command should not find anything (as shown here). If it
nonetheless finds anything then use chmod to change it being non
world-writable e.g. chmod 644 <file_or_directory>
sa@pc1:~$ pwd
/home/sa
sa@pc1:~$ find . -perm -0002 -a ! -type l -ls
find: ./.mozilla/firefox/xjlg0mai.default/FoxNotes: Permission denied
sa@pc1:~$
The example above is fine since we did not discover a world-writable
file or directory (please note, I started this at ~/ (my home
directory) just to terminate earlier — of course one sould start at /
(the file system root)). However,
sa@pc1:~$ cd .mozilla/firefox/xjlg0mai.default/
sa@pc1:~/.mozilla/firefox/xjlg0mai.default$ chmod 744 FoxNotes/
sa@pc1:~/.mozilla/firefox/xjlg0mai.default$ cd FoxNotes/
sa@pc1:~/.mozilla/firefox/xjlg0mai.default/FoxNotes$ ll
total 0
sa@pc1:~/.mozilla/firefox/xjlg0mai.default/FoxNotes$
we found a false permission setting and corrected it as can be seen —
it had been 644 before I set it to 744.
nouser/nogroup
Another file permission issue are files not owned by any user or
group. While this is not technically a security vulnerability, an
audited system should not contain any unowned files. This is to
prevent the situation where a new user is assigned a previous user's
UID, so now the previous owner's files, if any, are all owned by the
new user.
To find all files that are not owned by any user or group, execute
pc1:/tmp# time find / -path /proc -prune -nouser -o -nogroup > /tmp/find_output_nouser_nogroup

real    22m37.057s
user    0m46.451s
sys     1m14.421s
pc1:~# exit
exit
sa@pc1:~$ cat /tmp/find_output_nouser_nogroup
sa@pc1:~$
As can be seen, no files or directories not owned by either a group or
a user where found — exactly as it should be. The overall duration to
check about 2.5 million files, summing up to approximately 800GiB, was
roughly 23 minutes.
Security Auditing / Hardening
On a big scale, one might try something like
sa@wks:~$ debtags search "security::ids"
acidbase - Basic Analysis and Security Engine
acidlab - Analysis Console for Intrusion Databases
aide - Advanced Intrusion Detection Environment - static binary
aide-common - Advanced Intrusion Detection Environment - Common files
bastille - Security hardening tool
checksecurity - basic system security checks
chkrootkit - rootkit detector
fail2ban - bans IPs that cause multiple authentication errors
fcheck - IDS filesystem baseline integrity checker
harden-environment - Hardened system environment

[skipping a lot of lines...]

tiger-otheros - Scripts to run Tiger in other operating systems
tinyhoneypot - Small honeypot to trap attackers
tripwire - file and directory integrity checker
xwatch - A logfile monitor that displays in an X window.
sa@wks:~$
in order to figure what Debian has available in the area of IDSs
(Intrusion Detection Systems). After this kind of getting a notion of
the big picture, we might then look a little closer
sa@wks:~$ type acsn
acsn is aliased to `apt-cache search --names-only'
sa@wks:~$ acsn harden
harden - Makes your system hardened
harden-clients - Avoid clients that are known to be insecure
harden-development - Development tools for creating more secure programs
harden-doc - Useful documentation to secure a Debian system
harden-environment - Hardened system environment
harden-nids - Harden a system by using a network intrusion detection system
harden-remoteaudit - Audit your remote systems from this host
harden-servers - Avoid servers that are known to be insecure
harden-surveillance - Check services and/or servers automatically
harden-tools - Tools to enhance or analyze the security of the local system
hardening-wrapper - experimental compiler wrapper to enable security hardening flags
sa@wks:~$
which brings us right to the point of some packages I find quite
useful. Issuing aptitude -r install harden for example installs a
bunch packages which makes a Debian system more secure. One should
understand, that the harden-<some_suffix> packages are all
metapackages and therefore only contain dependencies to other
well-known packages like for example tiger, chkrootkit, etc. many of
which are listed below:
bastille
tiger
debsecan
chkrootkit
rkhunter
integrit
OSSEC
aide
sxid
netstat
pwgen
sysvinit-utils
Filesystem-level Encryption

Filesystem-level encryption, also known as file/folder encryption, is
a form of disk encryption where individual files or directories are
encrypted by the filesystem itself. This is in contrast to
block-layer encryption, where the entire partition or disk, in which the
file system resides, is encrypted. There are a few possible choices we
can pick from
- crypto-fs
- enc-fs
- ecryptfs
What we want is a state of the art solution (key management, policy
features, userspace only components, no centralized storage of
metadata, etc.) which we can use atop an existing filesystem. Long
story cut short, we are going to use ecryptfs since it is the only one
of the above which caters for all of our requirements.
One typical use case where we would opt for ecryptfs rather than
dm-crypt and LUKS is when we got some remote server, virtualized or
not, where we have no means for out-of-band management in order to
unlock the root filesystem because we cannot use SSH at that point —
sshd is placed within the encrypted partition itself.
Another good reason to go for ecryptfs rather than block-layer
encryption is flexibility —
ecryptfs is extremely flexible as we will
see further down. The reason is that it sits on top of an existing
filesystem and not below, as does dm-crypt for example.
From my point of view, there is only one reason when we absolutely not
want to use ecryptfs... speed that is. If, for example, we need to
take care of encrypting a database server which does heavy
transactions, then dm-crypt is the way to go. In practice, ecryptfs
seems to be slower than dm-crypt by around one order of magnitude — I
just did some pseudo testing and therefore, a more detailed and
meticulous benchmark might cater for different results although, I
believe, ecryptfs will always be slower than dm-crypt simply because
there is more overhead involved in computing the encrypted version of
the data.
However, as with all non-block-layer encryption solutions, ecryptfs too,
has a potential problem which is possible leakage of secret
information.
Any application used to access the data might decide to leave
ghostcopies of the data on the non-encrypted part of our
disk/partition (things like nautilus preview thumbnails, print spool,
etc.). Actually that can become quite annoying and complex to deal
with — my experience is that it is quite impossible and a waste of
time even trying to do it since, in the end, one always misses
something or an updated application suddenly decides to store its
stuff elsewhere and/or creates new data somewhere else.
One needs to make sure to configure his disk indexing tools (google
desktop, tracker, beagle etc.) to ignore a secret folder encrypted
with ecryptfs, or if that is not possible, tell each and every
application to forget that kind of information when restarted and not
to leave ghostcopies around. Also, even if the contents of the files
are not leaked, the filenames themselves may be stored in recently
opened file lists.
Using ecryptfs makes sense for a directory (and all of its contents
i.e. files and subdirectories) or a file if it is not used by any
application as mentioned above. One typical use case where using
filesystem-level encrypted and thus using ecryptfs makes sense is if
we want to sync data from our local machine to some remote machine
which keeps our backup. Otherwise, for some local machine, one should
probably use block-layer encryption to avoid all that pain and risks
that can arise from using the wrong tool/solution for data encryption.
As usual, there is no better... which solution for data encryption is
used depends on the use case and our requirements. I use both,
ecryptfs and dm-crypt/LUKS, depending on my different needs and
environments.
ecryptfs
ecryptfs is a POSIX-compliant enterprise-class stacked cryptographic
filesystem for Linux.
It is derived from cryptfs, implemented through the FiST framework for
generating stacked filesystems. ecryptfs extends cryptfs to provide
advanced key management and policy features. Those are two of our
requirements from above...
ecryptfs stores cryptographic metadata in the header of each file
written, so that encrypted files can be moved/copied between machines
i.e. the file will be decryptable with the proper key/passphrase, and
there is no need to keep track of any additional information aside
from what is already in the encrypted file itself. Decentralized
storage of metadata that is, yet another one of our requirements from
above...
In order to use ecryptfs on Debian we need a Linux kernel 2.6.19 or
higher. However, 2.6.29 or higher is recommended since only those also
support filename encryption in addition to encrypting file contents.
In order to manage ecryptfs directories/files, we also need the
ecryptfs userspace utils which go by the name
sa@wks:/tmp$ type dpl; dpl ecrypt* | grep ii
dpl is aliased to `dpkg -l'
ii  ecryptfs-utils             75-1       ecryptfs cryptographic filesystem (utilities)
sa@wks:/tmp$
Quickstart
This subsubsection is a quickstart guide for those who need/want to
have a working solution within the next 10 minutes. Our goal is to
create a directory (/tmp/testing) as user sa for which root will then
enable filesystem-level encryption using ecryptfs.
Once done, sa can use this directory transparently and all data within
/tmp/testing will be encrypted, both, their contents and their names.
 1  sa@wks:/tmp$ whoami; pwd; type pi; pi testing
 2  sa
 3  /tmp
 4  pi is aliased to `ls -la | grep'
 5  sa@wks:/tmp$ mkdir testing; chmod 700 testing; pi testing
 6  drwx------  2 sa   sa   4096 2009-06-29 12:31 testing
 7  sa@wks:/tmp$ su
 8  Password:
 9  wks:/tmp# whoami; pwd
10  root
11  /tmp
12  wks:/tmp# type {m,u}ec
13  mec is aliased to `mount -t ecryptfs -o key=passphrase:passphrase_passwd_file=/tmp/keyfile /tmp/testing /tmp/testing'
14  uec is aliased to `umount /tmp/testing'
With line 1 we just make a few things clear like for example the
current user we used to log in, current working directory and that we
use an alias from my ~/.bashrc to check whether /tmp/testing already
exists.
The real interesting stuff is with lines 13 and 14 where we created
two aliases for root — line 13 is used to put the ecryptfs layer over
the underlying filesystem and the alias from line 14 is used to
reverse the process i.e. disable the ecryptfs layer again.
In other words, after issuing mec (short for mount ecryptfs)
/tmp/testing will provide transparent encryption, recursively, both,
for file/directory names and their contents. uec (short for umount
ecryptfs) will disable the ecryptfs layer and thus make all contents
of /tmp/testing unreadable for someone without the correct passphrase
respectively key.
15  wks:/tmp# cat /tmp/keyfile
16  passphrase_passwd=[nose123]
17  wks:/tmp# mec
18  Select cipher:
19   1) aes: blocksize = 16; min keysize = 16; max keysize = 32 (not loaded)
20   2) blowfish: blocksize = 8; min keysize = 4; max keysize = 56 (loaded)
21   3) des3_ede: blocksize = 8; min keysize = 24; max keysize = 24 (not loaded)
22   4) twofish: blocksize = 16; min keysize = 16; max keysize = 32 (not loaded)
23   5) cast6: blocksize = 16; min keysize = 16; max keysize = 32 (not loaded)
24   6) cast5: blocksize = 8; min keysize = 5; max keysize = 16 (not loaded)
25  Selection [aes]:
26  Select key bytes:
27   1) 16
28   2) 32
29   3) 24
30  Selection [16]:
31  Enable plaintext passthrough (y/n) [n]:
32  Attempting to mount with the following options:
33    ecryptfs_unlink_sigs
34    ecryptfs_key_bytes=16
35    ecryptfs_cipher=aes
36    ecryptfs_sig=1aad35be29f73422
37  WARNING: Based on the contents of [/root/.ecryptfs/sig-cache.txt],
38  it looks like you have never mounted with this key
39  before. This could mean that you have typed your
40  passphrase wrong.
41
42  Would you like to proceed with the mount (yes/no)? yes
43  Would you like to append sig [1aad35be29f73422] to
44  [/root/.ecryptfs/sig-cache.txt]
45  in order to avoid this warning in the future (yes/no)? yes
46  Successfully appended new sig to user sig cache file
47  Mounted ecryptfs
48  wks:/tmp# di -h | egrep Filesystem\|ext3\|ecr
49  Filesystem         Mount               Size     Used    Avail %Used fs Type
50  /dev/dm-1          /                   1.4T   110.6G     1.2T  13%  ext3
51  /tmp/testing       /tmp/testing        1.4T   110.6G     1.2T  13%  ecryptfs
52  sa@wks:/tmp$ du -sh testing/; type la; la testing/
53  4.0K    testing/
54  la is aliased to `ls -la'
55  total 8
56  drwx------  2 sa   sa   4096 2009-06-29 12:31 .
57  drwxrwxrwt 20 root root 4096 2009-06-29 12:31 ..
Line 13 shows -o
key=passphrase:passphrase_passwd_file=/tmp/keyfile, which
enables us to use a keyfile rather than being prompted for the
passphrase each time we mount the ecryptfs layer on top the actual
filesystem as we do it in line 17.
Of course, for a real world use case, the passphrase would not just be
nose123 as can be seen in line 16 nor would the keyfile containing the
passphrase be stored on the same machine. Instead we would use a rather
strong passphrase and have the keyfile stored somewhere safe e.g. on
an USB stick which we only plug to carry out the mounting as we did it
in line 17.
Another obvious thing for a real world use case is to not use some
subdirectory in /tmp as it will probably vanish on reboot.
The interactive mount that goes on from line 18 to 47 is done by mount
helper (see man 8 mount.ecryptfs). Further down we will see how to
skip this step and thus have a semi-automatic process of putting the
ecryptfs layer atop the actual filesystem so we can enjoy transparent
encryption.
What we see from lines 50 and 51 is that the potential size of our
ecryptfs is of course the same as the underlying filesystem. This
flexibility is one of the benefits of using filesystem-level
encryption — it grows and shrinks with the underlying filesystem.
58 sa@wks:/tmp$ cp -a /home/sa/0/0/ testing/
59 sa@wks:/tmp$ du -sh testing/; la testing/
60 564K testing/
61 total 12
62 drwx------ 3 sa sa 4096 2009-06-29 12:37 .
63 drwxrwxrwt 20 root root 4096 2009-06-29 12:31 ..
64 drwxr-xr-x 7 sa sa 4096 2009-06-19 21:52 0
65 sa@wks:/tmp$ head -n3 testing/0/README
66 SOURCE CODE FOR SUNO'S WEBSITE
67 ------------------------------
68 My name is Markus Gattol. I have a website at . What you
69 sa@wks:/tmp$ su
70 Password:
71 wks:/tmp# uec
72 wks:/tmp# exit
73 exit
74 sa@wks:/tmp$ head -n3 testing/0/README
75 ��n����'K����������"3DUfw`�`�}��`����H ��_CONSOLE��5�)�4"��-�+�&v��?O��
76 R&��������0�n�:;�X�m��ăٺW;���)7�?���˩RQ�Ķ��L�-���c�?�u���eC'X�� ��3�:��*��\5� ��Л�z����e�#=ٶf�f�
77 sa@wks:/tmp$ di -h | egrep Filesystem\|ext3\|ecr
78 Filesystem Mount Size Used Avail %Used fs Type
79 /dev/dm-1 / 1.4T 111.0G 1.2T 13% ext3
80 sa@wks:/tmp$
It is now time to actually move some data into /tmp/testing and
therefore encrypt it in the process (line 58). I have chosen to copy
the whole source code for this website plus metadata and contents
(images, videos, etc.) trough the now open gates of encryption
(ecryptfs layer is currently enabled on /tmp/testing).
In line 65 we take a look at the first three lines of the contents of
my README file — that works as expected. Then, with line 71, we
decide to remove the ecryptfs layer atop the filesystem again, thus
closing the gates of transparent encryption.
If we try to take a look at the contents of README again in line 74,
now that we disabled the ecryptfs layer, we can see that it does not
work anymore — well, it does but we get the encrypted contents which
are useless to us and anybody else as well. The same command as issued
in line 48 issued again in line 77 does not show any signs of the
ecryptfs layer anymore — we issued line 71, that is why.
We have now successfully protected our data by using filesystem-level
encryption i.e. our data is now secured, our secrets are going to stay
secret.
If we wanted to unlock /tmp/testing again, issuing mec would do the
trick — assuming the keyfile with the correct passphrase is available
to mount helper.
I did not show filename encryption above simply because I am still on
Linux wks 2.6.26-2-openvz-amd64 #1 SMP Sun Jun 21 06:01:29 UTC 2009
x86_64 GNU/Linux
and, as mentioned above, filename encryption only
works for kernel versions 2.6.29 and above.
It is not unusual that projects which maintain fairly big kernel
patches lack behind mainline — as of now (June 2009) 2.6.30 is in sid
(still in development) but the OpenVZ Debian kernel image is still on
2.6.26.
If I were on 2.6.29 already, what would have happened is that mount
helper would have prompted me if I would like to enable filename
encryption as well i.e. Filename encryption (y/n) [y]:. I would have
gone with the default which is to encrypt filenames as well.
Things we should know about ecryptfs
After the quickstart part it is now time to have a theory session
before we make the final move from a practical point of view — which
will be automating the mount procedure even more plus, this time, we
will set things up for a real world use case i.e. stronger/better
security settings and testing the setup before it is used.
Access Control: Once one user can access an ecryptfs file, any users
with permission can also access the file/directory. Should not
ecryptfs require all users to have the key/passphrase in order to
access the data?
ecryptfs deliberately makes no attempt to re-implement the
discretionary and mandatory access control mechanisms already present
in the Linux kernel. ecryptfs will simply require that a FEK (File
Encryption Key) be associated with any given inode in order to decrypt
the contents of the file on disk. This prevents an attacker from
accessing the file contents outside the context of the trusted host
environment — for instance, by removing the storage device or by
booting a live CD like grml. This is the only type of unauthorized
access that ecryptfs is intended to prevent.
Once ecryptfs has associated that FEK with the inode, it does not
impose any additional restrictions on who or what can access the
files, deferring to the standard user/group/other permissions,
capabilities, Selinux type enforcement, and so forth to regulate
access to the files. ecryptfs maintains no pedigree regarding how the
FEK found its way to the inode, so it has no way of knowing that any
particular UID (User ID) should or should not be able to open the
file, nor should ecryptfs do such a thing.
Having ecryptfs impose additional access control onto the decrypted
file contents in a trusted host environment would provide no
additional security while introducing unintended usability issues. For
instance, a user may wish to share his decrypted files with certain
other users on the system without having to share his key with them or
add their keys to a set of keys wrapping the inode's FEK. Users expect
to be able to accomplish such a task via users, groups, capabilities,
and types, and ecryptfs defers access control decisions on trusted
host environments to these existing access control mechanisms.
Not anything is encrypted: Will ecryptfs by itself protect all my
data?
ecryptfs is just one component in a comprehensive set of mechanisms to
protect the confidentiality of our data. Simply mounting ecryptfs over
a directory in our home directory will not provide sufficient coverage
for everything our applications will write to disk.
For instance, applications that produce and store thumbnails of our
images may write the thumbnails to an unprotected location. Sensitive
application data will typically wind up in the following locations,
although some applications will write data to other locations not
listed here:
- Anywhere in our home directory
- The
/tmp directory
- The
/var directory
- The swap device
The /tmp directory and the swap device can be easily protected with
dm-crypt and LUKS using a key randomly generated when the system is
booted, since the information in those locations does not need to
persist between reboots.
ecryptfs must mount the /var directory prior to any daemons or other
system applications reading from or writing to that location
(including the syslog utility). ecryptfs must also mount over the
user's home directory prior to the user logging into the system.
We will need to consider other applications that diverge from
traditional paths for storing data on a case-by-case basis. Analyzing
application behavior with the kernel auditing system is one way to
profile the behavior of an application, and explicit Selinux rules
that only allow applications to write to encrypted mountpoints helps
prevent inadvertent information leakage.
It is recommend that we always use ecryptfs together with appropriate
MAC (Mandatory Access Control) mechanisms to ensure that our sensitive
data is always encrypted.
However, as I already mentioned above, in case we deal with a local
machine (e.g. workstation) rather than a remote machine with no means
to provide the passphrase via SSH prior to unlocking the crypto
volume, we might actually be better off using block-layer encryption.
Public Keys: Can I mount ecryptfs with a public key? Why would I want
to use public key anyway?
We can mount ecryptfs with a public key if we have public key support
in our kernel (default for official Debian kernels). We first need to
generate a public/private keypair.
We can run ecryptfs-manager, follow the prompts to generate the
keypair for the key module of our choosing, start the ecryptfsd
daemon, and then specify the key module when mounting. For instance,
for the OpenSSL key module, assuming we created our key in
/usb-drive/mykey.pem and we want to do a layover mount on /secret, we
would run:
wks:/tmp# ecryptfsd
wks:/tmp# mount -t ecryptfs -o key=openssl:keyfile=/usb-drive/mykey.pem /secret /secret
Cryptographic keys derived from passphrases are generally worthless.
Most passphrases that people can reasonably remember lack even the
strength of a 64-bit symmetric key.
The idea behind using a public key is to provide an opportunity for
two-factor authentication (as we already discussed this while setting
up PKA (Public Key Authentication) for SSH) — for instance, with
OpenSSL RSA, the PEM (Privacy-enhanced Electronic Mail) file is
something we posses and the passphrase is something we know. This
works best if we store our public key and our encrypted files on
separate media.
The public key mode of operations in ecryptfs is actually more general
than public key systems found elsewhere. It allows for arbitrary key
modules to perform the FEK (File Encryption Key) encryption and
decryption.
The key module could do RSA. Or, it could retrieve an employee's key
from e.g. a Domino server. Or, it could unseal the key protected by a
trusted computing chip, which will only honor the unseal request if
the machine is booted into a trusted state.
ecryptfsd: What is ecryptfsd?
ecryptfsd is a daemon that runs as the user performing file operations
under the ecryptfs mountpoint. It manages public key operations in
userspace on file open events. ecryptfsd only needs to be run when a
mount is done with a public key module.
ecryptfs-manager: What is ecryptfs-manager?
ecryptfs-manager is an application that manages ecryptfs objects such
as keys. We can use ecryptfs-manager to ask key modules to generate
new keys for us, for instance, as we will see further down.
Protect our Key: How can I protect my key?
Best thing to do is to make a copy and store it in a physically
secure location. For instance, we could copy our public/private
keypair to a USB flash drive and write our passphrase onto a sheet of
paper. Then, lock the drive and paper in our desk drawer or put them
in a safe deposit box (depending on the sensitivity of the data that
the keys protect). Future versions of ecryptfs userspace utilities may
implement key splitting functions to provide even more paranoid levels
of key protection.
We should never store our keys in the same physical security context
in which we store our encrypted data. It should be much harder for an
attacker to get to our keys than it is for him to get to our media
containing the encrypted data.
When we use the public key mode and generate a new key using
ecryptfs-manager, the generated keyfile is the one that we must back
up in order to access our encrypted data.
When mounting with a new key, I recommend performing a full mount i.e.
creating a new file, unmounting, clearing the user's session keyring
(keyctl clear @u), mounting again, and then trying to access the newly
created file. We will do that further down with the real world
example.
This minimizes the likelihood that we will mistype a passphrase and
create files that we will not be able to later recover/decrypt.
When mounting in passphrase mode, we should make sure that the
ecryptfs_sig value matches between mounts. To help avoid the pitfall
of mistyping a passphrase on mount, ecryptfs stores a cache of
previous ecryptfs_sig values and warns us if a mount passphrase does
not match any passphrases used for previous mounts.
Comparison of ecryptfs: How does ecryptfs compare with other Linux
disk encryption solutions?
Well, we discussed that above a little bit already but because it is
very important for anybody to understand the difference, here we go
again...
ecryptfs is an actual filesystem which sits atop the usual filesystem
e.g. btrfs, ext4, etc. Some other popular disk encryption
technologies, like for example dm-crypt and LUKS, are not filesystems
but block device encryption layers i.e. they provide what appears to
be a physical block device to some actual filesystem — they sit below
the actual filesystem like for example btrfs or ext4.
There is no filesystem logic in these layers. A few of the more
well-known block device encryption layers include dm-crypt, truecrypt,
and loop-aes. Perhaps the best thing about block device-layer
encryption is that it is an order of magnitude simpler to implement
than filesystem-layer encryption and around one order of magnitude
faster than filesystem-level encryption.
Another advantage of block device-layer encryption is that it will
encrypt the entire filesystem, including all of the filesystem
metadata.
While ecryptfs uses a powerful and flexible approach to protecting
filesystem contents, block device-layer encryption technology is still
required to protect swap space and certain databases that use their
own block device partition.
I anticipate that block device-layer encryption will be the best
solution for some people, while stacked filesystem encryption will be
the best solution for others. Sometimes it even makes sense to use
them both together, to combine the comprehensive block-layer encryption
of a block device layer encryption technology with the transparent
per-file/directory encryption provided by ecryptfs (this will result
in double-encryption of the file contents).
Key Types: What types of keys exits for ecryptfs?
ecryptfs uses public key cryptography. Those can be created by one of
the key modules supported by ecryptfs like for example the SSL (Secure
Sockets Layer) module.
From the usage point of view, we know two types of keys. The FNEK
(Filename Encryption Key) used to encrypt the filenames and the FEK
(File Encryption Key) used to encrypt the file contents. The same
public key pair can be used as FNEK as well as FEK key although, using
two different keys is recommended for the sake of better/stronger
security.
Real-world Example
I have this server within a datacenter which runs OpenVZ. One of the
many VEs (Virtual Environments) running atop the HN (Hardware Node) is
used to backup my stuff (.emacs, Iceweasel settings,
Pidgin configuration, etc.). The backup is done via Unison which also
has the benefit of allowing me to sync my machines
(workstation, notebook, phone, etc.) with each another. Thereby the
server sits at the center of a star and all machines (workstation,
notebooks, phones, etc.) sync with this server.
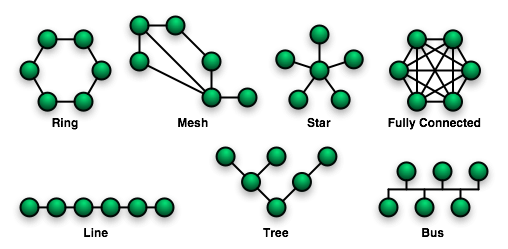
Now, although dm-crypt and LUKS is used on this server i.e. the entire
RAID array is encrypted, using ecryptfs for my backup data makes sense
simply because I might, at some point, for some reason, decide to
migrate this backup VE to another HN which might not have a dm-crypt
layer below the actual filesystem.
However, the fact that I am using a server and no
notebook/workstation, as well as the fact that I am using
virtualization technology and that this server has an enterprise-class
RAID (Redundancy Arrays of Independent Disks) array should not confuse
the reader.
What we will do below also works and makes sense for ones phone for
example or a common notebook without enterprise-class storage nor
running some virtualization technology like for example OpenVZ —
actually, even more so because the risk for us of getting a notebook
stolen and thus the leakage of sensitive information is a lot higher
than for one of our servers within a datacenter which features all
kinds of physical access control.
Also, I mentioned Unison, which I use to sync my machines... this
does not have to be a concern to the reader. From a technical point of
view, it has nothing to do with using ecryptfs as we will do now... I
just mentioned it so we have a big-picture view and people understand
the motivation behind our/my doings.
Note: Those who do not use virtualization or a remote machine can skip
to line 114 right away.
  1  sa@wks:~$ whoami; hostname; pwd; who -q
  2  sa
  3  wks
  4  /home/sa
  5  sa sa sa sa sa sa sa sa
  6  # users=8
  7  sa@wks:~$ ssh rh0
  8
  9          / \      _-'
 10        _/   \-''- _ /
 11   __-' {            \
 12       /              \
 13       /       "o.  |o }
 14       |            \ ;            YOU ARE BEING WATCHED!
 15                     ',
 16          \_         __\
 17            ''-_    \.//
 18              / '-____'
 19             /
 20           _'
 21         _-'
 22
 23
 24  This computer system is the private property of its owner, whether individual, corporate or government. It is
 25  for authorized use only. Users (authorized or unauthorized) have no explicit or implicit expectation of
 26  privacy.
 27
 28  Any or all uses of this system and all files on this system may be intercepted, monitored, recorded, copied,
 29  audited, inspected, and disclosed to your employer, to authorized site, government, and law enforcement
 30  personnel, as well as authorized officials of government agencies, both domestic and foreign.
 31
 32  By using this system, the user consents to such interception, monitoring, recording, copying, auditing,
 33  inspection, and disclosure at the discretion of such personnel or officials.
 34
 35
 36          UNAUTHORIZED OR IMPROPER USE OF THIS SYSTEM MAY RESULT
 37          IN CIVIL AND CRIMINAL PENALTIES AND ADMINISTRATIVE OR
 38          DISCIPLINARY ACTION, AS APPROPRIATE !!
 39
 40
 41  By continuing to use this system you indicate your awareness of and consent to these terms and conditions of
 42  use. LOG OFF IMMEDIATELY if you do not agree to the conditions stated in this warning. However, if you are
 43  authorized personal with no bad intentions please continue. Have a nice day! :-)
 44
 45  sa@rh0:~$ su
 46  Password:
 47  rh0:/home/sa# vzbulk status
 48  Current status on Virtual Environments is:
 49  -----------------------------------------------------------------------------------------------------------------------------
 50  Total number of available VEs: 9
 51  VEID   HOSTNAME      NAME              SIZE     HOME
 52  2002   wks-ve2       testing           524M     /var/lib/vz/private/2002
 53  2005   wks-ve5       testing_sec       524M     /var/lib/vz/private/2005
 54  3001   wks-ve7       monkeysphere      539M     /var/lib/vz/private/3001
 55  3002   wks-ve8       dolmen0           904M     /var/lib/vz/private/3002
 56  3003   wks-ve9       grok0             745M     /var/lib/vz/private/3003
 57  3004   rh0-ve1       website           1.3G     /var/lib/vz/private/3004
 58  3005   rh0-ve2       dolmen_demo       817M     /var/lib/vz/private/3005
 59  3006   rh0-ve3       dolmen_trac       636M     /var/lib/vz/private/3006
 60  3007   rh0-ve4       backup            1.5G     /var/lib/vz/private/3007
 61
 62  Number of running VEs: 7
 63  VEID   HOSTNAME      NAME              IPv4             UPTIME
 64  2002   wks-ve2       testing           10.0.2.2         06:51:51 up 2 days, 20:36,  0 users,  load average: 0.00, 0.00, 0.00
 65  2005   wks-ve5       testing_sec       10.0.2.5         06:51:51 up 2 days, 20:36,  0 users,  load average: 0.00, 0.00, 0.00
 66  3001   wks-ve7       monkeysphere      10.0.3.1         06:51:51 up 2 days, 20:36,  0 users,  load average: 0.00, 0.00, 0.00
 67  3002   wks-ve8       dolmen0           10.0.3.2         06:51:51 up 2 days, 20:36,  0 users,  load average: 0.00, 0.00, 0.00
 68  3003   wks-ve9       grok0             10.0.3.3         06:51:51 up 2 days, 20:36,  0 users,  load average: 0.00, 0.00, 0.00
 69  3004   rh0-ve1       website           xxx.xxx.xxx.xxx  06:51:51 up 2 days, 20:36,  0 users,  load average: 0.00, 0.00, 0.00
 70  3005   rh0-ve2       dolmen_demo       xxx.xxx.xxx.xxx  06:51:51 up 2 days, 20:36,  0 users,  load average: 0.00, 0.00, 0.00
 71
 72  Number of stopped VEs: 2
 73  3006   rh0-ve3       dolmen_trac
 74  3007   rh0-ve4       backup
 75
 76  Beancounter Problems on VE with VEID:
 77  VEID     FAILED BEANCOUNTERS
 78  2002:
 79  2005:
 80  3001:
 81  3002:
 82  3003:
 83  3004:
 84  3005:
 85  -----------------------------------------------------------------------------------------------------------------------------
 86
 87  Cleanup actions successfully performed...
 88  rh0:/home/sa# vzctl start backup
 89  Starting container...
 90  Container is mounted
 91  Adding IP address(es): xxx.xxx.xxx.xxx
 92  Setting CPU units: 1000
 93  Configure meminfo: 491520
 94  Set hostname: rh0-ve4
 95  File resolv.conf was modified
 96  Container start in progress...
 97  rh0:/home/sa# exit
 98  exit
 99  sa@rh0:~$ exit
100  logout
101  Connection to rh0.example.com closed.
102  sa@wks:~$ ssh backup
103
104
105  [skipping a lot of lines...]
106
107
108  sa@rh0-ve4:~$ whoami; hostname; pwd; who -q
109  sa
110  rh0-ve4
111  /home/sa
112  sa
113  # users=1
Lines 1 to 113 are only important because I use OpenVZ and all work is
done on a remote machine (using a PKA (Public Key Authentication) SSH
(Secure Shell) setup), rather than on one of my local machines like
for example my workstation as we did it above in the quickstart
example.
In lines 2 to 6 we just wanted to orientate ourselves a little bit,
thus issuing all the commands like for example whoami in line 1.
With line 7 we leave our local machine (wks) and use SSH to log into
the remote machine/server — we get the usual banner message in lines
9 to 44. In line 45, we can see that the prompt changed from sa@wks to
sa@rh0 which also confirms that we are now operating remotely. As a
marginal note... by the prompt changed I am referring to the change
in hostname and change in color — the later of course is not shown by
the above screendump.
rh0 is the OpenVZ HN (Hardware Node) which runs a bunch of VEs
(Virtual Environments) among of which is one which I use for backup
i.e. within this VE we are going to setup ecryptfs encryption further
down.
After becoming root in line 46, we issue vzbulk status which gives us
lines 48 to 87. I wrote vzbulk myself — of course, it is FLOSS
(Free/Libre Open Source Software) and can be used by anyone with all
the other scripts I have and which await upstream inclusion into some
free software project.
As of now (July 2009) it is not shipped by OpenVZ itself but that may
change once they realize how cool it is to get a status report on all
VEs running on top a HN or starting/stopping all VEs with just one
command ;-]
As we can see, line 74 shows that my backup VE is currently not
running — with line 88 it gets started because we need it now. The
public IPv4 addresses for some of the VEs are xed-out (line 91 for
example). Also, the URL in line 101 does not show the real one but got
replaced by example.com. I simply do this because there are always
bored folks out there which have nothing better to do than portscan us
— not that I care because they would not succeed anyway but then,
why make it easy for them...
Since we are on the HN right now, we need to leave again, go local,
and again, go remote but this time SSH into the backup VE we just
started and which is now up and running — this is what happens from
lines 99 to 108. Once there, the usual orientation in lines 108
to 113.
114  sa@rh0-ve4:~$ type pi; pi backup
115  pi is aliased to `ls -la | grep'
116  sa@rh0-ve4:~$ mkdir backup{,_encrypted}; umask; pi back
117  0022
118  drwxr-xr-x 2 sa   sa   4096 2009-07-02 12:52 backup
119  drwxr-xr-x 2 sa   sa   4096 2009-07-02 12:52 backup_encrypted
120  sa@rh0-ve4:~$ chmod 700 backup_encrypted; chmod 500 backup; pi back
121  dr-x------ 2 sa   sa   4096 2009-07-02 12:52 backup
122  drwx------ 2 sa   sa   4096 2009-07-02 12:52 backup_encrypted
123  sa@rh0-ve4:~$ la backup*
124  backup:
125  total 8
126  dr-x------ 2 sa sa 4096 2009-07-02 12:52 .
127  drwxr-xr-x 7 sa sa 4096 2009-07-02 12:52 ..
128
129  backup_encrypted:
130  total 8
131  drwx------ 2 sa sa 4096 2009-07-02 12:52 .
132  drwxr-xr-x 7 sa sa 4096 2009-07-02 12:52 ..
133  sa@rh0-ve4:~$ echo "hello world" > backup/some_file
134  -sh: backup/some_file: Permission denied
Back on the VE which I use for my backup, we can see that there is no
/home/sa/backup yet, otherwise the command from line 114 would have
revealed it.
An additional requirement to those requirements mentioned above, is
that it must be impossible to write unencrypted data into the backup
directory i.e. if, for some reason, some application or a user tries
to write to the backup directory when the ecryptfs layer is not
enabled on top of it, write permission should be refused.
This is important since otherwise it could happen that some sensitive
information gets written to the disk without being encrypted!
Remember, this is one weakness of all filesystem-level encryption
solutions in general — only block-layer encryption would prevent this
from happening.
We are going to use a trick in order to meet this requirement of ours.
We are not going to use a so-called overlay mount as we used it above
in line 13 and 17 respectively i.e. we are not going to mount the same
path over itself e.g. /tmp/testing onto /tmp/testing but rather, we
are going to use two different paths and give the unencrypted
(/home/sa/backup) only read and execute permissions for the owner (500
in octal that is) but no write permissions.
The encrypted path however (/home/sa/backup_encrypted) will get read,
write and execute permissions for its owner (sa).
In line 116 we create both paths. With the default umask both get the
permissions of 755. We then change backup_encrypted to have 700 and
backup gets 500. As of now (line 133) we do not have the ecryptfs
layer enabled on top of /home/sa/backup which means we cannot write
some data into or below /home/sa/backup as we can see from line 134.
Excellent!
Of course, our plan is based on the assumption that no one is going to
write to /home/sa/backup_encrypted — no user, no application, no
nothing should ever write to it... Unison will be told to write to
/home/sa/backup and that will only work if the ecryptfs layer is
enabled i.e. our backup will always be encrypted or Unison will simply
not be able to write to /home/sa/backup if the ecryptfs is not
enabled.
Now that we have all permissions in place, what is left to do is to
apply the ecryptfs layer on top of /home/sa/backup i.e. we are going
to lay /home/sa/backup_encrypted on top of /home/sa/backup (line 144).
135  sa@rh0-ve4:~$ exit
136  logout
137  Connection to backup.example.com closed.
138  sa@wks:~$ ssh rh0
139  sa@rh0:~$ su
140  Password:
141  rh0:/home/sa# vzbulk status | grep backup
142  3007   rh0-ve4  backup  1.3G              /var/lib/vz/private/3007
143  3007   rh0-ve4  backup  xxx.xxx.xxx.xxx    12:56:15 up  7:04,  0 users,  load average: 0.00, 0.00, 0.00
144  rh0:/home/sa# mount -t ecryptfs /var/lib/vz/root/3007/home/sa/backup_encrypted /var/lib/vz/root/3007/home/sa/backup -o key=passphrase,ecryptfs_cipher=aes,ecryptfs_key_bytes=32,ecryptfs_unlink_sigs,ecryptfs_passthrough=no
145  Passphrase:
146  Attempting to mount with the following options:
147    ecryptfs_unlink_sigs
148    ecryptfs_key_bytes=32
149    ecryptfs_cipher=aes
150    ecryptfs_sig=1696db7636e61651
151  WARNING: Based on the contents of [/root/.ecryptfs/sig-cache.txt],
152  it looks like you have never mounted with this key
153  before. This could mean that you have typed your
154  passphrase wrong.
155
156  Would you like to proceed with the mount (yes/no)? yes
157  Would you like to append sig [1696db7636e61651] to
158  [/root/.ecryptfs/sig-cache.txt]
159  in order to avoid this warning in the future (yes/no)? yes
160  Successfully appended new sig to user sig cache file
161  Mounted eCryptfs
162  rh0:/home/sa# di | egrep File\|md2\|ecrypt
163  Filesystem         Mount               Megs     Used    Avail %Used fs Type
164  /dev/md2           /               703657.1   8363.4 659831.5   6%  ext3
165  /var/lib/vz/root/3 /var/lib/vz/roo 703657.1   8363.4 659831.5   6%  ecryptfs
166  rh0:/home/sa# exit
167  exit
With our virtualized setup we have to leave the backup VE (Virtual
Environment) again and log into the HN (Hardware Node) again since we
cannot (for security reasons) do basic filesystem operations from
within the VE.
We leave the VE in line 135 and log back into the HN in line 140.
There, we issue vzbulk again and only extract the information
regarding the backup VE — in lines 142 and 143, we can see that the
path to the VE (from the point of view of the HN) is
/var/lib/vz/private/3007 were 3007 is the VEID (Virtual Environment
IDentifer).
The mount point however is /var/lib/vz/root/3007. Long story cut
short, from the point of view of the HN, the path /home/sa/backup
within the backup VE becomes /var/lib/vz/root/3007/home/sa/backup and
/home/sa/backup_encrypted becomes
/var/lib/vz/root/3007/home/sa/backup_encrypted.
Therefore, line 144, issued from the HN, enables the ecryptfs layer on
top of /home/sa/backup within our backup VE. Everything else following
-o on line 144 are ecryptfs specific mount parameters like for example
what kind of cipher we are going to use. No need for me to explain
those since man 7 ecryptfs does it in detail already.
The important part is with line 145 — because of
key=passphrase in line 144 we do the whole mount using a
passphrase rather than some public key. This depends on the use case
and I just think that for my current use case, with OpenVZ,
maintenance will be easier if I use a passphrase rather than a key.
Anyway, whatever passphrase we choose, as usual, if lost/forgotten
then there is no way (and I really mean it .. NO WAY!) to ever recover
the encrypted data again. Note that, as with any other serious
encryption, the data is not just encryption with
our 20 or so character passphrase but the passphrase is salted and
then this result is used to encrypt the data... in practice that
means, NO WAY to ever recover the encrypted data without the initial
passphrase. Just do not loose or forget it that is all I am saying ;-]
Since this is the first time we enable the ecryptfs layer we got asked
a few yes or no questions in lines 156 and 159. As line 161 indicates
and line 165 proofs, we have now enabled the ecryptfs layer on top of
/var/lib/vz/root/3007/home/sa/backup thereby making everything written
to/below it encrypted — this happens transparently for any user or
application that writes data into/below /home/sa/backup from the VE
point of view respectively /var/lib/vz/root/3007/home/sa/backup from
the HN point of view.
168 sa@rh0:~$ exit
169 logout
170 Connection to rh0.example.com closed.
171 sa@wks:~$ ssh backup
172 sa@rh0-ve4:~$ echo "hello world" > backup/some_file
173 sa@rh0-ve4:~$ head -n1 backup/some_file
174 hello world
175 sa@rh0-ve4:~$ exit
176 logout
177 Shared connection to backup.example.com closed.
178 sa@wks:~$ ssh rh0
179 sa@rh0:~$ su
180 Password:
181 rh0:/home/sa# di | egrep File\|md2\|ecrypt
182 Filesystem Mount Megs Used Avail %Used fs Type
183 /dev/md2 / 703657.1 8363.4 659831.5 6% ext3
184 /var/lib/vz/root/3 /var/lib/vz/roo 703657.1 8363.4 659831.5 6% ecryptfs
185 rh0:/home/sa# umount /var/lib/vz/root/3007/home/sa/backup
186 rh0:/home/sa# di | egrep File\|md2\|ecrypt
187 Filesystem Mount Megs Used Avail %Used fs Type
188 /dev/md2 / 703657.1 8363.4 659831.5 6% ext3
189 rh0:/home/sa# exit
190 exit
191 sa@rh0:~$ exit
192 logout
193 Connection to rh0.example.com closed.
194 sa@wks:~$ ssh backup
195 sa@rh0-ve4:~$ head -n1 backup/some_file
196 head: cannot open `backup/some_file' for reading: No such file or directory
197 sa@rh0-ve4:~$ head -n1 backup_encrypted/some_file
198 �\�'��������-� ���"3DUfw`-�A��H��2ԫ������P���[U]�a����{������v6��Q3(Unr+
It is now time to test the enabled ecryptfs layer therefore we leave
the HN in lines 168 to 170 and login to the backup VE once again.
There, in line 172, the same command as we already issued it in line
133 before but did not succeed because of the lack of write
permissions on the directory — which is one of our requirements i.e.
not being able to write unencrypted data into our backup directory
/home/sa/backup that is.
As we can see, now that we applied/enabled the ecryptfs on top of our
backup directory /home/sa/backup, we (user sa that is) suddenly get
write permissions — see lines 172 to 174 in comparison to lines 133
and 134.
Ok, transparent encryption is now working, time to test if toggling it
works too i.e. we are now going back to the HN and disable the
encryption layer by unmounting our topmost layer (ecryptfs) on
/home/sa/backup (line 185).
Line 184 and the lack of it further down in lines 187 to 188 shows
that disabling the ecryptfs layer works as expected. Well, so far so
good but does disabling the ecryptfs layer really just leave the
unencrypted data on the disk, thus protecting our sensitive data?
We are going to find out but first let us switch back from the HN into
the VE first, then take a look starting with line 195.
Yes! Excellent!... disabling the ecryptfs layer does not just refuse
access to the non-encrypted version of some_file as can be seen in
line 196 but also, even if we try to access the encrypted version of
some_file directly, we only see/get the encrypted contents of it as we
can see in line 198. No need to mention that those are utterly useless
to anybody because, without the key/passphrase to enable the ecryptfs
layer, it is just a chaotic mix of bits.
What we are going to do next is to make one iteration over
umounting/disabling (which we did above already) and mounting/enabling
the ecryptfs layer again so we can be sure our setup works as expected.
199  sa@rh0-ve4:~$ exit
200  logout
201  Connection to backup.example.com closed.
202  sa@wks:~$ ssh rh0
203  sa@rh0:~$ grep "ec=" /root/.bashrc
204       alias mec='mount -t ecryptfs /var/lib/vz/root/3007/home/sa/backup_encrypted /var/lib/vz/root/3007/home/sa/backup -o key=passphrase,ecryptfs_cipher=aes,ecryptfs_key_bytes=32,ecryptfs_unlink_sigs,ecryptfs_passthrough=no'
205       alias uec='umount /var/lib/vz/root/3007/home/sa/backup'
206  sa@rh0:~$ su
207  Password:
208  rh0:/home/sa# source /root/.bashrc
209  rh0:/home/sa# type {u,m}ec
210  uec is aliased to `umount /var/lib/vz/root/3007/home/sa/backup'
211  mec is aliased to `mount -t ecryptfs /var/lib/vz/root/3007/home/sa/backup_encrypted /var/lib/vz/root/3007/home/sa/backup -o key=passphrase,ecryptfs_cipher=aes,ecryptfs_key_bytes=32,ecryptfs_unlink_sigs,ecryptfs_passthrough=no'
212  rh0:/home/sa# di -h | egrep File\|md2\|ecrypt
213  Filesystem         Mount               Size     Used    Avail %Used fs Type
214  /dev/md2           /                 687.2G     8.2G   644.4G   6%  ext3
215  rh0:/home/sa# mec
216  Passphrase:
217  Attempting to mount with the following options:
218    ecryptfs_unlink_sigs
219    ecryptfs_key_bytes=32
220    ecryptfs_cipher=aes
221    ecryptfs_sig=1696db7636e61651
222  Mounted eCryptfs
223  rh0:/home/sa# di -h | egrep File\|md2\|ecrypt
224  Filesystem         Mount               Size     Used    Avail %Used fs Type
225  /dev/md2           /                 687.2G     8.2G   644.4G   6%  ext3
226  /var/lib/vz/root/3 /var/lib/vz/roo   687.2G     8.2G   644.4G   6%  ecryptfs
227  rh0:/home/sa# exit
228  exit
229  sa@rh0:~$ exit
230  logout
231  Connection to rh0.example.com closed.
232  sa@wks:~$ ssh backup
233  sa@rh0-ve4:~$ cat backup/some_file | head -n1
234  hello world
235  sa@rh0-ve4:~$
In line 199 we leave the backup VE again and log into the HN in line
202, after a short stopover on my workstation. Before we try another
mount again however, we are going to use a trick that is common
whenever we have to deal with long lines of recurring input on the CLI
(Command Line Interface).
We do what we did above in lines 13 and 14 already i.e. we put aliases
in root's .bashrc file as can be seen from lines 204 and 205.
Line 208 is often forgotten — without it we would have to log out and
then log in again in order to activate the aliases we just put into
/root/.bashrc. That sourcing /root/.bashrc worked can be seen by the
fact that the type command for muc and uec returns their aliases in
lines 210 and 211.
Right now the ecryptfs layer is not enabled because we disabled it
with line 185 above — the fact that the output of the command issued
in line 212 lacks any indication of ecryptfs gives proof to the fact
that, right now, the ecryptfs layer is not enabled.
With line 215 we enable the ecryptfs layer again by using our just
created shell alias — it prompts us for the passphrase that we
supplied when we initially created the ecryptfs mount (lines 144 to
161). Note that now, the two yes or no questions (lines 156 and 159)
are not present anymore.
This is because ecryptfs has created /root/.ecryptfs/sig-cache.txt
which contains, among possible other signatures, 1696db7636e61651, the
signature matching our current ecryptfs task and thus, from the second
mount onwards, ecryptfs uses the metadata within the encrypted data
and this signature to recognize all the settings that we made when
enabling the ecryptfs layer for the first time.
Let us open a bottle of champagne now... we are done! We do have a
fully functional ecryptfs setup that can be switched on by issuing muc
and switched of by issuing uec.
The fact that I used a PKA (Public Key Authentication) SSH setup with
an OpenVZ environment on the remote machine does not make a difference
for setting things up — in fact, if someone does not have either one,
it just gets easier with the most trivial case of setting up
filesystem-level encryption with ecryptfs for a local machine without
any virtualized setup whatsoever.
Testing the Real-world Example Setup
Even though we are done with line 234 i.e. we have successfully
installed and configured a fully functional enterprise-class
filesystem-level encryption, we are now going to answer some
questions that most people will want to know the answers for:
Do not allow unencrypted Data to be written: What happens if we write
data to /home/sa/backup without the ecryptfs layer being enabled. For
example, what if Unison starts syncing before the ecryptfs layer got
enabled?
This one is solved as we do not provide write permissions to
/home/sa/backup. See lines 120 and following lines plus their
explanation.
System reboot while ecryptfs layer is enabled: What happens when a
system (non-virtualized or not) gets rebooted while ecryptfs is
enabled? Will it stay enabled across reboots or does it have to be
enabled again?
The state after restarting/rebooting a system (in our case, HN and/or
VE) with an ecryptfs layer enabled will be that encryption/decryption
is disabled afterwards i.e. it has to be enabled again using, for
example, mec as we did in line 215 above.
1 sa@wks:~$ ssh rh0
2 sa@rh0:~$ su
3 Password:
4 rh0:/home/sa# vzbulk status | grep backup
5 3007 rh0-ve4 backup 1.3G /var/lib/vz/private/3007
6 3007 rh0-ve4 backup xxx.xxx.xxx.xxx 11:39:42 up 13 min, 0 users, load average: 0.00, 0.00, 0.00
7 rh0:/home/sa# di -h | egrep File\|md2\|ecrypt
8 Filesystem Mount Size Used Avail %Used fs Type
9 /dev/md2 / 687.2G 8.2G 644.4G 6% ext3
10 rh0:/home/sa# mec
11 Passphrase:
12 Attempting to mount with the following options:
13 ecryptfs_unlink_sigs
14 ecryptfs_key_bytes=32
15 ecryptfs_cipher=aes
16 ecryptfs_sig=1696db7636e61651
17 Mounted eCryptfs
18 rh0:/home/sa# di -h | egrep File\|md2\|ecrypt
19 Filesystem Mount Size Used Avail %Used fs Type
20 /dev/md2 / 687.2G 8.2G 644.4G 6% ext3
21 /var/lib/vz/root/3 /var/lib/vz/roo 687.2G 8.2G 644.4G 6% ecryptfs
22 rh0:/home/sa# exit
23 exit
24 sa@rh0:~$ exit
25 logout
26 Connection to rh0.example.com closed.
27 sa@wks:~$ ssh backup
28 sa@rh0-ve4:~$ la backup; cat backup/some_file
29 total 20
30 drwx------ 2 sa sa 4096 2009-07-02 13:14 .
31 drwxr-xr-x 7 sa sa 4096 2009-07-02 12:52 ..
32 -rw-r--r-- 1 sa sa 12 2009-07-02 13:14 some_file
33 hello world
34 sa@rh0-ve4:~$ exit
35 logout
36 Connection to backup.example.com closed.
37 sa@wks:~$ ssh rh0
38 sa@rh0:~$ su
39 Password:
40 rh0:/home/sa# di -h | egrep File\|md2\|ecrypt
41 Filesystem Mount Size Used Avail %Used fs Type
42 /dev/md2 / 687.2G 8.2G 644.4G 6% ext3
43 /var/lib/vz/root/3 /var/lib/vz/roo 687.2G 8.2G 644.4G 6% ecryptfs
44 rh0:/home/sa# vzbulk status | grep backup
45 3007 rh0-ve4 backup 1.3G /var/lib/vz/private/3007
46 3007 rh0-ve4 backup xxx.xxx.xxx.xxx 11:45:44 up 19 min, 0 users, load average: 0.00, 0.00, 0.00
47 rh0:/home/sa# vzctl restart backup
48 Restarting container
49 Stopping container...
50 Container was stopped
51 Container is unmounted
52 Starting container...
53 Container is mounted
54 Adding IP address(es): xxx.xxx.xxx.xxx
55 Setting CPU units: 1000
56 Configure meminfo: 491520
57 Set hostname: rh0-ve4
58 File resolv.conf was modified
59 Container start in progress...
60 rh0:/home/sa# vzbulk status | grep backup
61 3007 rh0-ve4 backup 1.3G /var/lib/vz/private/3007
62 3007 rh0-ve4 backup xxx.xxx.xxx.xxx 11:46:01 up 0 min, 0 users, load average: 0.00, 0.00, 0.00
63 rh0:/home/sa# di -h | egrep File\|md2\|ecrypt
64 Filesystem Mount Size Used Avail %Used fs Type
65 /dev/md2 / 687.2G 8.2G 644.4G 6% ext3
66 /var/lib/vz/root/3 /var/lib/vz/roo 200.0G 1.3G 198.7G 1% ecryptfs
67 rh0:/home/sa# exit
68 exit
69 sa@rh0:~$ exit
70 logout
71 Connection to rh0.example.com closed.
72 sa@wks:~$ ssh backup
73 sa@rh0-ve4:~$ la backup
74 total 8
75 dr-x------ 2 sa sa 4096 2009-07-02 12:52 .
76 drwxr-xr-x 7 sa sa 4096 2009-07-02 12:52 ..
77 sa@rh0-ve4:~$ head -n1 backup_encrypted/some_file
78 �\�'��������-� ���"3DUfw`-�A��H��2ԫ������P���[U]�a����{���_CONSOLE���v6��Q3(Unr+��g�,
79 sa@rh0-ve4:~$ exit
80 logout
81 Connection to backup.example.com closed.
82 sa@wks:~$
The example is self-explanatory. The only thing that might be wort
mentioning is, it seems nothing changed when rebooting the VE because
line 66 seems to indicate the ecryptfs is still enabled. Well, yes,
but internally the path /var/lib/vz/root/3007/home/sa/backup now has
an entire different ID and lock therefore it is as I said above...
lines 75 and 76 plus 78 proof, that after rebooting the VE (maybe not
by intention but some power outage etc.) our data is secure i.e.
encrypted —we would have to issue mec again to enable the ecryptfs
layer as we did in line 10.
Would we have rebooted the HN then the same would be true — even line
66 would not be present which might be less confusing for beginners I
guess... well... ;-]
/root/.ecryptfs/sig-cache.txt vanishes: What happens if
/root/.ecryptfs/sig-cache.txt vanishes e.g. gets deleted?
We get a notice that we obviously never mounted before plus we get
asked if we would like to proceed — same as shown in lines 151 to 160
from above. Our sensitive data can only be accessed/decrypted with the
correct key/passphrase i.e. for an attacker, removing/deleting
/root/.ecryptfs/sig-cache.txt is worthless.
Wrong passphrase: What happens if we try to mount with a different
passphrase?
The mounting process appears to work at first glance but when we try
to access the data, then we notice that it is encrypted i.e. we only
get garbled output that makes no sense (the encrypted representation
of the data on the disk that is) — same as line 198 for example.
As I said above... there is no way, for no one, not even an
organization like the NSA with all its resources, to access our
encrypted data without having the correct key/passphrase.
Therefore, as mentioned already, we should never store our
key/passphrase in the same physical security context in which we store
our encrypted data. It should be much harder for an attacker to get to
our key/passphrase than it is for him to get to our media containing
the encrypted data.
Kernel
WRITEME
Things like Selinux etc. will go here in the future.
Network
WRITEME
Network related Security
TCP Wrapper
What is done with TCP wrappers is mostly trivial. For example, one
line (ALL: ALL) in /etc/hosts.deny and one (sshd: <our_ip_address>) in
/etc/hosts.allow already significantly hardens our installation since,
with it in place, packets from hostile clients are dropped very early
in the TCP session. They are dropped before they even reach a
potentially vulnerable daemon like for example sshd where those
packages might cause any damage.
WRITEME
Port Knocking
Go here.
fail2ban
Go here.
psad
Go here.
SSH (Secure Shell)
I decided to create a dedicated page for this subsection simply
because this subject is worth it.
denyhosts
This subject is covered on another page. Basically it is a dynamic
block list for SSH.
Honey Pot
SSL (Secure Sockets Layer)
Exploration/Reconnaissance and Security Auditing
WRITEME
This subsection is actually part of the Network context but I decided
to put it here (Security --> Networking context) because it fits even
more into here.
The contents of this subsection are about how to explore network
infrastructure which is a mandatory thing for any system administrator
in order to know his network. Aside from that, I will also show how to
use standard CLI (Command Line Interface) tools to do security
auditing of networks we own in order to find potential weak spots in
our network so we can take actions.
In fact, bad boys and girls mostly use the same tactics and tools (at
least in first place) to go on a reconnaissance mission when it comes
to gather information about networks they are interested in. Usually,
good as well as bad boys and girls use exactly the same tactics and
tools in the first place to explore networks in order to find
potential weak spots. It is just that later on, the good boys and
girls take a different turn compared to the bad girls and boys.
Packet Sniffing
MAC and IP Addresses - Reverse Look Up
nmap
ettercap
dsniff
|


