Geek goes Mobile
Status: ETA (Estimated Time of Arrival) 2012 or later. Just notes until then.
Last changed: Saturday 2015-01-10 18:31 UTC
Abstract:
This page is about free software, portable gadgets/devices and the art of connecting to the net (thus becoming independent of any geographical location -- this is the 21st century, desk-bound days are over - get used to it!) and the so possible lifestyle. The focus is on portable gadgets/devices (e.g. notebooks) in conjunction with free software for free people, may they need them for daily demanding business tasks or on their holiday trip around the globe. The page also provides information relating to the preparation, usage and fun that comes with mobile gadgets driven by free software -- e.g. mobile gadgets like portable music players, digital camcorders, cell phones, built-in or explicit GPS (Global Positioning System) systems for location based services or just the oh-so-not-can-be-without-it subnotebook. I will also try to provide information about how to choose a service provider for wireless Internet in order to be able to stay online for the ever since city exploring folks out there or for those sitting in planes a lot -- yesterday the polar bear today the camel -- different places, different oh so funky animals but nonetheless, cool kids stay connected to the net... oh yeah!
|
Table of Contents
|
Who needs it? Who wants it?
- Corporate nomads also known as road runners
- Globetrotters
Satellite vs. Terrestrial Access
Best of course would be a merger of both i.e. gaining the pros of
satellite and terrestrial access and leaving the cons of both out. For
example, as of now (August 2007) it is so, that bandwidth with
terrestrial access (e.g. UMTS) is around 10-20 times higher than the
one available over satellite access. On the other hand, where there is
no terrestrial infrastructure, there is no terrestrial access — only
satellite coverage is truly worldwide available.
-
So, a method has to be introduces to automatically toggle the access
method depending on the current geographical location, costs for
access and data I/O (Input/Output), reliability, bandwidth/latency,
etc.
However, this method has to take into account not just software or
hardware issues but also the whole diversity of continuously changing
access providers and the market offers in... well, everywhere one
goes — in fact that is the whole globe. My guess is, software as well
as hardware issues can be solved but the access provider diversity for
terrestrial access looks like big challenge. As often, the technical
part of a solution is less work than the part that involves the human
issue.
Terrestrial Access
Those are things like GSM, 3G, GSM, UMTS, etc. — in other words
terrestrial mobile data services and fixed wireless broadband
infrastructure.
Miscellaneous
Access Provider
Hardware
Software
Pros and Cons
WiFi and Debian
This subsection is about how to set up WiFi (Wireless Fidelity) with
DebianGNU/Linux i.e. how to connect a computer running Debian to some
wireless network. In this particular case, I am going to show how I
configured and installed WiFi on my subnotebook.
A Step at a Time
So what is necessary to finally connect a computer e.g. notebook to
some WiFi network? The following enumeration lists what we need to do
in chronological order:
- One needs to somehow access the computer that should be connected
to the WiFi network. The easiest way would of course be to
directly type into that box. Another one is to connect this box to
the LAN (Local Area Network) via its ethernet NIC (Network
Interface Card) and enter it remotely via SSH (Secure Shell) from
another machine (I opted for the latter i.e. remote access
method).
- We assume DebianGNU/Linux is installed and running properly on the
computer in question i.e. the one that should get its WiFi
connection set up. One should make certain that his Debian is a
reasonably fresh Debian release i.e. stable and younger is
considered fine. I run sid (still in development) on all my
machines (workstation and subnotebook that is) but testing as well
as stable should be fine as well. For those who are uncertain, I
would say testing is certainly a very good choice — about 10 days
behind sid but not that edgy. Nowadays, problems with testing are
very very unlikely to happen... (things changed a lot for the
better during the last 5 or so years).
- We need to figure out a few things about the WiFi hardware e.g.
what type of WiFi chip is build into our computer that should get
his WiFi connection enabled.
- Since there are several options we can pick from in order to
establish a WiFi connection, we need to decide for a particular
one.
- Now that we know which of the available options we want, we are
going to set it up and configure it. At the end of this step we
should be able to access WiFi networks just as we are used to do
via any wired connection.
Accessing the Subnotebook via SSH
Well, this part actually has nothing to do with the upcoming
installation and configuration of WiFi on my subnotebook. What I do is
simply accessing the subnotebook from my workstation via SSH (Secure
Shell). Why? Well, simply because the workstation has a more pleasant
screen resolution amongst other benefits. So here we go
 1  sa@pc1:~$ ssh [email protected]
 2  [email protected]'s password:
 3  Last login: Sat May 24 12:28:24 2008 from pc1.local
 4  Linux sub 2.6.25-2-amd64 #1 SMP Wed May 14 14:04:05 UTC 2008 x86_64
 5
 6  The programs included with the Debian GNU/Linux system are free software;
 7  the exact distribution terms for each program are described in the
 8  individual files in /usr/share/doc/*/copyright.
 9
10  Debian GNU/Linux comes with ABSOLUTELY NO WARRANTY, to the extent
11  permitted by applicable law.
12  sub:~#
As can be seen in lines 1 to 12, nothing special here. I am in my LAN
at home and 192.168.1.2 is the current IP Address of my subnotebook.
Currently I am connected via the wired network i.e.
Ethernet. A neat and probably the
simplest way to determine this IP address (192.168.1.2) is by
running ifconfig on the remote machine i.e. the subnotebook in my
case.
-
Except for a few servers at home which I keep in my rack@home, I use
DHCP (Dynamic Host Configuration Protocol) for all other machines
which includes my workstation and my subnotebook.
In line 12 we can see that we got the CLI (Command Line Interface)
prompt on the remote machine (the subnotebook) that we logged into via
SSH.
A fresh DebianGNU/Linux installation
As mentioned before, one should take care that the box is running
up-to-date software. Since I just installed Debian sid, we are good to
go. What we also need for our WiFi endeavor is to install the software
needed to get going
13  sub:~# su sa
14  sa@sub:/root$ cd
15  sa@sub:~$ type dpl
16  dpl is aliased to `dpkg -l'
17  sa@sub:~$ dpl {wireless*,pwgen*} | grep ^ii
18  ii  pwgen                                2.06-1                     Automatic Password generation
19  ii  wireless-tools                       29-1                       Tools for manipulating Linux Wireless Extensions
20  sa@sub:~$ type afs
21  afs is aliased to `apt-file search'
22  sa@sub:~$ afs lspci | grep bin/
23  pciutils: /usr/bin/lspci
24  sa@sub:~$ dpl pciutils | grep ^ii
25  ii  pciutils                             1:3.0.0-4                  Linux PCI Utilities
Again, nothing special in lines 13 to 25. All I wanted to show is line
18, 19 and 25. One should have installed those packages since we are
going to need them later. I already have them installed as can be
seen. For those who have not, a apt-get install <packagename(s)>
respectively aptitude install <packagename(s)> will do the trick. The
commands I used in lines 17 and 22 are just some aliases in my
.bashrc.
The reason I switched to my normal user in line 13 is simply
because I never do things as being root if not necessary simply
because doing something stupid as root is potentially way more
destructive than it is with a normal user account — mine is sa
as can be seen in line 27... and no, even if default in Debian with
its default shell also known as Bash, the fact that we see sa@sub:
does not tell us for certain we are currently working under the system
user sa.
26  sa@sub:~$ whoami
27  sa
Gathering information about the WiFi Hardware of my Subnotebook
Now I need to know what type of WiFi hardware I have build into my
subnotebook. In a minute from now, I either smile or get up pissed and
have to go for a walk. Why? Well, simply because the later case means
I have to recompile a kernel instead of just using Debian's kernel
simply because I need a driver which is not yet a fixed part of the
Linux Kernel respectively it might be but Debian might not ship it.
Second to that it might be necessary for me to use NdisWrapper which
would also suck.
What I want is that it all works out of the box i.e. no need to touch
the kernel, install third-party software or some other kind of
non-free software etc. Why? Because it is complex and tricky? No,
simply because it costs time and I want to get going as quick as
possible. So, what WiFi chip do I have?
28  sa@sub:~$ lspci
29  00:00.0 Host bridge: ATI Technologies Inc RS480 Host Bridge (rev 10)
30  00:01.0 PCI bridge: ATI Technologies Inc RS480 PCI Bridge
31
32  [skipping a lot of lines...]
33
34  05:04.2 SD Host controller: O2 Micro, Inc. Integrated MMC/SD Controller (rev 01)
35  05:04.3 Mass storage controller: O2 Micro, Inc. Integrated MS/xD Controller (rev 01)
36  05:09.0 Network controller: RaLink RT2500 802.11g Cardbus/mini-PCI (rev 01)
37  sa@sub:~$ lspci -v | grep -A8 RaLink
38  05:09.0 Network controller: RaLink RT2500 802.11g Cardbus/mini-PCI (rev 01)
39          Subsystem: Micro-Star International Co., Ltd. Device 6833
40          Flags: bus master, slow devsel, latency 64, IRQ 22
41          Memory at ffdfa000 (32-bit, non-prefetchable) [size=8K]
42          Capabilities: <access denied>
43          Kernel driver in use: rt2500pci
44          Kernel modules: rt2500pci
45
46 sa@sub:~$ uname -r
47 2.6.25-2-amd64
48 sa@sub:~$
Excellent! As I hoped it would be. In line 28 I am issuing a command
that lists all PCI (Peripheral Component Interconnect) devices on my
subnotebook — one per line (note: we might have also used hwinfo
--wlan). We are looking for a line that indicates a WiFi chip. What
gave it away in my case was 802.11g in line 36. Now that I know what I
am dealing with, I might look a little deeper into the whole thingy
(lines 37 to 46). The stuff that really puts a smile on my face are
the lines 43 respectively 44 — the out of the box Debian Kernel that
I am currently using (line 47) already ships with this driver i.e.
rt2500pci, the driver that supports my subnotebook's WiFi chip.
So, how do I know that particular driver is already shipped with
Debian respectively my current kernel (line 47)? Well, the lazy animal
simply issues something like this
49  sa@sub:~$ locate rt2500; type gr; gr RT2500 /boot/config-2.6.25-2-amd64
50  /lib/modules/2.6.25-2-amd64/kernel/drivers/net/wireless/rt2x00/rt2500pci.ko
51  /lib/modules/2.6.25-2-amd64/kernel/drivers/net/wireless/rt2x00/rt2500usb.ko
52  gr is aliased to `grep -rni --color'
53  1750:CONFIG_RT2500PCI=m
54  1751:CONFIG_RT2500PCI_RFKILL=y
55  1754:CONFIG_RT2500USB=m
56  sa@sub:~$
Bottom line from looking at lines 49 to 56 is that the driver I need
is compiled as a Linux Kernel module, ready for me to use... awesome!
No need to leave for a walk, pissed like a wasp that got slapped
against the wall. Anyways, I am leaving because slapping a wasp
against the wall is what I just did — so better let the nutter cool
down a bit ;-]
Getting the Firmware
Back again, for those who are not so lucky (WiFi chip set driver
compiled as a Linux Kernel module or statically compiled into the
kernel) they have to get the driver which might just be as easy as
adding non-free to
sa@sub:~$ grep -m2 non-free /etc/apt/sources.list
# non-free because of Java try `acsn sun-j'
deb ftp://ftp.de.debian.org/debian/ unstable main contrib non-free
sa@sub:~$
and then install one of (the appropriate one; see lspci above)
sa@sub:~$ acsn firmware | grep wireless
atmel-firmware - Firmware for Atmel at76c50x wireless networking chips.
firmware-ralink - Binary firmware for Ralink RT2561, RT2571, RT2661 and RT2671 wireless cards
libertas-firmware - Firmware for Marvell's 8388 (libertas) wireless chips
zd1211-firmware - Firmware images for the zd1211 and zd1211rw wireless drivers
sa@sub:~$
wpasupplicant? network-manager? What shall I use?
There are several ways to go from now on. Basically we need to decide
among the GUI (Graphical User Interface) and the CLI (Command Line
Interface) approach next to a few other things.
- GUI:
- network-manager
- wifi-radar
- wicd (afaik not officially shipped with Debian)
- CLI:
- wpasupplicant
- wireless-tools
/etc/network/interfaces
I am of course going down the CLI path using the package wpasupplicant
as can be seen in line 59. There is also a GUI for those who are more
comfortable using a GUI for whatever reason that might be.
57  sa@sub:~$ dpl wpa* | egrep "^u|^i"
58  un  wpagui                               <none>                     (no description available)
59  ii  wpasupplicant                        0.6.3-1                    Client support for WPA and WPA2 (IEEE 802.11
The reasons why I prefer wpasupplicant over network-manager for
example is simply because I like to be in charge of what happens and
when it happens i.e. network-manager pretty much does what he thinks
is best... whatever that might be... I did not really consider the
other two GUI methods simply because they are GUI methods.
Subsequently we are going to deal with any of the three mentioned
under the CLI grouping above.
Now that we have installed all the software on my subnotebook — we
know we can activate the WiFi chip because we have the driver compiled
as a Linux Kernel module —, we can start to search for our AP (Access
Point).
Now would be a good time to
- configure whatever AP should be used i.e. enable it, if possible
opt to use WPA (Wi-Fi Protected Access) etc.
- disconnect the wired connection respectively disable the Ethernet
interface on the computer that is supposed to get its WiFi
configured (subnotebook in my case).
I already did all this stuff so we are good to go. Most APs are
accessible via a webinterface. Below is a screenshot of mine @home.
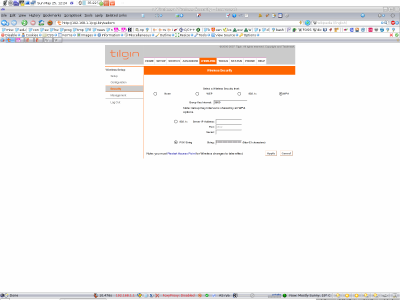
As can be seen, I enabled WPA and supplied a PSK (Pre-shared key)
which is exactly 63 characters in length. I created it as follows
60 sa@sub:~$ pwgen -syncB 63 1
61 c*N3%zi7o|4u\Y~{3*}A~=HYLp^><qT/KuAnH?gC<E!E.d-:/fXHWd$F^{*]h$*
The key from line 61 has to be supplied to the AP e.g. via the
webinterface (copy paste) or one might access the AP remotely via SSH
and so forth — it all depends on the type of AP, environment and
personal preference of the person who does it. As can be seen from the
screenshot above, this is not my Linksys WRT54GL but another AP I own.
Would it have been the WRT54GL, I would have supplied the key from
line 61 by entering the AP via SSH.
Checking if Debian knows about the WiFi Chip
Until now we have not checked — although we already know about the
Linux Kernel modules for my WiFi chip — if the WiFi chip from my
subnotebook is known by Debian already. We can figure that out by
using one of the tools from the wireless-tools package.
62  sa@sub:~$ afl wireless-tools | grep bin/
63  wireless-tools: /sbin/iwconfig
64  wireless-tools: /sbin/iwevent
65  wireless-tools: /sbin/iwgetid
66  wireless-tools: /sbin/iwlist
67  wireless-tools: /sbin/iwpriv
68  wireless-tools: /sbin/iwspy
The command I issue in line 62 is yet another alias in my .bashrc. In
lines 63 to 68 we can see all relevant tools included in the package
wireless-tools.
We are going to make use of iwconfig in order to determine if the WiFi
chip built into my subnotebook is already known to the OS (Operating
System).
69  sa@sub:~$ su
70  Password:
71  sub:/home/sa# iwconfig
72  lo        no wireless extensions.
73
74  eth0      no wireless extensions.
75
76  wmaster0  no wireless extensions.
77
78  wlan0     IEEE 802.11g  ESSID:"home_istanbul"
79            Mode:Managed  Frequency:2.462 GHz  Access Point: Not-Associated
80            Bit Rate=1 Mb/s   Tx-Power=27 dBm
81            Retry min limit:7   RTS thr:off   Fragment thr=2352 B
82            Encryption key:329B-A0B6-DB10-BE14-9F57-CD08-4479-807B-E701-05FD-63B3-9ADE-C5D2-3571-11B0-3391 [2]
83            Link Quality=43/100  Signal level=-57 dBm
84            Rx invalid nwid:0  Rx invalid crypt:0  Rx invalid frag:0
85            Tx excessive retries:0  Invalid misc:0   Missed beacon:0
86
Terrific! Why? Because it simply works... After I became root (yes, I
know I should have used sudo so everything is logged etc.) in line 71,
I used iwconfig which primary purpose it is to configure a wireless
network interface. However, as with ifconfig, if issued without
supplying any parameter, it provides us with all interfaces and their
settings currently known by the OS. Interfaces showing no wireless
extensions are simply interfaces which are not capable of doing
wireless data transfer (e.g. eth0 in line 74).
In my case everything is fine as can be seen in line 78 to 85. The
interface name is wlan0, IEEE 802.11g is a WiFi standard and
home_istanbul is the SSID (Service Set Identifier) I configured on my AP
(Access Point).
Now, what we want to change is line 79. As we can see, the WiFi chip
built into my subnotebook is not associated to some AP so far. What
needs to be done next is to figure out the AP MAC (Media Access
Control) address and assign it to the WiFi chip i.e. the interface
wlan0 of my subnotebook.
Gathering Information from the AP (Access Point)
At this point we are done setting up the AP — aside from my
suggestion to use WPA as the preferred encryption method and how to
supply the PSK, everyone is pretty much on its own with this since we
all do have different types of APs.
What we need to do next, is to gather information from the AP that we
can supply to wpasupplicant so he can take care of establishing and
maintaining the WiFi connection between the AP and the subnotebook.
87  sub:/home/sa# iwlist scan
88  lo        Interface doesn't support scanning.
89
90  eth0      Interface doesn't support scanning.
91
92  wmaster0  Interface doesn't support scanning.
93
94  wlan0     Scan completed :
95            Cell 01 - Address: 00:A2:64:78:E8:34
96                      ESSID:"home_istanbul"
97                      Mode:Master
98                      Channel:11
99                      Frequency:2.462 GHz (Channel 11)
100                      Quality=50/100  Signal level=-60 dBm
101                      Encryption key:on
102                      IE: WPA Version 1
103                          Group Cipher : TKIP
104                          Pairwise Ciphers (1) : TKIP
105                          Authentication Suites (1) : PSK
106                      Bit Rates:1 Mb/s; 2 Mb/s; 5.5 Mb/s; 11 Mb/s; 6 Mb/s
107                                9 Mb/s; 12 Mb/s; 18 Mb/s; 24 Mb/s; 36 Mb/s
108                                48 Mb/s; 54 Mb/s
109                      Extra:tsf=000000004da1991b
110
The command from line 87 is pretty much anything we need in order to
gather all the information to proceed. As we can see, line 95 provides
us with the MAC address which I mentioned earlier. Line 96 tells us
the ESSID (Extended Service Set Identifier) and lines 101 to 105 tell
us about the encryption method. The rest is nice to know but not
necessarily important for us to know in order to continue.
It is important to know that most APs have three MAC addresses:
- the one on the WAN (Wide Area Network) interface i.e. the wired
connection to the outside world,
- the one interface the AP has (also known as BSSID (Basic Service
Set Identifier)) i.e. the wireless connection into the LAN and last
but not least,
- the Ethernet interface MAC address i.e. the wired connection into
some LAN (Local Area Network)
Right now, we need the AP MAC address which we already have (line 95).
If we for example try to get the Ethernet MAC address i.e. the one we
see within the LAN when we use a wired network, then that would be
pc1:/home/sa# arp -an | grep 1.1
? (192.168.1.1) at 03:62:61:2A:A4:23 [ether] on eth0
pc1:/home/sa#
Using the gathered Information from the AP (Access Point)
Now that we know the AP MAC address from line 95, we can force my
subnotebook respectively its WiFi chip to register to the AP with the
MAC address 00:A2:64:78:E8:34. The command from line 111 does this.
One might take a look at man 8 iwconfig for more background
information on this command etc.
111  sub:/home/sa# iwconfig wlan0 ap 00:A2:64:78:E8:34
112  sub:/home/sa# iwconfig
113  lo        no wireless extensions.
114
115  eth0      no wireless extensions.
116
117  wmaster0  no wireless extensions.
118
119  wlan0     IEEE 802.11g  ESSID:"home_istanbul"
120            Mode:Managed  Frequency:2.462 GHz  Access Point: 00:A2:64:78:E8:34
121            Bit Rate=1 Mb/s   Tx-Power=27 dBm
122            Retry min limit:7   RTS thr:off   Fragment thr=2352 B
123            Encryption key:51E3-95AC-CE58-900B-B99D-DCAF-24E5-B3D2-99B7-F85C-03E4-2340-7C6B-9622-33C4-C56E [3]
124            Link Quality=42/100  Signal level=-63 dBm
125            Rx invalid nwid:0  Rx invalid crypt:0  Rx invalid frag:0
126            Tx excessive retries:0  Invalid misc:0   Missed beacon:0
127
As we can see after issuing line 112 (same as we did in line 71), line
120 now shows the AP (Access Point) MAC address. We are done setting
up the interfaces and basics on both sides — AP and WiFi interface on
my subnotebook. What needs to be done next is to configure
wpasupplicant. After that, we are done and ready to enjoy WiFi
(Wireless Fidelity).
Tool Set
I think now is a good time for us to get a better understanding of the
tools we are already dealing with respectively that we are going to
use later on. First there is the package wireless-tools
sa@pc1:~$ type afl
afl is aliased to `apt-file list'
sa@pc1:~$ afl wireless-tools | grep bin/
wireless-tools: /sbin/iwconfig
wireless-tools: /sbin/iwevent
wireless-tools: /sbin/iwgetid
wireless-tools: /sbin/iwlist
wireless-tools: /sbin/iwpriv
wireless-tools: /sbin/iwspy
We already know about iwconfig (e.g. line 111 and 112) and we also
know about iwlist (line 87). The really important ones are iwconfig
(this one is probably the most important one), iwlist and maybe
iwpriv. Most of us will probably never need any of the others.
Then there is the package wpasupplicant
sa@pc1:~$ afl wpasupplicant | grep bin/
wpasupplicant: /sbin/wpa_action
wpasupplicant: /sbin/wpa_cli
wpasupplicant: /sbin/wpa_supplicant
wpasupplicant: /usr/bin/wpa_passphrase
sa@pc1:~$
From this package, what we really need is wpa_supplicant. For most
cases, the rest is nice to have but not important to know. What I
recommend the reader to do, is to take a look at the manual files of
those tools I just mentioned. In addition, one might also do a man
wpa_supplicant.conf. After one skimmed over those manual files, it
should be enough to get the big picture and wipe out any uncertainty
which might be still left.
wpasupplicant
Next we need to set up wpasupplicant which we do by editing
/etc/wpasupplicant/wpa_supplicant.conf. Most probably, this file is
not in place so far. Therefore we can get from
/usr/share/doc/wpasupplicant/examples/ or somewhere from the net.
After striping all lines that start with # (comments) and blank lines
from /etc/wpa_supplicant/wpa_supplicant.conf my wpa_supplicant.conf on
the subnotebook looks like this:
128  sub:/home/sa# cat /etc/wpa_supplicant/wpa_supplicant.conf | grep -v \# | grep .
129  ctrl_interface=/var/run/wpa_supplicant
130  eapol_version=1
131  ap_scan=1
132  fast_reauth=1
133  network={
134          ssid="home_istanbul"
135          scan_ssid=0
136          bssid=00:A2:64:78:E8:34
137          proto=WPA
138          key_mgmt=WPA-PSK
139          pairwise=TKIP
140          group=TKIP
141          psk="c*N3%zi7o|4u\Y~{3*}A~=HYLp^><qT/KuAnH?gC<E!E.d-:/fXHWd$F^{*]h$*"
142          priority=10
143  }
The important stuff is with lines 133 to 143. As can be seen, this is
the place where I put all the information which we gathered in lines
94 to 109.
I am not going to explain why these values are in place and what their
meaning is simply because anyone can find this information in the
manual files I mentioned earlier plus the example wpa_supplicant.conf
file that can be found on the net has a huge load of explaining
content inside. All the reader needs to do is to study this
information and then adapt his case based on his individual situation.
However, with the help of this page and all the excellent
documentation from the man files respectively the wpa_supplicant.conf
file itself that should be no problem.
While still setting up the whole shebang and before making the
settings to autoload them at boot time, one can test and debug his
settings with something like this wpa_supplicant -i wlan0 -c
/etc/wpa_supplicant/wpa_supplicant.conf -d. Again, the manual files
explain this in detail. If all looks good in debug mode (-d) then one
can use wpa_supplicant -i wlan0 -c
/etc/wpa_supplicant/wpa_supplicant.conf -B and after that dhclient
wlan0 in order the get an IP address assigned to the interface wlan0.
/etc/network/interfaces
To make the WiFi settings automatically available with every system
boot instead of starting wpa_supplicant manually and send it to
background (wpa_supplicant -i wlan0 -c
/etc/wpa_supplicant/wpa_supplicant.conf -B), we need to add one line
(line 162) to /etc/network/interfaces
144  sub:/home/sa# cat /etc/network/interfaces
145  # This file describes the network interfaces available on your system
146  # and how to activate them. For more information, see interfaces(5).
147
148  # The loopback network interface
149  auto lo
150      iface lo inet loopback
151
152
153  # The primary network interface
154  auto eth0
155      iface eth0 inet dhcp
156      allow-hotplug eth0
157
158
159  #wlan
160  auto wlan0
161  iface wlan0 inet dhcp
162     wpa-conf /etc/wpa_supplicant/wpa_supplicant.conf
163
The Need for Speed
The attentive reader might have already spotted the fact that as of
now my WiFi connection was rather slow (e.g. line 172). Flipping the
turbo switch (line 190) does its trick (line 200).
164  sub:/home/sa# iwlist rate
165  lo        no bit-rate information.
166
167  eth0      no bit-rate information.
168
169  wmaster0  no bit-rate information.
170
171  wlan0     unknown bit-rate information.
172            Current Bit Rate=1 Mb/s
173
174  sub:/home/sa# iwconfig
175  lo        no wireless extensions.
176
177  eth0      no wireless extensions.
178
179  wmaster0  no wireless extensions.
180
181  wlan0     IEEE 802.11g  ESSID:"home_istanbul"
182            Mode:Managed  Frequency:2.462 GHz  Access Point: 00:A2:64:78:E8:34
183            Bit Rate=1 Mb/s   Tx-Power=27 dBm
184            Retry min limit:7   RTS thr:off   Fragment thr=2352 B
185            Encryption key:1AB4-32D3-EB70-CCF6-09CC-920E-7712-7AF9-7B97-209A-7B97-11C8-B960-727F-A17B-84E0 [3]
186            Link Quality=45/100  Signal level=-64 dBm
187            Rx invalid nwid:0  Rx invalid crypt:0  Rx invalid frag:0
188            Tx excessive retries:0  Invalid misc:0   Missed beacon:0
189
190  sub:/home/sa# iwconfig wlan0 rate 54M
191  sub:/home/sa# iwconfig
192  lo        no wireless extensions.
193
194  eth0      no wireless extensions.
195
196  wmaster0  no wireless extensions.
197
198  wlan0     IEEE 802.11g  ESSID:"home_istanbul"
199            Mode:Managed  Frequency:2.462 GHz  Access Point: 00:A2:64:78:E8:34
200            Bit Rate=54 Mb/s   Tx-Power=27 dBm
201            Retry min limit:7   RTS thr:off   Fragment thr=2352 B
202            Encryption key:1AB4-32D3-EB70-CCF6-09CC-920E-7712-7AF9-7B97-209A-7B97-11C8-B960-727F-A17B-84E0 [3]
203            Link Quality=64/100  Signal level=-64 dBm
204            Rx invalid nwid:0  Rx invalid crypt:0  Rx invalid frag:0
205            Tx excessive retries:0  Invalid misc:0   Missed beacon:0
206
However, after rebooting I would be back to 1 Mb/s and therefore every
time have to issue line 190. That is of course nothing we want.
There is a cure to this pain — line 211; I choose the highest rate
(line 108). This ensures that the interface called wlan0 on my
subnotebook is automatically set to a rate (also known as speed ;-])
of 54 Mb/s anytime I do a system (re)boot.
207  sub:/home/sa# cat /etc/network/interfaces | grep -A3 wlan
208  #wlan
209  auto wlan0
210  iface wlan0 inet dhcp
211      wireless-rate 54M
212      wpa-conf /etc/wpa_supplicant/wpa_supplicant.conf
213
214  sub:/home/sa#
-
We are done setting up WiFi... Well, I am done actually ;-] However,
I think with nowadays super-out-of-the-box-Debian anyone should be
able to follow my notes (its a piece of cake, really...) and enjoy
wireless freedom after a few hours of reading and typing into his
computer.
Satellite Access
BGAN (Broadband Global Area Network)
http://www.inmarsat.com/Services/Land/BGAN/default.aspx
http://www.evosat.com/home/support/faq.aspx
Access Provider
Hardware
Software
Pros and Cons
Redundancy
|


